Why You'll Love It
- - Melt-in-your-mouth texture that stays fudgy
- - A delicate red hue that brightens any plate
- - Simple ingredients you likely have at home
- - Perfect balance of chocolate and velvet flavor
*These brownies are the best I've ever tasted—so soft and rich.*
Essential Ingredient Guide
- Unsweetened cocoa powder: Provides deep chocolate flavor; choose a high‑quality cocoa for the richest taste
- Beet juice or red food coloring: Creates the iconic red color; beet juice adds a subtle earthiness
- Buttermilk: Adds tenderness and a slight tang that balances the sweetness
- Vanilla extract: Enhances overall aroma; a tiny splash goes a long way
- Lemon zest: A touch of citrus brightens the chocolatey depth
- Brown sugar: Gives a caramel richness and helps keep the brownies moist
Complete Cooking Process
-
Ingredient Readiness:
Measure dry ingredients into a bowl, whisk together cocoa, flour, and a pinch of salt; melt butter and let it cool slightly.
-
Flavor Development:
Combine melted butter with sugars, then whisk in eggs, vanilla, and beet juice; the mixture takes on a velvety sheen.
-
Texture Control:
Fold the dry components gently until just incorporated; over‑mixing would create a tougher crumb.
-
Finishing Touches:
Pour batter into a lined pan, smooth the top, and bake until a skewer comes out with a few moist crumbs.
-
Serving Timing:
Let the brownies cool completely before cutting; this lets the crumb set and the colors stay vibrant.
- Use room‑temperature eggs for a smoother batter
- Line the pan with parchment for effortless removal
- Add a tablespoon of espresso powder for extra depth
- Dust lightly with powdered sugar just before serving
Pro Tips
After the brownies have rested, you’ll notice how the crust retains a faint crispness while the interior remains soft and velvety. It’s a lovely contrast that makes each bite feel intentional. I often find a quiet moment to slice a piece, letting the aroma linger before I place it on a plate.
The essence of the dish:
A fun fact or historical angle:
Flavor or sensory focus:
You Must Know
- Do not over‑bake; the center should stay slightly fudgy
- Let the brownies cool fully for clean cuts
- Store in an airtight container to keep moisture
Frequently Asked Questions
→ Can I substitute beet juice with regular food coloring?
Yes, a few drops of red food coloring work fine, though beet juice adds a faint earthy note that many enjoy.
→ How do I keep the brownies from drying out?
Store them in an airtight container at room temperature; adding a slice of bread on top can help retain moisture.
→ Can I make these gluten‑free?
Swap all‑purpose flour for a 1:1 gluten‑free blend; the texture remains tender.
→ What’s the best way to reheat leftovers?
Warm gently in the microwave for 10‑15 seconds, or toast lightly in a skillet with a dab of butter.
→ Do the brownies freeze well?
Absolutely. Wrap tightly and freeze for up to three months; thaw at room temperature before serving.
→ Can I add chocolate chips?
Sure! Fold in a half‑cup of chocolate chips before baking for extra pockets of melty chocolate.
Chef's Tips
If you prefer a richer chocolate flavor, add a tablespoon of instant espresso powder to the dry ingredients.,For a glossy finish, brush the tops with a light glaze made from powdered sugar and milk.,Feel free to sprinkle a tiny pinch of sea salt on each square before baking for a sweet‑salty contrast.
Nutrition Facts
per serving
320
Calories
4g
Protein
40g
Carbs
15g
Fat
Taste Profile
Rich chocolate with a subtle tang and delicate sweetness
Ingredient Substitutions
Don't have an ingredient? Try these alternatives
Provides a nuttier flavor; reduce the amount slightly as it absorbs more moisture
Gives a slight coconut aroma; keep the oil solid but softened
Recipe Variations
Try these delicious twists on the original
Spicy Version
Add 1/2 tsp cinnamon and a pinch of cayenne for a warm, subtle heat.
Mediterranean Style
Stir in 1/4 cup crumbled feta and a handful of chopped pistachios for a savory twist.
Common Mistakes to Avoid
Learn from others' mistakes for perfect results
- Over‑mixing the batter, leading to a dense texture
- Baking too long, causing dryness
- Using too much food coloring, which can impart a bitter taste
Meal Prep & Storage
Make Ahead Tips
You can prepare the batter a day ahead and keep it refrigerated; bake when needed for fresh‑warm brownies.
Leftover Ideas
Reheat gently in a skillet with a pat of butter for a crisp edge, or microwave briefly on low power.
Perfect Pairings
Serve this with...
Cooking Timeline
Preheat oven, line pan, and gather all ingredients.
Melt butter, combine sugars, eggs, and flavorings; whisk until smooth.
Sift dry ingredients and fold into wet mixture gently.
Pour batter into pan, smooth top, and bake.
Cool completely, then cut into squares and dust with powdered sugar.
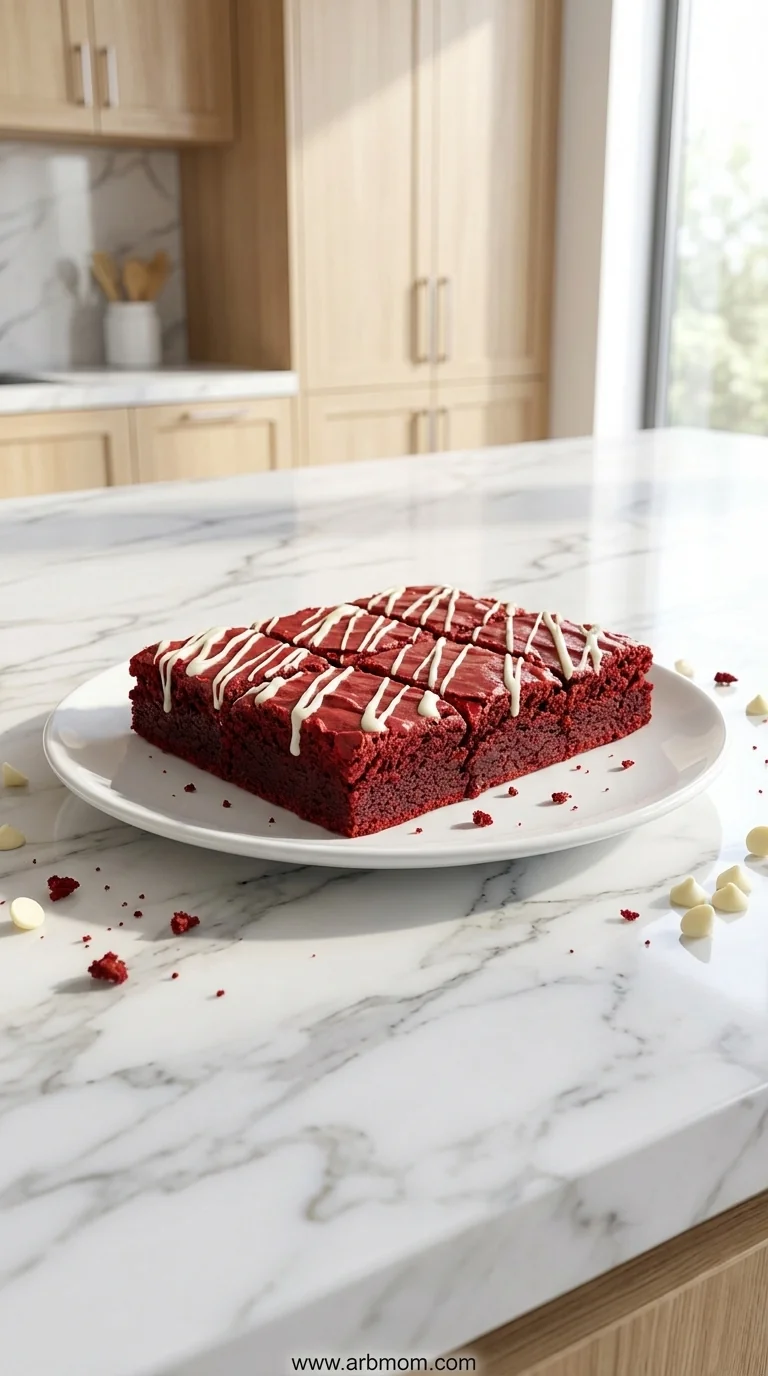
Red Velvet Brownies Recipe
These red velvet brownies are a comforting blend of cocoa and a whisper of velvet red, offering a moist, chocolatey bite that feels like a gentle hug. I love how the subtle swirl of color looks on the plate, and honestly, it’s a treat that fits any gathering, from casual tea to a festive dessert table. For a similar celebration, you might enjoy red velvet cake or explore a desserts collection for inspiration.
Timing
Prep Time
20 Minutes
Cook Time
25 Minutes
Total Time
45 Minutes
Recipe Details
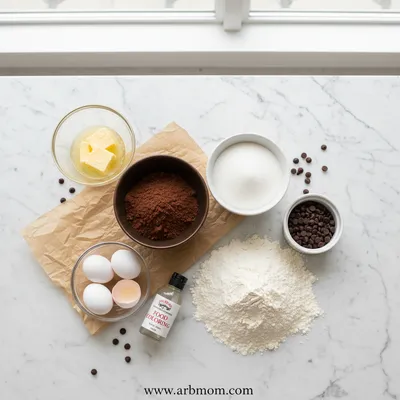
Ingredients
Main Ingredients
- 01 1 cup (2 sticks) unsalted butter, melted
- 02 1 1/2 cups granulated sugar
- 03 2 large eggs, room temperature
- 04 1 tsp vanilla extract
- 05 2 tbsp beet juice or red food coloring
- 06 1/2 cup buttermilk
- 07 1 cup all‑purpose flour
- 08 1/2 cup unsweetened cocoa powder
- 09 1/2 tsp baking powder
- 10 1/4 tsp salt
- 11 Zest of 1 lemon
Optional Topping
- 01 Powdered sugar for dusting
- 02 Fresh berries for garnish
Instructions
Preheat the oven to 350°F (175°C). Line a 9×13‑inch baking pan with parchment paper.
In a large bowl, whisk melted butter with sugar until smooth; then add eggs one at a time, mixing well after each.
Stir in vanilla, beet juice (or food coloring), lemon zest, and buttermilk; the batter should turn a deep pink‑red.
Sift together flour, cocoa powder, baking powder, and salt; gently fold into the wet mixture until just combined.
Pour batter into prepared pan, smooth the top, and bake for 22‑25 minutes, or until a toothpick emerges with a few moist crumbs.
Allow the brownies to cool completely in the pan before lifting them out and cutting into squares.
Notes & Tips
- 1 If you prefer a richer chocolate flavor, add a tablespoon of instant espresso powder to the dry ingredients.
- 2 For a glossy finish, brush the tops with a light glaze made from powdered sugar and milk.
- 3 Feel free to sprinkle a tiny pinch of sea salt on each square before baking for a sweet‑salty contrast.
Tools You'll Need
-
Oven
-
9×13‑inch baking pan
-
Parchment paper
-
Large mixing bowl
-
Whisk
-
Spatula
-
Sifter
-
Measuring cups and spoons
Must-Know Tips
- Don’t over‑mix the batter; it can make the brownies tough
- Use room‑temperature eggs for a smoother texture
- Line the pan to prevent sticking and ensure clean cuts
Professional Secrets
- Room temperature butter incorporates more evenly, giving a uniform crumb
- Baking at a steady 350°F ensures the interior stays moist while the edges set
- Let the brownies rest; residual heat finishes the cooking gently

Recipe by
EmilyEmily is a passionate food blogger and seasoned recipe creator at Arbmom Recipe, where she brings her culinary expertise and creativity to home cooks ...
Get Delicious Recipes Weekly
Join 25,000+ home cooks getting our best recipes straight to their inbox.
Free forever • No spam • Unsubscribe anytime