Why You'll Love It
- - No ice‑cream maker required, just zip‑lock bags
- - Ready in ten minutes, perfect for spontaneous cravings
- - Kids can help shake, making it a fun family activity
- - Adjustable flavors, you can add fruit, chocolate, or spices
*"My kids begged for seconds, and I was amazed how smooth it turned out—so simple, yet magical!"*
Essential Ingredient Guide
- Heavy cream: Provides the rich, velvety base; use cold cream for faster freezing
- Sugar: Sweetens and lowers the freezing point, keeping the texture smooth
- Vanilla extract: Adds aromatic warmth; a little goes a long way
- Rock salt: Creates a super‑cold brine that freezes the cream without ice crystals
- Lemon zest (optional): Brightens the flavor with a hint of citrus
- Mini chocolate chips: For texture and bursts of cocoa goodness
Complete Cooking Process
-
Ingredient Readiness:
Measure cream, sugar, and vanilla into a small zip‑lock; chill the bag for a few minutes while you prep the ice‑salt mixture.
-
Flavor Development:
Shake the sealed bag vigorously for 5‑7 minutes; the friction and cold brine begin to crystallize the cream into a soft‑serve texture.
-
Texture Control:
Continue shaking until the mixture feels thick yet spoon‑able; this is where the magic of smooth ice cream forms.
-
Finishing Touches:
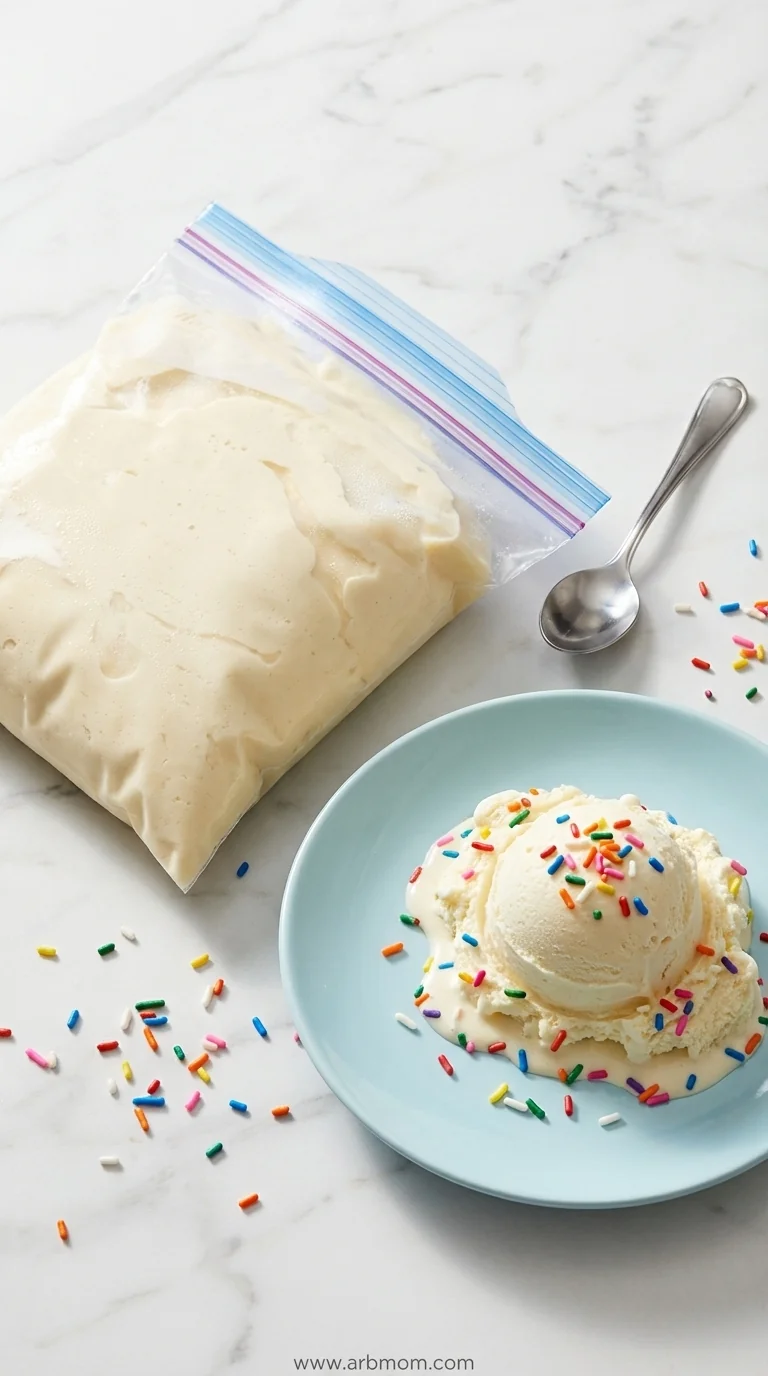
Transfer the ice cream to a serving bowl, fold in chocolate chips or fruit, and let it sit a minute to settle.
-
Serving Timing:
Serve immediately for a soft‑serve feel, or freeze an extra 10 minutes for a firmer scoop.
- Use a double‑bag system to avoid leaks
- Shake with a towel for a better grip
- Add a pinch of salt to enhance sweetness
- Experiment with extracts like almond or mint
Pro Tips
Well, these little adjustments can turn a simple bag of ice cream into a personalized dessert. I remember trying peppermint extract once, and the cool aroma reminded me of winter holidays, even in July. It’s those tiny experiments that keep the kitchen exciting.
The essence of the dish:
A fun fact or historical angle:
Flavor or sensory focus:
You Must Know
- Keep the cream cold before sealing
- Use enough rock salt for a true brine
- Shake consistently for even freezing
- Taste and adjust sweetness after shaking
Frequently Asked Questions
→ Can I use low‑fat milk instead of heavy cream?
You can, but the texture will be lighter and less rich. The ice‑cream may be a bit more icy.
→ How long can I store the ice cream?
Transfer to an airtight container and keep in the freezer for up to 3 days. Stir before serving if it hardens.
→ What if I don’t have rock salt?
Regular kosher salt works, but rock salt creates a colder brine faster.
→ Can I add fruit purees?
Yes, fold in fruit purées after the base is frozen to avoid unwanted ice crystals.
→ Is a freezer necessary for this recipe?
No, the ice‑salt mixture does all the chilling; a freezer is only needed if you want a firmer finish.
→ What other flavors work well?
Try coffee, cinnamon, or a drizzle of honey; just add them before shaking.
Chef's Tips
If the bag leaks, double‑bag to avoid a salty mess.,Shake with a towel for a better grip and to protect your hands.,Taste the mixture before the final shake; you can add a pinch more sugar if desired.
Nutrition Facts
per serving
220
Calories
3g
Protein
20g
Carbs
15g
Fat
Taste Profile
Creamy sweet with a hint of vanilla
Ingredient Substitutions
Don't have an ingredient? Try these alternatives
Provides similar richness; the texture will be slightly coconutty.
Use 2‑3 tbsp; honey adds floral notes and reduces crystallization.
Recipe Variations
Try these delicious twists on the original
Spicy Version
Add a pinch of cayenne pepper and a drizzle of honey for a subtle heat.
Mediterranean Style
Stir in chopped pistachios and a few drops of rose water for an exotic twist.
Common Mistakes to Avoid
Learn from others' mistakes for perfect results
- Using warm cream, which slows freezing
- Not sealing the inner bag tightly, causing leaks
- Shaking for too short a time, resulting in watery texture
Meal Prep & Storage
Make Ahead Tips
You can pre‑measure the cream, sugar, and vanilla into the small bag and keep it refrigerated; add ice and salt when ready to shake.
Leftover Ideas
Re‑freeze in a sealed container; stir gently before serving to restore smoothness.
Perfect Pairings
Serve this with...
Cooking Timeline
Gather and measure all ingredients; prepare the two zip‑lock bags.
Create the ice‑salt brine in the larger bag and seal both bags.
Shake vigorously until the mixture thickens into soft‑serve consistency.
Transfer to serving bowls, stir in optional mix‑ins, and serve.
Ice Cream in a Bag – Quick 10‑Minute Kid‑Approved Recipe
Whip up creamy, smooth ice cream in a zip‑lock bag in just ten minutes. No ice‑cream maker needed, and kids love the hands‑on fun of shaking the bag while waiting for the sweet chill to set.
Timing
Prep Time
10 Minutes
Cook Time
0 Minutes
Total Time
15 Minutes
Recipe Details
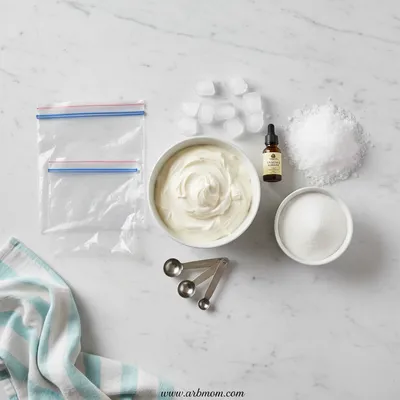
Ingredients
Main Ingredients
- 01 1 cup heavy cream, cold
- 02 1/3 cup granulated sugar
- 03 1 tsp vanilla extract
- 04 2 cups ice cubes
- 05 1/2 cup rock salt
Optional Mix‑Ins
- 01 2 tbsp mini chocolate chips
- 02 1 tsp lemon zest
- 03 1/4 cup crushed cookies
Instructions
Place the cream, sugar, and vanilla into a small zip‑lock bag; seal tightly, removing as much air as possible.
Fill a larger zip‑lock bag halfway with ice cubes and rock salt; seal the larger bag securely.
Nest the small bag inside the ice‑salt bag, ensuring it’s fully surrounded; seal the outer bag.
Shake vigorously for 5‑7 minutes, pausing briefly to prevent the bag from overheating; the mixture will thicken.
Remove the inner bag, wipe off any salt, and scoop the soft‑serve ice cream into bowls; stir in any optional mix‑ins.
Notes & Tips
- 1 If the bag leaks, double‑bag to avoid a salty mess.
- 2 Shake with a towel for a better grip and to protect your hands.
- 3 Taste the mixture before the final shake; you can add a pinch more sugar if desired.
Tools You'll Need
-
Small zip‑lock bag (quart size)
-
Large zip‑lock bag (gallon size)
-
Measuring cups and spoons
-
Towel for grip
-
Spoon for serving
Must-Know Tips
- Do not over‑fill the inner bag, it makes shaking harder.
- Keep the salt and ice mixture cold; add a few ice cubes if it warms.
- Allow the cream to sit a minute after shaking before serving.
Professional Secrets
- Cold ingredients freeze faster and stay smoother.
- Rock salt creates a lower temperature brine than regular salt.
- Consistent shaking prevents large ice crystals from forming.

Recipe by
AmeliaAmelia is a passionate food blogger and recipe creator at Arbmom Recipe, where she combines her culinary expertise with a love for creating approachab ...
Get Delicious Recipes Weekly
Join 25,000+ home cooks getting our best recipes straight to their inbox.
Free forever • No spam • Unsubscribe anytime