Why You'll Love It
- - Layers of smooth vanilla ice cream and gooey caramel
- - Crunchy candy bar pieces add texture
- - Easy to assemble ahead of time
- - Perfect for celebrations or a simple treat
“The Buster Bar cake stole the show at our dinner—rich, buttery, and just the right amount of crunch.”
Essential Ingredient Guide
- Buster Bar candy: Choose bars with chocolate, caramel, and nuts for authentic texture; crush them just before folding into the ice cream.
- Vanilla ice cream: Use a high‑quality, creamy base; let it soften slightly for easier mixing.
- Chocolate ganache: Adds a glossy finish and deep chocolate flavor; melt gently to avoid scorching.
- Caramel sauce: Drizzle for sweet richness; homemade caramel brings a buttery nuance.
- Sea salt: A pinch enhances the sweetness and balances the caramel.
- Whipped cream (optional): Fold in for a lighter texture if you prefer a softer bite.
Complete Cooking Process
-
Ingredient Readiness:
Gather all components, soften ice cream, crush candy bars, and melt chocolate and caramel separately.
-
Flavor Development:
Mix crushed Buster Bar pieces into the softened ice cream, allowing the candy to soften slightly while retaining crunch.
-
Texture Control:
Layer the ice cream with ribbons of ganache and caramel, then fold in extra candy bits for varied mouthfeel.
-
Finishing Touches:
Swirl additional caramel on top, sprinkle a pinch of sea salt, and freeze until firm.
-
Serving Timing:
Let the cake sit at room temperature for 5‑10 minutes before slicing to achieve clean cuts.
- Use a warm knife for clean slices
- Add a splash of ice bomb for extra vanilla depth
- Press a thin layer of candy bar between ice cream layers for extra crunch
- Top with fresh berries for a bright contrast
Pro Tips
Well, I’ve found that letting the cake rest a little after removal from the freezer makes the texture more forgiving, especially when you’re dealing with crunchy candy bits. It’s those small pauses that let the flavors settle, and you’ll notice the caramel glisten a touch more as it meets the cool air. So, take your time, enjoy the process, and trust that a patient hand yields a truly satisfying slice.

The essence of the dish:
A fun fact or historical angle:
Flavor or sensory focus:
You Must Know
- Keep the ice cream slightly soft for mixing
- Don’t over‑mix the candy, preserve some crunch
- Layer evenly for pretty slices
Frequently Asked Questions
→ Can I use a different candy bar?
Yes, any chocolate‑caramel‑nut bar works, just adjust the crumble size to keep some texture.
→ How long can I store the cake?
Wrap tightly and freeze for up to 2 weeks; let it soften before serving for best slices.
→ Is it possible to make a dairy‑free version?
Swap the vanilla ice cream for a coconut‑based or almond‑based alternative and use a dairy‑free chocolate.
→ Do I need an ice cream maker?
No, you can use store‑bought soft‑serve ice cream and let it firm up after assembling.
→ What’s the best topping?
A drizzle of caramel, a sprinkle of sea salt, or fresh berries add a bright contrast.
→ Can I add alcohol for adult gatherings?
The recipe excludes alcohol, but a splash of coffee liqueur could be added if desired.
Chef's Tips
If the ice cream becomes too soft while mixing, chill the bowl for a few minutes.,Crush candy bars just before adding to preserve crunch.,For a richer chocolate flavor, use a dark chocolate ganache.
Nutrition Facts
per serving
420
Calories
5g
Protein
45g
Carbs
22g
Fat
Taste Profile
Richly sweet with buttery caramel notes and a crunchy finish
Ingredient Substitutions
Don't have an ingredient? Try these alternatives
May alter the crunch level; crush gently.
Provides a dairy‑free option with a subtle coconut flavor.
Recipe Variations
Try these delicious twists on the original
Spicy Version
Add a pinch of cayenne pepper to the caramel for a subtle heat.
Mediterranean Style
Incorporate toasted almond slivers and a drizzle of honey for a Mediterranean twist.
Common Mistakes to Avoid
Learn from others' mistakes for perfect results
- Over‑mixing the candy, resulting in loss of crunch.
- Not letting the cake rest before slicing, causing ragged edges.
- Using warm candy bars, which melt too quickly into the ice cream.
Meal Prep & Storage
Make Ahead Tips
You can assemble the cake up to 24 hours ahead; keep it covered and frozen until ready to serve.
Leftover Ideas
Slice a piece and let it soften for a few minutes before enjoying as a quick dessert.
Perfect Pairings
Serve this with...
Cooking Timeline
Gather and prep ingredients; line pan and soften ice cream.
Fold crushed candy into ice cream, layer half in pan, add caramel and ganache.
Add remaining ice cream, top with sea salt, cover and freeze.
Freeze until firm; rest 5‑10 min before slicing.
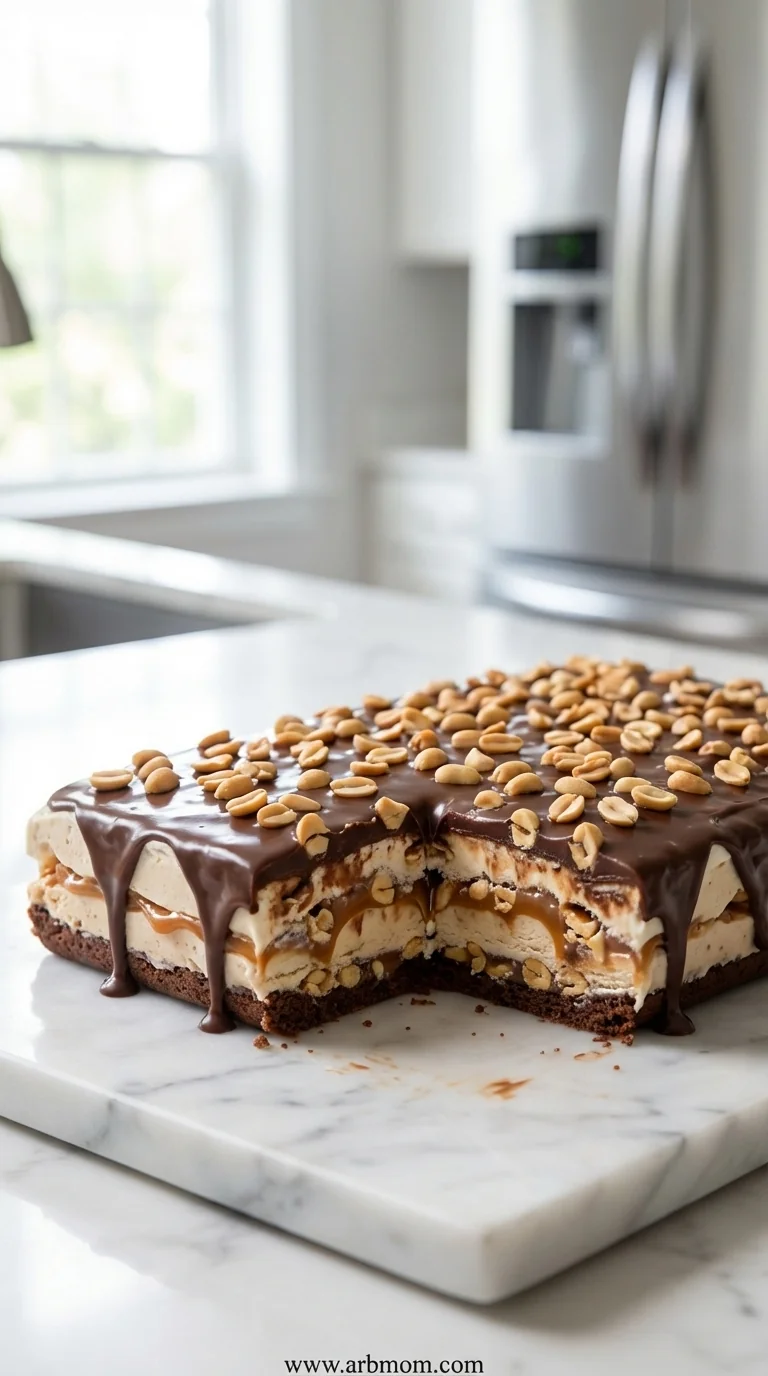
Buster Bar Ice Cream Cake
Enjoy a rich and creamy Buster Bar Ice Cream Cake, layered with chocolate, caramel and crunchy candy bars for a festive frozen treat. This indulgent dessert combines the smoothness of vanilla ice cream with the crackle of toffee and the nostalgic bite of candy bars, making it perfect for celebrations or a simple evening surprise.
Timing
Prep Time
20 Minutes
Cook Time
0 Minutes
Total Time
20 Minutes plus freezing
Recipe Details
Ingredients
Main Ingredients
- 01 1 (12‑oz) package premium vanilla ice cream, softened
- 02 4 Buster Bar candy bars, crushed
- 03 1/2 cup chocolate ganache (store‑bought or homemade)
- 04 1/3 cup caramel sauce
- 05 1 pinch sea salt
Optional Toppings
- 01 Whipped cream
- 02 Fresh berries
- 03 Additional crushed Buster Bar for garnish
Instructions
Line a 9‑inch springform pan with parchment; set aside.
In a large bowl, gently fold the softened vanilla ice cream with the crushed Buster Bar pieces, keeping some larger chunks for texture.
Spread half of the ice cream mixture evenly in the prepared pan, smoothing the top with a spatula.
Drizzle half of the caramel sauce over the ice cream, then swirl with a knife to create ribbons.
Pour the chocolate ganache over the caramel layer, allowing it to pool and set a bit.
Top with the remaining ice cream mixture, smoothing the surface. Sprinkle the final pinch of sea salt.
Cover tightly with plastic wrap and freeze for at least 4 hours, or overnight for firm slices.
Before serving, run a warm knife through the edges, release the cake, and garnish with extra crushed Buster Bar or fresh berries.
Notes & Tips
- 1 If the ice cream becomes too soft while mixing, chill the bowl for a few minutes.
- 2 Crush candy bars just before adding to preserve crunch.
- 3 For a richer chocolate flavor, use a dark chocolate ganache.
Tools You'll Need
-
Springform pan
-
Large mixing bowl
-
Spatula
-
Sharp knife
-
Plastic wrap
Must-Know Tips
- Don’t over‑mix the candy; retain texture for a satisfying bite.
- Let the cake rest 5‑10 minutes at room temperature before slicing.
- Use a warm knife for clean cuts without dragging the ice cream.
Professional Secrets
- Softening ice cream slightly ensures an even fold with candy pieces.
- Freezing the cake in layers prevents color bleeding of caramel and chocolate.
- A brief warm‑knife pass creates clean slices without melting the edges.

Recipe by
AmeliaAmelia is a passionate food blogger and recipe creator at Arbmom Recipe, where she combines her culinary expertise with a love for creating approachab ...
Get Delicious Recipes Weekly
Join 25,000+ home cooks getting our best recipes straight to their inbox.
Free forever • No spam • Unsubscribe anytime