Why You'll Love It
- - No baking required, just a quick assembly
- - Crunchy texture with a hint of honey sweetness
- - Fun shape that kids love for school lunches
- - Minimal mess, easy clean‑up
“These wafer pencils were a hit at my daughter’s first day—so fun and tasty!”
Essential Ingredient Guide
- Waffle or cookie wafer sheets: Choose thin, buttery wafers; they bend easily and give a satisfying snap.
- Chocolate or candy melt: Use a smooth melt for a glossy coat; it adds sweetness and holds the shape.
- Mini marshmallows (optional): Adds a soft chew contrast when placed at the tip.
- Sprinkles or edible glitter: A tiny pinch adds visual sparkle without overwhelming flavor.
- Lemon zest: A fresh zing balances the richness of the melt.
- Honey: Just a drizzle for natural sweetness; adjust to taste.
Complete Cooking Process
-
Ingredient Readiness:
Lay out wafer sheets on a clean surface, warm the melt gently, and have toppings within reach.
-
Flavor Development:
Dipping each wafer in melt lets the chocolate coat every edge, creating a glossy finish.
-
Texture Control:
Bend the wafers slowly around a thin wooden skewer to avoid cracking.
-
Finishing Touches:
Add a sprinkle of zest or a tiny marshmallow tip, then set on parchment to set.
-
Serving Timing:
Allow the coating to firm for about five minutes before packing in lunchboxes.
- Work with one wafer at a time to keep the melt warm.
- Use a silicone mat for easy cleanup.
- Store in an airtight container to retain crunch.
Pro Tips
So, when you’re assembling, take a moment to enjoy the gentle scent of chocolate. It’s a small pause that makes the kitchen feel cozy, especially on those hurried school‑morning rushes. And yes, if the melt starts to thicken, a quick whisk restores its silkiness—no worries at all.
The essence of the dish:
A fun fact or historical angle:
Flavor or sensory focus:
You Must Know
- Work quickly, the melt can set fast.
- Wafers should be at room temperature.
- Avoid over‑bending to prevent breakage.
Frequently Asked Questions
→ Can I use gluten‑free wafers?
Yes, just substitute with a gluten‑free version; the texture remains crisp.
→ What’s the best way to store them?
Place in an airtight container with a paper towel to absorb any excess moisture.
→ Can I add a flavor to the melt?
A dash of vanilla or a sprinkle of cinnamon works beautifully.
→ How long do they stay crunchy?
If kept sealed, they stay crisp for up to three days.
→ Are they suitable for vegans?
Use a plant‑based chocolate melt and ensure the wafers contain no animal products.
→ Can I make them ahead of time?
Yes, assemble a day before and store sealed; they’ll retain their snap.
Chef's Tips
If the melt thickens, a splash of milk revives its fluidity.,Work in small batches to keep the chocolate warm.,You can pair these with a glass of milk for a classic snack.
Nutrition Facts
per serving
120
Calories
2g
Protein
15g
Carbs
6g
Fat
Taste Profile
Sweet and buttery with a bright hint of citrus
Ingredient Substitutions
Don't have an ingredient? Try these alternatives
Will give a lighter crunch; adjust dipping time.
Provides a sweeter base; may need less honey.
Recipe Variations
Try these delicious twists on the original
Spicy Version
Add a pinch of cayenne to the melt for a subtle heat.
Mediterranean Style
Mix a bit of crushed pistachio into the melt and sprinkle with sea salt.
Common Mistakes to Avoid
Learn from others' mistakes for perfect results
- Overheating the chocolate, causing a grainy texture.
- Bending wafers too quickly, leading to cracks.
- Skipping the cooling time, resulting in a sticky finish.
Meal Prep & Storage
Make Ahead Tips
You can melt the chocolate and keep it warm in a thermos for up to an hour; assemble pencils just before serving.
Leftover Ideas
Re‑dip any un‑coated wafers and let set again for a fresh crunch.
Perfect Pairings
Serve this with...
Cooking Timeline
Gather all ingredients and tools; zest lemon.
Melt chocolate and stir in honey and zest.
Dip each wafer edge, roll around skewer, and shape.
Add toppings, let set, and transfer to container.

Wafer Pencil Cookies – Cute Back To School Treat
Create adorable wafer pencil cookies—perfect sweet treats for back‑to‑school fun. These crunchy delights are quick to assemble, whimsical in shape, and bring a smile to any lunchbox.
Timing
Prep Time
15 Minutes
Cook Time
0 Minutes
Total Time
15 Minutes
Recipe Details
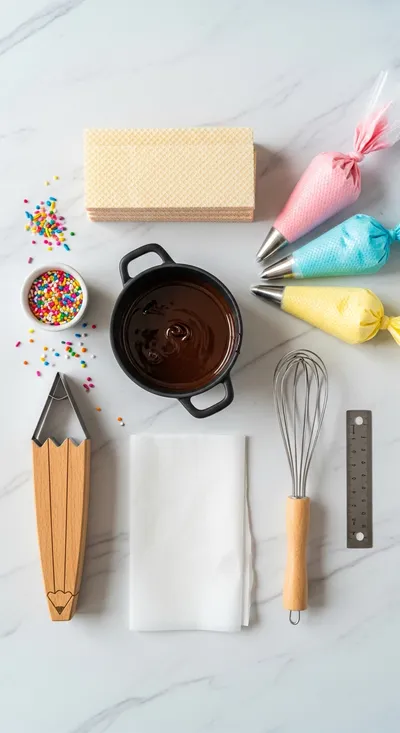
Ingredients
Main Ingredients
- 01 24 wafer sheets (thin and buttery)
- 02 1 cup chocolate melt or candy coating
- 03 2 tsp honey
- 04 1 tsp lemon zest
Optional Decorations
- 01 Mini marshmallows
- 02 Colorful sprinkles
- 03 Edible glitter
Instructions
Warm the chocolate melt in a small saucepan over low heat, stirring gently until smooth.
Add honey and lemon zest to the melt, whisk for a few seconds, then set aside.
Place a wafer sheet on a clean surface, dip one edge in the melt, then quickly roll it around a thin skewer to form a pencil shape.
Slide the shaped wafer onto parchment, add a tiny marshmallow tip if desired, and sprinkle with sprinkles or glitter.
Allow the coating to set for 5‑7 minutes, then transfer to a serving plate or lunchbox.
Notes & Tips
- 1 If the melt thickens, a splash of milk revives its fluidity.
- 2 Work in small batches to keep the chocolate warm.
- 3 You can pair these with a glass of milk for a classic snack.
Tools You'll Need
-
Small saucepan
-
Whisk
-
Silicone mat or parchment paper
-
Thin wooden skewer or straw
-
Small cooling rack
Must-Know Tips
- Don't let the melt sit too long; it firms quickly.
- Keep wafers flat until dipped to avoid breakage.
- Taste the melt; adjust sweetness with a touch more honey.
Professional Secrets
- Warm the melt just enough to flow, not boil, for a glossy finish.
- Use a silicone spatula to scrape every last drop.
- Let the coated pencils rest on a cooling rack for even setting.

Recipe by
GraceGrace is a passionate food blogger and recipe developer at Arbmom Recipe, where she brings a fresh and flavorful approach to home cooking. With years ...
Get Delicious Recipes Weekly
Join 25,000+ home cooks getting our best recipes straight to their inbox.
Free forever • No spam • Unsubscribe anytime