Why You'll Love It
- - No animal products, yet full of flavor
- - Easy to slice and store
- - Packs a satisfying chew
- - Great for sandwiches, pizza, or snack boards
*"I was blown away by the smoky bite – it truly feels like the real thing!"*
Essential Ingredient Guide
- Vital wheat gluten: Acts as the meat‑like backbone; look for a fine, high‑quality brand for the best texture.
- Smoked paprika: Provides the deep, smoky flavor that defines salami; toast it lightly for extra depth.
- Liquid smoke: A few drops add authentic smoke without a smoker; use sparingly to avoid bitterness.
- Soy sauce: Adds saltiness and umami; choose low‑sodium if you watch sodium levels.
- Apple cider vinegar: A touch of acidity brightens the flavor and helps tenderize the gluten.
- Maple syrup: Balances the savory notes with a subtle sweetness, reminiscent of cured meats.
Complete Cooking Process
-
Ingredient Readiness:
Gather all dry ingredients, whisk the wet mixture, and let the gluten rest for a few minutes to hydrate.
-
Flavor Development:
Mix the wet and dry components thoroughly, then let the dough sit to allow the spices to meld.
-
Texture Control:
Knead the dough just enough to develop gluten; over‑kneading can make it too firm.
-
Finishing Touches:
Wrap the log tightly in cheesecloth, brush with a glaze of soy sauce and maple, then smoke or bake.
-
Serving Timing:
Allow the salami to chill for at least 4 hours, preferably overnight, before slicing.
- Roll the log tight to avoid air pockets.
- Use a cold smoker or oven at low heat for true smoked flavor.
- Slice with a sharp wire for clean cuts.
- Store in the fridge wrapped in parchment for up to a week.
Pro Tips
I’ve found that letting the salami rest in the fridge after smoking really deepens the flavor—there’s a quiet patience to it, like waiting for tea to steep. When you finally slice it, the texture should be firm yet slightly yielding, and the scent will remind you of a quiet kitchen window on a breezy autumn afternoon.
The essence of the dish:
A fun fact or historical angle:
Flavor or sensory focus:
You Must Know
- Keep the log refrigerated until set
- Avoid over‑cooking – low heat preserves chew
- Use parchment, not plastic, for storage
Frequently Asked Questions
→ Can I use tamari instead of soy sauce?
Yes, tamari works great and adds a richer umami flavor while still keeping it gluten‑free if you need.
→ Do I need a smoker?
A low oven at 200°F with a liquid smoke glaze mimics a smoker quite well; real smokers give deeper depth but aren’t required.
→ How long can I store the salami?
Wrapped tightly, it lasts about a week in the refrigerator. Freeze for up to two months for longer storage.
→ Can I add nuts for extra texture?
Sure, finely chopped walnuts or pistachios add a pleasant crunch, just fold them in before shaping.
→ Is this recipe suitable for kids?
Absolutely; the flavors are mild yet satisfying, and the no‑meat approach often appeals to younger palates.
→ What can I serve with the salami?
It pairs beautifully with crusty bread, pickles, cheese‑free spreads, or tossed into salads.
Chef's Tips
If you like extra smoke, add a few more drops of liquid smoke to the glaze.,For a firmer texture, let the dough rest an additional 10 minutes before shaping.,Slice with a serrated wire for clean cuts and avoid crumbling.
Nutrition Facts
per serving
150
Calories
10g
Protein
22g
Carbs
4g
Fat
Taste Profile
Smoky, savory with a gentle sweet finish
Ingredient Substitutions
Don't have an ingredient? Try these alternatives
Texture may vary; adjust liquid ratios accordingly.
Slightly sweeter; reduce maple syrup a touch.
Recipe Variations
Try these delicious twists on the original
Spicy Version
Add 1 tsp cayenne pepper and a dash of sriracha to the wet mix for a kick.
Mediterranean Style
Mix in 2 tbsp chopped sun‑dried tomatoes and 1 tbsp oregano for a fragrant twist.
Common Mistakes to Avoid
Learn from others' mistakes for perfect results
- Over‑kneading, which makes the salami too tough.
- Skipping the glaze, leading to a dry exterior.
- Baking at too high a temperature, causing a hard crust.
Meal Prep & Storage
Make Ahead Tips
You can shape and wrap the log, then refrigerate overnight before the final bake; the flavors will deepen.
Leftover Ideas
Slice and serve cold, or gently warm in a skillet with a drizzle of olive oil.
Perfect Pairings
Serve this with...
Cooking Timeline
Gather and measure all ingredients.
Mix dry and wet components, then knead.
Shape log, wrap in cheesecloth, and place on sheet.
Brush glaze and pre‑heat oven to 200°F.
Bake, turning and glazing halfway through.
Cool, then refrigerate before slicing.

Vegan Salami Recipe – Plant‑Based Perfection
A deeply smoky, tender vegan salami that’s perfect sliced onto sandwiches, crumbled on pizza, or enjoyed straight from the board. It captures all the classic cured‑meat vibes without any animal ingredients.
Timing
Prep Time
20 Minutes
Cook Time
4 Hours
Total Time
4 Hours 20 Minutes
Recipe Details
Ingredients
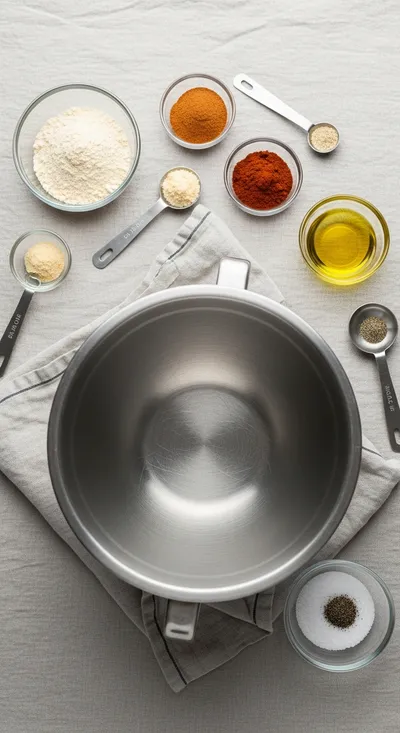
Dry Mix
- 01 2 cups vital wheat gluten
- 02 1/4 cup chickpea flour
- 03 2 tsp smoked paprika
- 04 1 tsp garlic powder
- 05 1 tsp onion powder
- 06 1/2 tsp black pepper
Wet Mix
- 01 1 cup vegetable broth
- 02 2 tbsp soy sauce
- 03 1 tbsp maple syrup
- 04 1 tbsp apple cider vinegar
- 05 1 tsp liquid smoke
- 06 1 tbsp olive oil
Glaze
- 01 2 tbsp soy sauce
- 02 1 tbsp maple syrup
- 03 1 tsp smoked paprika
Instructions
In a bowl, whisk together all dry ingredients until evenly combined.
In a separate bowl, mix the wet ingredients; whisk until the liquid smoke is fully blended.
Pour the wet mixture into the dry, stir, then knead for 2‑3 minutes until the dough becomes elastic.
Shape the dough into a log, wrap tightly in cheesecloth, and place on a baking sheet.
Brush the glaze over the log, then bake at 200°F (93°C) for 3‑4 hours, turning halfway and re‑applying glaze.
Allow the salami to cool, then refrigerate for at least 4 hours before slicing.
Notes & Tips
- 1 If you like extra smoke, add a few more drops of liquid smoke to the glaze.
- 2 For a firmer texture, let the dough rest an additional 10 minutes before shaping.
- 3 Slice with a serrated wire for clean cuts and avoid crumbling.
Tools You'll Need
-
Large mixing bowl
-
Whisk
-
Measuring cups and spoons
-
Serrated wire or sharp knife
-
Cheesecloth
-
Baking sheet
-
Oven
Must-Know Tips
- Don’t over‑mix the dough, it can become tough.
- Wrap tightly to prevent air pockets during baking.
- Taste the glaze before applying; adjust sweetness if needed.
Professional Secrets
- Let the gluten rest after mixing, it improves texture.
- Low‑and‑slow baking mimics traditional curing.
- Brush glaze multiple times for a glossy finish.

Recipe by
OliviaOlivia is a passionate food blogger and recipe creator at Arbmom Recipe, where she brings her culinary expertise and love for home cooking to a vibran ...
Get Delicious Recipes Weekly
Join 25,000+ home cooks getting our best recipes straight to their inbox.
Free forever • No spam • Unsubscribe anytime