Why You'll Love It
- - Simple pantry staples, no fancy equipment needed
- - Fun shaping and coloring let kids join the process
- - Soft interior with a lightly crisp edge
- - Easy to store and re‑heat for later cravings
*These cookies were a hit at our PTA meeting – kids couldn't stop talking about the tiny book shapes!*
Essential Ingredient Guide
- Unsalted butter: Use softened butter for a smooth creaming texture; it carries the richness of every bite
- All‑purpose flour: Choose fresh flour; it helps the cookie hold its shape when you press the school motifs
- Royal icing: Color it with food‑grade gels for bright school‑spirit hues; it hardens into a gentle glaze
- Vanilla extract: A splash adds warmth and depth without overwhelming the delicate sweetness
- Lemon juice: A tiny dash balances the sweetness and helps the icing set nicely
- Powdered sugar: Sifts easily into the icing, giving a smooth finish and subtle extra sweetness
Complete Cooking Process
-
Ingredient Readiness:
Soften butter, measure flour, and pre‑mix the royal icing colors before you start cutting the dough.
-
Flavor Development:
Cream butter and sugar until pale, then add vanilla; this step builds the buttery aroma that fills the kitchen.
-
Texture Control:
Fold in flour gently; over‑mixing can make the cookies tough, and you’ll want a tender bite.
-
Finishing Touches:
Pipe the colored icing into pencil, book, or apple shapes, then let them set at room temperature.
-
Serving Timing:
Serve once the icing hardens, ideal for a mid‑afternoon snack or a classroom reward.
- Chill the dough for 15 minutes before cutting; it holds shapes better
- Use a small offset spatula for smooth icing lines
- Let the cookies cool completely on a wire rack before decorating
- Store in an airtight container with a slice of bread to keep them soft
Pro Tips
These small adjustments make the whole experience feel less rushed and more like a quiet, purposeful routine. I’ve found that a little patience in the icing stage rewards you with a polished look that even the adults appreciate. The cookies stay fresh for days, so you can enjoy them over a weekend of school projects.
The essence of the dish:
A fun fact or historical angle:
Flavor or sensory focus:
You Must Know
- Work with chilled dough for clean cuts
- Use food‑grade gels for vivid colors
- Allow icing to dry fully for a polished finish
Frequently Asked Questions
→ Can I use gluten‑free flour?
Yes, substitute the all‑purpose flour with a 1:1 gluten‑free blend; the texture remains tender.
→ How do I keep the icing from running?
Add a pinch of cornstarch to the royal icing; it thickens the mixture without affecting flavor.
→ What if I don’t have food‑grade gels?
You can use liquid food coloring, but use a bit less to avoid thinning the icing.
→ How long do the cookies stay fresh?
Stored in an airtight container, they stay fresh for up to a week, especially if you add a slice of bread to retain softness.
→ Can I freeze the decorated cookies?
Absolutely – freeze once the icing is fully set, then thaw at room temperature before serving.
→ Do I need special cookie cutters?
A small round cutter works fine; you can hand‑shape the designs with a knife for pencils or books.
Chef's Tips
If the dough feels sticky, add a tablespoon of flour at a time.,For a glossy finish, lightly brush the baked cookies with a thin layer of melted butter before icing.,You can add a pinch of cinnamon to the dough for a subtle warm note that pairs well with the bright icing.
Nutrition Facts
per serving
180
Calories
2g
Protein
26g
Carbs
8g
Fat
Taste Profile
A sweet, buttery bite with a gentle vanilla undertone
Ingredient Substitutions
Don't have an ingredient? Try these alternatives
Will change flavor slightly; keep chilled for shaping
Results in a more crumbly texture; add an extra egg white for binding
Recipe Variations
Try these delicious twists on the original
Spicy Version
Add a pinch of ground cinnamon to the dough and sprinkle a light dusting of cayenne on the icing for a subtle heat.
Mediterranean Style
Incorporate finely chopped pistachios into the dough and drizzle with honey after icing for a nutty, sweet twist.
Common Mistakes to Avoid
Learn from others' mistakes for perfect results
- Over‑mixing the dough, which can create a tough cookie
- Skipping the chill step, leading to spreading and loss of shape
- Applying icing before cookies are fully cooled, causing runs
Meal Prep & Storage
Make Ahead Tips
You can prepare the dough a day ahead, wrap tightly, and refrigerate; the icing can be piped a few hours before serving and left to set.
Leftover Ideas
Reheat gently in a low oven (300°F) for 5 minutes to revive the butter aroma without melting the icing.
Perfect Pairings
Serve this with...
Cooking Timeline
Gather and measure all ingredients; preheat oven.
Cream butter and sugar; add egg and vanilla.
Incorporate dry ingredients; form dough and chill.
Roll out dough, cut shapes, bake, and cool.
Prepare icing, tint colors, and pipe designs.
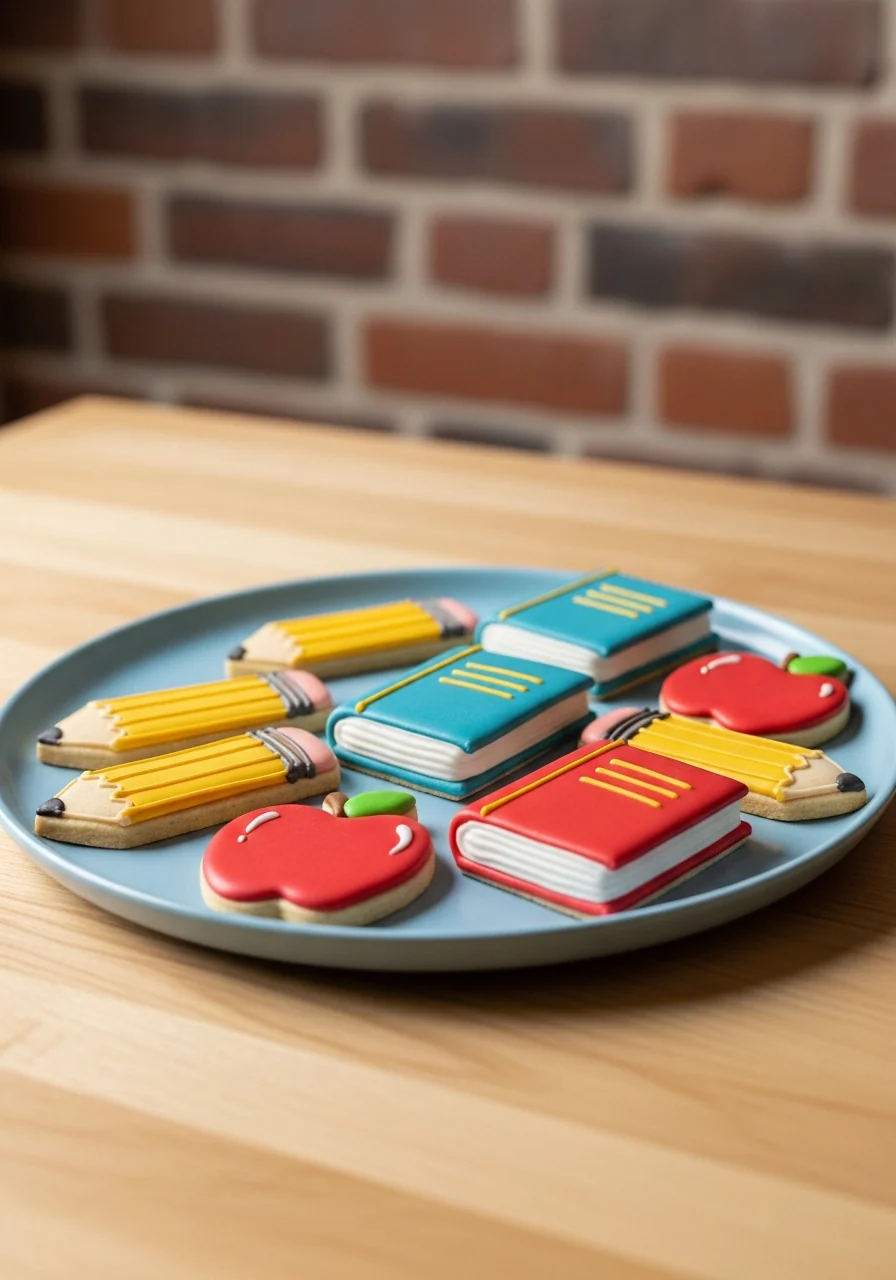
School-Themed Cookies
These school-themed cookies are perfect for classroom celebrations, after‑school snacks, or birthday parties. With simple ingredients, gentle shading of icing, and a dash of nostalgia, they bring a smile to every student’s face. Honestly, the scent of vanilla and butter will fill your kitchen, and you’ll hear the quiet giggle of kids as they recognise the little pencil‑shaped treats. teacher cookies are a nice reference, and you might also enjoy soft chocolate chip cookies for a different twist.
Timing
Prep Time
20 Minutes
Cook Time
12 Minutes
Total Time
32 Minutes
Recipe Details
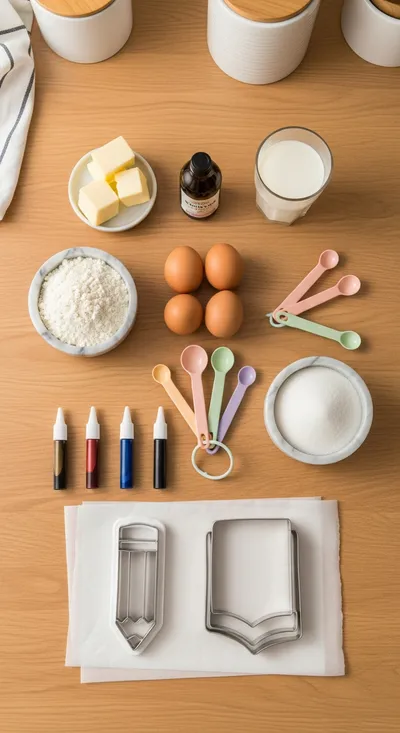
Ingredients
Cookie Dough
- 01 1 cup unsalted butter, softened
- 02 1 cup granulated sugar
- 03 1 large egg
- 04 2 tsp vanilla extract
- 05 2 ½ cups all‑purpose flour
- 06 ½ tsp baking powder
- 07 ¼ tsp salt
Royal Icing
- 01 3 cups powdered sugar
- 02 2‑3 tbsp milk
- 03 ½ tsp lemon juice
- 04 Food‑grade gel colors (red, blue, yellow, green)
- 05 1 tsp vanilla extract (optional)
Instructions
In a large bowl, cream the softened butter and granulated sugar together until the mixture is light and fluffy, about 3‑4 minutes.
Add the egg and vanilla extract, beating until fully incorporated; the batter should feel smooth and slightly glossy.
Whisk together flour, baking powder, and salt in a separate bowl, then gradually fold into the butter mixture until a soft dough forms.
Divide the dough into two portions, wrap each in plastic, and chill for 15 minutes to firm up.
Preheat the oven to 350°F (175°C). On a lightly floured surface, roll out one portion of dough to about ¼‑inch thickness.
Using a small round cutter, press out circles, then gently shape some with a knife into pencils, books, or apple silhouettes.
Place the shaped cookies on a parchment‑lined baking sheet, spacing them a couple of inches apart.
Bake for 10‑12 minutes, or until the edges are just lightly golden. Remove and let cool completely on a wire rack.
While the cookies cool, whisk together powdered sugar, milk, lemon juice, and vanilla (if using) to create a smooth royal icing; adjust consistency with more milk or sugar as needed.
Divide the icing into separate bowls and tint each with a different gel color, stirring gently to keep the hues vibrant.
Pipe the colored icing onto the cooled cookies, drawing pencil lines, book spines, or apple stems; let the designs set at room temperature for at least 30 minutes.
Notes & Tips
- 1 If the dough feels sticky, add a tablespoon of flour at a time.
- 2 For a glossy finish, lightly brush the baked cookies with a thin layer of melted butter before icing.
- 3 You can add a pinch of cinnamon to the dough for a subtle warm note that pairs well with the bright icing.
Tools You'll Need
-
Stand mixer or hand mixer
-
Rolling pin
-
Small round cookie cutter
-
Paring knife for shaping
-
Piping bags and small round tips
-
Wire cooling rack
Must-Know Tips
- Don't over‑mix the dough; it can become tough
- Let the icing fully dry before stacking cookies
- Chill the dough for cleaner cuts and less spreading
Professional Secrets
- Room temperature butter creams more evenly, giving a uniform crumb
- A brief pause after baking allows the interior to settle, preventing cracks
- Sifting powdered sugar into icing eliminates lumps for a smooth glaze

Recipe by
GraceGrace is a passionate food blogger and recipe developer at Arbmom Recipe, where she brings a fresh and flavorful approach to home cooking. With years ...
Get Delicious Recipes Weekly
Join 25,000+ home cooks getting our best recipes straight to their inbox.
Free forever • No spam • Unsubscribe anytime