Why You'll Love It
- - No oven needed, perfect for hot days
- - Simple ingredients you likely have at home
- - Creamy peanut butter and rich chocolate balance each other
- - Keeps well in the fridge for next‑day indulgence
*"The cake was a hit at our family gathering—creamy, crunchy, and beautifully layered. Everyone asked for the recipe!"*
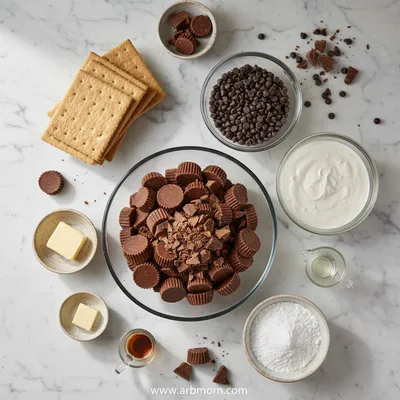
Essential Ingredient Guide
- Reese's Peanut Butter Cups: Provides the iconic chocolate‑peanut butter crunch; crush lightly to keep some texture.
- Cream Cheese: Forms the silky base; room‑temperature helps it blend smoothly.
- Powdered Sugar: Adds sweetness without graininess; sift to avoid lumps.
- Unsalted Butter: Enriches the filling and helps it set firmly when chilled.
- Lemon Juice: A touch of acid brightens the flavor and prevents the cream from feeling heavy.
- Dark Chocolate Ganache: Creates a glossy, velvety topping that contrasts the creamy interior.
Complete Cooking Process
-
Ingredient Readiness:
Soften cream cheese and butter, bring them to room temperature, and crush the Reese's cups while they’re still firm.
-
Flavor Development:
Whisk the butter, cream cheese, powdered sugar, and lemon juice together until light; then fold in melted chocolate for the ganache.
-
Texture Control:
Layer crushed Reese's between creamy layers, pressing gently to keep the crunch intact.
-
Finishing Touches:
Spread a smooth chocolate ganache over the top, sprinkle with extra Reese's pieces, and chill until set.
-
Serving Timing:
Allow the cake to rest in the fridge for at least two hours; slice with a warm knife for clean cuts.
- Use a metal tray for even cooling
- Don’t over‑mix the filling; keep it airy
- Taste the ganache before spreading, adjust sugar if needed
- Cover the cake loosely with foil to avoid absorbing fridge odors
Pro Tips
Well, these little tricks keep the cake from getting a freezer‑burn taste and ensure each bite is as soft as a cloud. I always find that a gentle press of the layers before chilling helps the flavors meld together, and it’s a quiet moment of satisfaction as the cake settles. Ugh, sometimes the chocolate ganache can get too thick; a splash of milk or a quick whisk will bring it back to that perfect pourable consistency.
The essence of the dish:
A fun fact or historical angle:
Flavor or sensory focus:
You Must Know
- Keep the cake refrigerated until serving
- Use high‑quality dark chocolate for the ganache
- Let the cake sit a bit after cutting for clean slices
Frequently Asked Questions
→ Can I use almond butter instead of peanut butter?
Yes, almond butter works nicely; it will give a slightly different nutty flavor but still pairs well with chocolate.
→ Do I need to chill the cake for a full day?
Two hours is enough for the layers to set, but overnight chilling deepens the flavors.
→ Is this cake gluten‑free?
If you use gluten‑free cookies or omit them altogether, the cake can be made gluten‑free.
→ Can I substitute the dark chocolate ganache?
Milk chocolate or semi‑sweet works, just adjust the sugar level accordingly.
→ How long will leftovers keep?
Store in an airtight container in the fridge for up to 4 days.
→ What’s a good topping for extra crunch?
Add a handful of chopped peanuts or extra crushed Reese's pieces just before serving.
Chef's Tips
Make sure the cream cheese is truly at room temperature; cold cheese will create lumps.,If the ganache thickens too much, warm it very gently before spreading.,For extra shine, drizzle a thin ribbon of melted chocolate on top just before serving.
Nutrition Facts
per serving
420
Calories
6g
Protein
32g
Carbs
28g
Fat
Taste Profile
A sweet‑nutty chocolate harmony
Ingredient Substitutions
Don't have an ingredient? Try these alternatives
Will give a lighter texture; ensure it’s thick enough to hold layers
Creates a sweeter ganache; reduce added sugar if needed
Recipe Variations
Try these delicious twists on the original
Spicy Version
Add a pinch of cayenne pepper to the cream mixture and sprinkle crushed chili‑infused peanuts on top.
Mediterranean Style
Swap the chocolate ganache for a white chocolate‑honey glaze and garnish with toasted pistachios.
Common Mistakes to Avoid
Learn from others' mistakes for perfect results
- Over‑mixing the cream base, leading to a dense texture.
- Pouring hot ganache over the layers, which can melt the cream.
- Skipping the chilling step, resulting in a loose cake.
Meal Prep & Storage
Make Ahead Tips
You can prepare the cream base and crush the Reese's cups up to a day ahead; keep them covered and refrigerated. Assemble the cake the night before and chill overnight.
Leftover Ideas
Reheat gently in the microwave for 10 seconds if you prefer a softer texture, or enjoy chilled straight from the fridge.
Perfect Pairings
Serve this with...
Cooking Timeline
Gather and soften all dairy ingredients; crush cookies and chop Reese's.
Mix cream cheese, butter, sugar, peanut butter, lemon, and vanilla until fluffy.
Melt chocolate and cream, stir in butter to make ganache; let cool slightly.
Layer cream, cookies, and Reese's in the pan; finish with ganache.
Cover and refrigerate for at least two hours before serving.
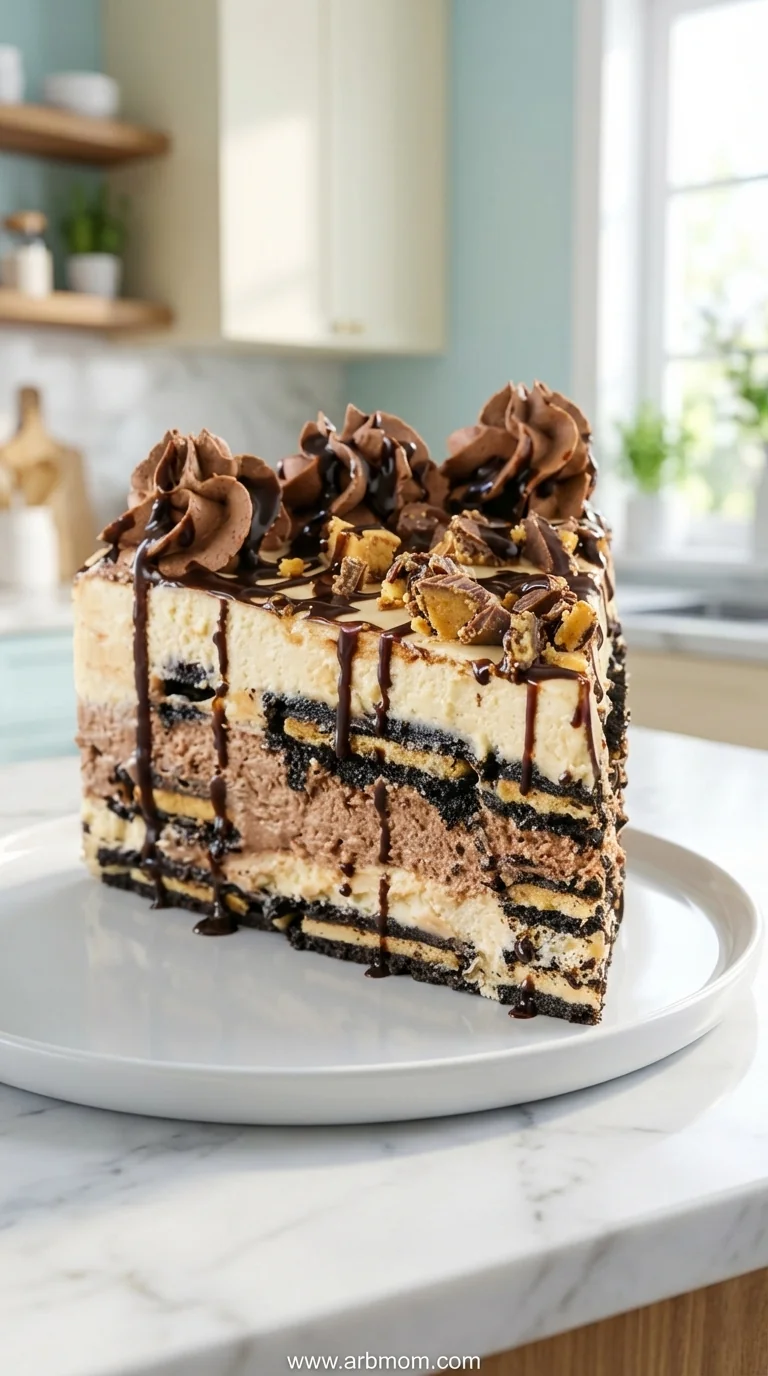
Reese's Peanut Butter Chocolate Icebox Cake
A velvety, no‑bake icebox cake that layers crunchy Reese's pieces, smooth peanut butter cream, and dark chocolate for a cool, indulgent dessert that feels like a hug from the kitchen.
Timing
Prep Time
20 Minutes
Cook Time
0 Minutes
Total Time
2 Hours
Recipe Details
Ingredients
Cream Base
- 01 8 oz cream cheese, softened
- 02 4 tbsp unsalted butter, softened
- 03 1/2 cup powdered sugar
- 04 2 tbsp peanut butter
- 05 1 tsp lemon juice
- 06 1 tsp vanilla extract
Chocolate Ganache
- 01 1 cup dark chocolate chips
- 02 1/2 cup heavy cream
- 03 1 tbsp butter
Layers
- 01 1 1/2 cups crushed Oreo cookies (or gluten‑free cookies)
- 02 12 Reese's Peanut Butter Cups, chopped
Instructions
In a large bowl, beat the softened cream cheese and butter together until smooth, then gradually add powdered sugar, peanut butter, lemon juice, and vanilla; mix until light and fluffy.
Place the chocolate chips and heavy cream in a saucepan; heat gently until melted, then stir in a tablespoon of butter to create a glossy ganache. Let it cool slightly.
Line a 9x13 inch dish with parchment; spread a thin layer of the cream mixture on the bottom.
Sprinkle half of the crushed cookies evenly, then scatter half of the chopped Reese's pieces.
Add another layer of the cream mixture, followed by the remaining cookies and Reese's pieces.
Top the cake with the final layer of cream, then gently pour the chocolate ganache over the surface, spreading with a spatula.
Cover loosely with foil and refrigerate for at least two hours, or overnight for best flavor.
Notes & Tips
- 1 Make sure the cream cheese is truly at room temperature; cold cheese will create lumps.
- 2 If the ganache thickens too much, warm it very gently before spreading.
- 3 For extra shine, drizzle a thin ribbon of melted chocolate on top just before serving.
Tools You'll Need
-
Mixing bowls
-
Hand mixer or stand mixer
-
Spatula
-
9x13 inch baking dish
-
Saucepan
-
Plastic wrap
Must-Know Tips
- Don’t over‑beat the cream cheese; keep it airy
- Cover the cake loosely to avoid fridge odors
- Use a warm knife for clean slices
Professional Secrets
- Room temperature dairy ensures a velvety texture
- Cooling the ganache slightly before spreading prevents it from soaking the cake
- A light press of the crushed cookies helps them adhere to the cream layer

Recipe by
EmilyEmily is a passionate food blogger and seasoned recipe creator at Arbmom Recipe, where she brings her culinary expertise and creativity to home cooks ...
Get Delicious Recipes Weekly
Join 25,000+ home cooks getting our best recipes straight to their inbox.
Free forever • No spam • Unsubscribe anytime