Why You'll Love It
- - No baking required, so it stays cool and fresh
- - Vibrant patriotic colors make a visual impact
- - Simple ingredients you likely have on hand
- - Gentle sweetness perfect for all ages
"The colors are stunning, the flavor is light and refreshing—my guests loved it!"
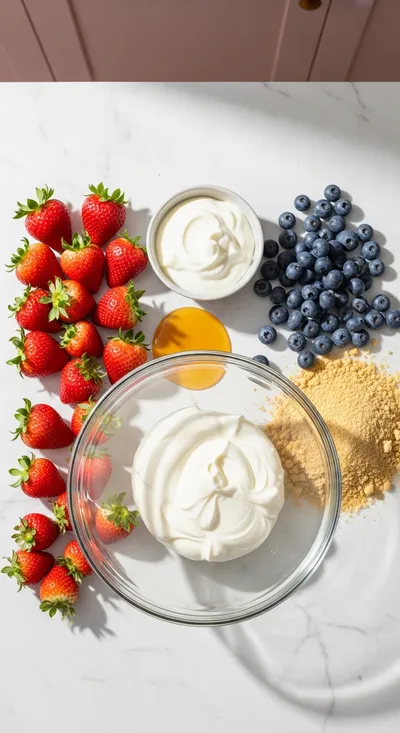
Essential Ingredient Guide
- Mixed berries (strawberries, blueberries, raspberries): Choose ripe, firm berries; wash gently and pat dry to prevent soggy layers.
- Cream cheese: Room‑temperature cheese blends smoothly with sugar for a silkier filling.
- Graham cracker crust: Crush and press with butter; allows the dessert to hold its shape.
- Honey or agave: Adds just enough sweetness without overwhelming the fresh fruit.
- Lemon zest: A touch of zest brightens the berry flavors and balances richness.
- Fresh mint (optional): Garnish for aroma and a pop of green contrast.
Complete Cooking Process
-
Ingredient Readiness:
Wash berries, pat dry, slice strawberries, and crumble the graham crackers.
-
Flavor Development:
Blend cream cheese with honey and a pinch of lemon zest until smooth.
-
Texture Control:
Press crust firmly, layer berries carefully to keep each color distinct.
-
Finishing Touches:
Top with a drizzle of honey and a few mint leaves for scent.
-
Serving Timing:
Chill for at least two hours; serve cold for the best contrast.
- Use a springform pan for easy removal
- Layer berries in the order of color for a clean stripe effect
- Freeze the crust a few minutes before adding filling to prevent sogginess
- Add a splash of vanilla extract to the cream cheese for extra depth
Pro Tips
These little adjustments make the dessert feel polished without extra effort. I’ve found that a short chill in the freezer (just ten minutes) really sets the layers, giving each bite a firm bite and a glossy finish. It’s the kind of detail that makes guests pause and admire before they dig in.
The essence of the dish:
A fun fact or historical angle:
Flavor or sensory focus:
You Must Know
- Keep berries dry to avoid a watery dessert
- Chill well for clean slices
- Use a springform pan for easy removal
Frequently Asked Questions
→ Can I use frozen berries?
Yes, but thaw and dry them thoroughly first to keep the crust from getting soggy.
→ Is this dessert gluten‑free?
Swap the graham crackers for gluten‑free crushed cookies or almond meal.
→ How long can I store it?
Keep refrigerated in an airtight container for up to three days.
→ Can I add a protein boost?
Stir in a scoop of Greek yogurt into the cream cheese mixture for extra protein.
→ What if I don’t have a springform pan?
A regular 8‑inch square pan works fine; just line it with parchment and lift out the dessert.
→ Is sweetener optional?
Feel free to omit honey and let the natural fruit sugars shine, especially with very ripe berries.
Chef's Tips
If you prefer a sweeter crust, increase sugar by a tablespoon.,A splash of orange liqueur (optional) pairs nicely; just omit for a non‑alcoholic version.,For extra crunch, sprinkle toasted slivered almonds over the top before chilling.
Nutrition Facts
per serving
260
Calories
5g
Protein
28g
Carbs
14g
Fat
Taste Profile
Bright and lightly sweet with fresh fruit acidity
Ingredient Substitutions
Don't have an ingredient? Try these alternatives
Adjust sugar amount as digestive biscuits are slightly sweeter.
Maple adds a gentle caramel note; use the same quantity.
Recipe Variations
Try these delicious twists on the original
Spicy Version
Add a pinch of cayenne and drizzle honey mixed with chili for a subtle kick.
Mediterranean Style
Swap berries for pomegranate seeds, add feta crumbs, and drizzle a light honey‑lemon glaze.
Common Mistakes to Avoid
Learn from others' mistakes for perfect results
- Over‑mixing the cream cheese can make it grainy.
- Using wet berries leads to a soggy crust.
- Skipping the chill step makes layers slide together.
Meal Prep & Storage
Make Ahead Tips
You can assemble the crust and filling up to a day ahead; keep berries separate and add just before serving to retain freshness.
Leftover Ideas
Cover and refrigerate; gently warm a slice in a skillet with a drizzle of honey if you prefer it slightly warm.
Perfect Pairings
Serve this with...
Cooking Timeline
Prepare crust: combine crumbs, butter, and sugar; press into pan.
Blend cream cheese, honey, lemon zest, and vanilla until smooth.
Spread cheese mixture over crust.
Layer strawberries, then blueberries, then raspberries.
Drizzle honey, garnish with mint, chill for at least 2 hours.
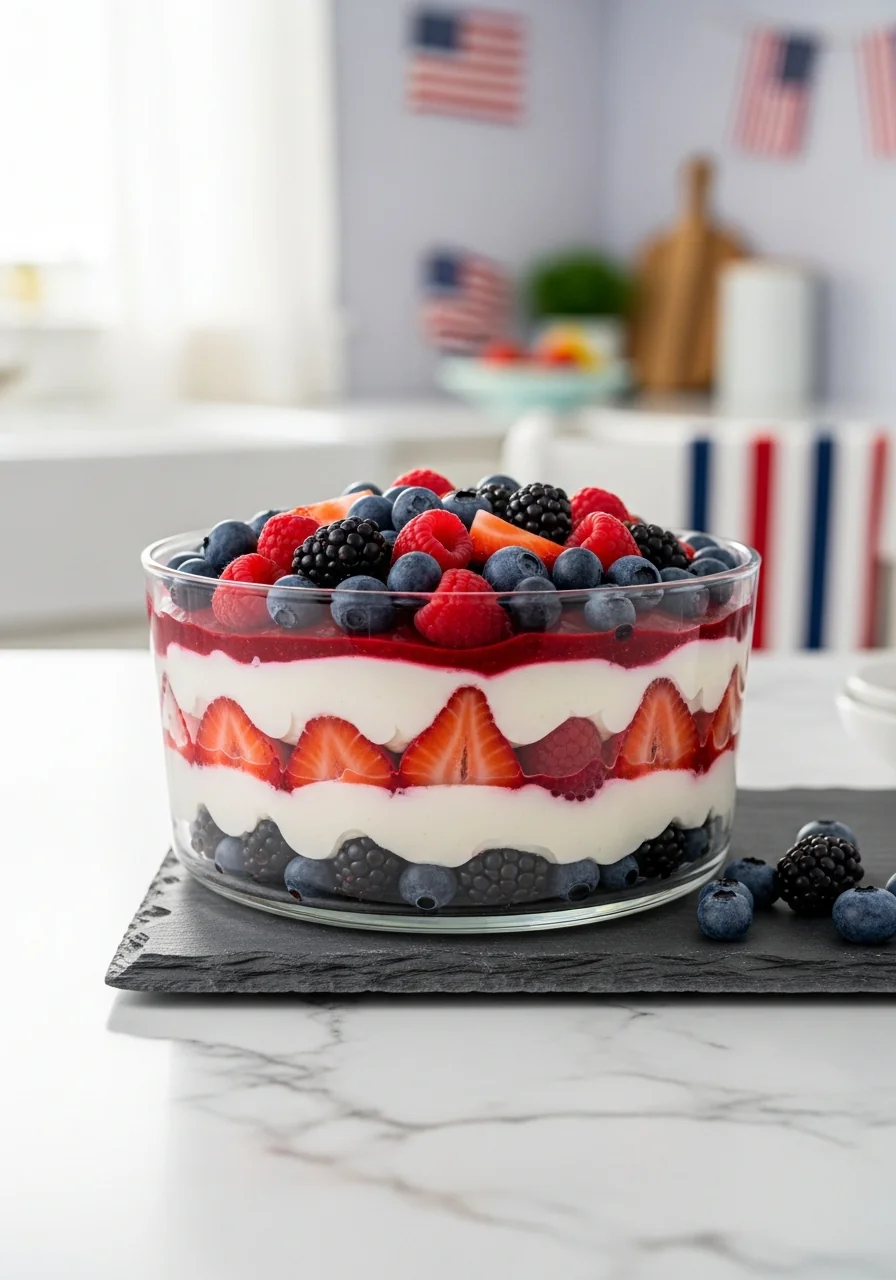
Red White & Blue Mixed Berry No‑Bake Dessert
A fresh, no‑bake layered dessert that brings the patriotic colors of red, white, and blue together with sweet berries, creamy cheese, and a crisp crust—perfect for gatherings.
Timing
Prep Time
15 Minutes
Cook Time
0 Minutes
Total Time
15 Minutes
Recipe Details
Ingredients
Crust
- 01 1 ½ cups graham cracker crumbs
- 02 4 tbsp unsalted butter, melted
- 03 2 tbsp sugar
Filling
- 01 8 oz cream cheese, softened
- 02 ¼ cup honey
- 03 1 tsp lemon zest
- 04 ½ tsp vanilla extract
Berry Layers
- 01 1 cup strawberries, hulled and sliced
- 02 1 cup blueberries
- 03 1 cup raspberries
Garnish
- 01 Fresh mint leaves
- 02 Extra drizzle of honey
Instructions
Combine graham crumbs, melted butter, and sugar; press firmly into the bottom of a 9‑inch springform pan, then chill for 5 minutes.
Beat cream cheese, honey, lemon zest, and vanilla until smooth; spread evenly over the chilled crust.
Layer strawberries first, followed by blueberries, then raspberries, pressing gently to keep colors distinct.
Drizzle a little honey over the top, garnish with mint leaves, and refrigerate for at least 2 hours before serving.
When ready, remove from the springform pan, slice cleanly, and enjoy the cool, colorful layers.
Notes & Tips
- 1 If you prefer a sweeter crust, increase sugar by a tablespoon.
- 2 A splash of orange liqueur (optional) pairs nicely; just omit for a non‑alcoholic version.
- 3 For extra crunch, sprinkle toasted slivered almonds over the top before chilling.
Tools You'll Need
-
Springform pan
-
Food processor or zip‑top bag (for crumbs)
-
Mixing bowl
-
Hand mixer
-
Spatula
-
Knife for slicing berries
Must-Know Tips
- Don’t over‑mix the cream cheese; it can become grainy.
- Pat berries dry after washing to avoid excess moisture.
- Press the crust firmly to ensure it holds together.
Professional Secrets
- Room‑temperature cheese integrates without lumps.
- Chill the crust first; it prevents cracking when adding filling.
- Use a light hand when layering berries to keep color stripes clean.

Recipe by
EmilyEmily is a passionate food blogger and seasoned recipe creator at Arbmom Recipe, where she brings her culinary expertise and creativity to home cooks ...
Get Delicious Recipes Weekly
Join 25,000+ home cooks getting our best recipes straight to their inbox.
Free forever • No spam • Unsubscribe anytime