Why You'll Love It
- - No oven needed, perfect for hot days
- - Vibrant colors brighten any table
- - Simple pantry ingredients keep cost low
- - Fresh fruit adds natural sweetness
*"These dirt cups were a hit at my kids' backyard party—easy, pretty, and delicious!"*
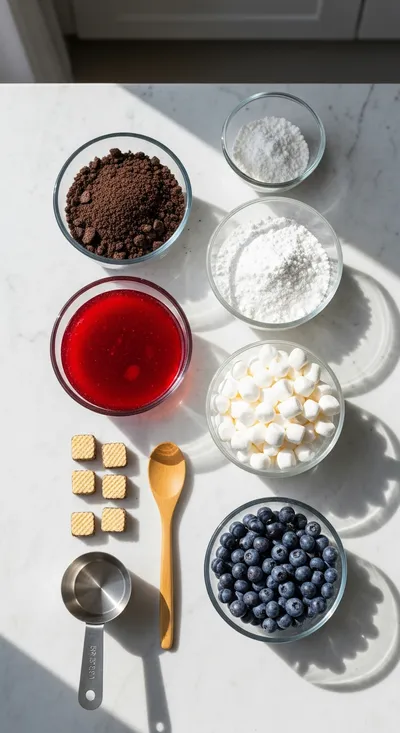
Essential Ingredient Guide
- Chocolate cookies: Choose a sturdy, slightly sweet cookie; crush to a fine crumb for a solid base.
- Vanilla pudding mix: A ready‑made instant pudding gives a silky texture without cooking.
- Whipped topping: Adds airy lightness; fold gently to keep the mousse airy.
- Fresh berries (strawberries, blueberries, bananas): Select bright, ripe berries for natural color; pat dry to avoid excess moisture.
- Milk: Whole milk gives a richer pudding; any dairy‑free alternative works too.
- Granulated sugar (optional): A pinch can balance tartness of berries if desired.
Complete Cooking Process
-
Ingredient Readiness:
Gather and measure each component; crush cookies while the pudding sets, and wash berries carefully.
-
Flavor Development:
Mix pudding and whipped topping, then layer with berries; each layer builds color and taste.
-
Texture Control:
Press cookie crumbs firmly for stability, but keep topping light for a gentle bite.
-
Finishing Touches:
Top each cup with a final drizzle of melted chocolate and a sprinkle of extra berries for sparkle.
-
Serving Timing:
Chill the cups for at least 30 minutes; serve straight from the fridge for maximum freshness.
- Use a food processor for uniform cookie crumbs.
- Layer colors in order: red, white, then blue for a crisp visual gradient.
- Add a tiny pinch of sea salt to the chocolate drizzle to enhance flavor.
- Prepare berries just before assembling to keep them vibrant.
Pro Tips
Well, these little tricks keep the cups looking bright and tasting fresh. I find that a short pause while the pudding thickens gives me a moment to enjoy the kitchen scent of cocoa, and then the rest of the assembly feels almost meditative. It’s a quiet part of the day where I can reflect on how simple ingredients can create something celebratory. So, once you’ve plated, step back, admire the red‑white‑blue layers, and let the anticipation of that first spoonful build. It’s a gentle reminder that the best desserts often come from calm, intentional preparation.
The essence of the dish:
A fun fact or historical angle:
Flavor or sensory focus:
You Must Know
- Keep the cups refrigerated until serving.
- Use fresh, ripe berries for best color.
- Do not over‑mix the pudding, or it becomes dense.
Frequently Asked Questions
→ Can I make these cups vegan?
Yes, substitute the cookie crumbs with a vegan chocolate cookie, use plant‑based milk for the pudding, and replace whipped topping with coconut whipped cream.
→ How long can I store them?
Keep refrigerated in an airtight container for up to 2 days; the berries stay fresh if added just before serving.
→ What if I don’t have vanilla pudding mix?
You can whisk together milk, cornstarch, sugar, and vanilla extract on the stovetop until thick, then cool before folding in the whipped topping.
→ Can I add a crunchy topping?
A sprinkle of toasted coconut flakes or crushed pretzels adds extra texture without altering the flavor profile.
→ Is it okay to use frozen berries?
You can, but thaw and pat them dry first to avoid a watery bottom.
→ Do the cups need to set before serving?
A minimum of 30 minutes of chilling helps the pudding firm up, ensuring clean layers when you dig in.
Chef's Tips
If you prefer a sweeter base, add a tablespoon of sugar to the cookie‑butter mixture.,For extra crunch, sprinkle a pinch of crushed graham crackers on top just before serving.,You can replace banana with white grapes for a different white‑fruit texture.
Nutrition Facts
per serving
260
Calories
4g
Protein
32g
Carbs
12g
Fat
Taste Profile
A balanced sweet‑tart flavor with rich chocolate undertones
Ingredient Substitutions
Don't have an ingredient? Try these alternatives
Ensures the recipe remains gluten‑free without losing flavor.
Provides a dairy‑free alternative with a subtle coconut aroma.
Recipe Variations
Try these delicious twists on the original
Spicy Version
Add a sprinkle of cinnamon and a dash of cayenne to the pudding for warmth.
Mediterranean Style
Swap berries for chopped figs and pistachios, drizzle with honey.
Common Mistakes to Avoid
Learn from others' mistakes for perfect results
- Over‑mixing the pudding, leading to a dense texture.
- Adding fruit too early; it can make the base soggy.
- Using cold butter for the crust; it may not bind properly.
Meal Prep & Storage
Make Ahead Tips
You can crush the cookie base and store it in an airtight container for up to 2 days; prepare the pudding mixture a day ahead and keep chilled, then assemble the cups right before serving.
Leftover Ideas
Refrigerate leftovers in a sealed container; gently stir the pudding layer before serving again.
Perfect Pairings
Serve this with...
Cooking Timeline
Crush cookies and combine with butter; press into cups.
Whisk pudding with milk, let set, then fold in whipped topping.
Layer pudding over crust and arrange fresh fruit in patriotic pattern.
Drizzle melted chocolate and add garnish.
Chill cups in refrigerator before serving.
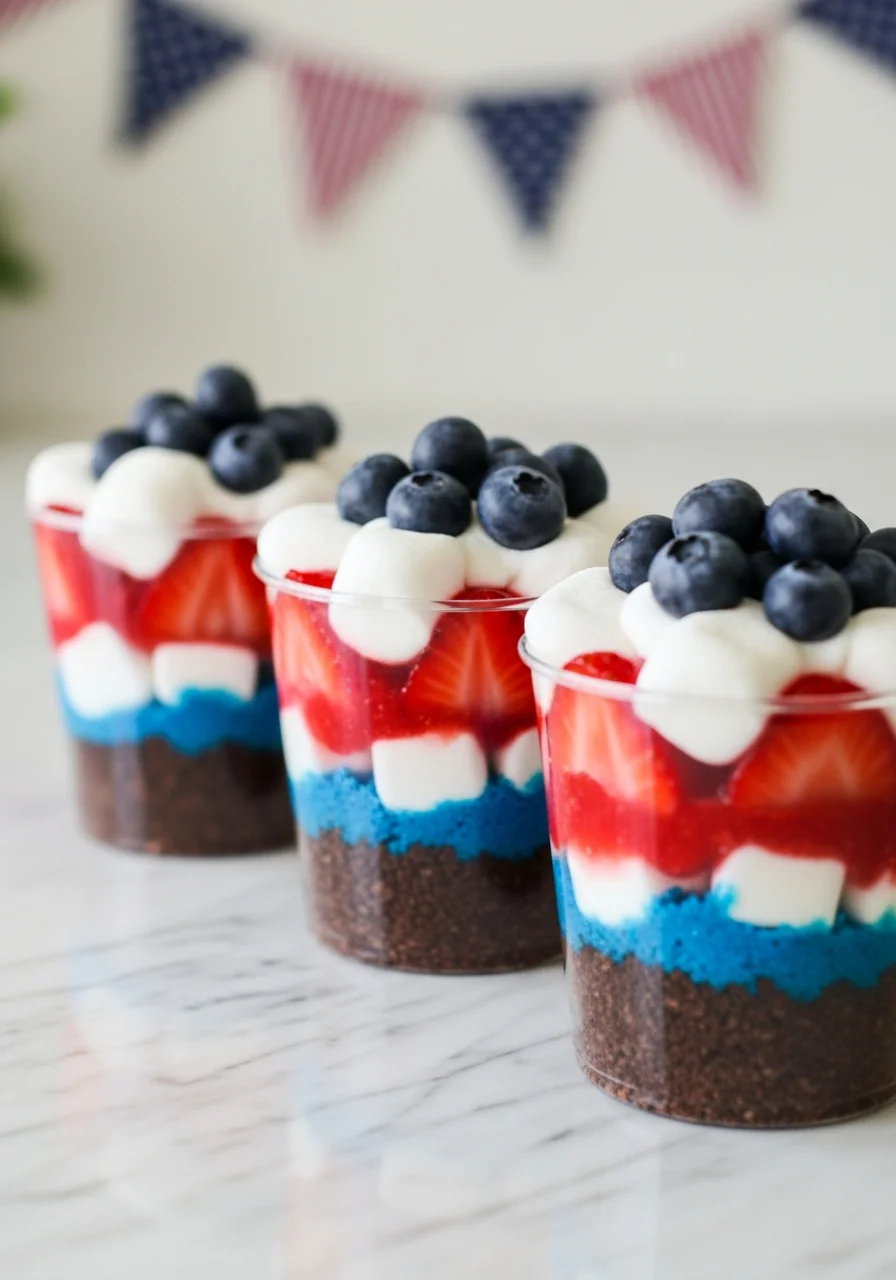
Red, White & Blue Dirt Cups – Easy No-Bake Summer Dessert
Patriotic flavors meet simple preparation in these no‑bake red, white and blue dirt cups. A crunchy chocolate base, creamy vanilla layer, and fresh berries create a dessert that feels like summer in a cup, perfect for Fourth of July picnics or any gathering where you want a splash of color and comfort.
Timing
Prep Time
15 Minutes
Cook Time
0 Minutes
Total Time
45 Minutes
Recipe Details
Ingredients
Base
- 01 2 cups chocolate sandwich cookies, finely crushed
- 02 3 tbsp melted butter
Cream Layer
- 01 1 package (3.4 oz) instant vanilla pudding mix
- 02 2 cups cold milk
- 03 1 cup whipped topping
Fruit Topping
- 01 1 cup fresh strawberries, sliced
- 02 1 cup fresh blueberries
- 03 1 cup fresh banana slices
- 04 Optional: additional berries for garnish
Finishing Drizzle
- 01 2 tbsp melted dark chocolate
Instructions
Combine the crushed cookies with melted butter; press the mixture evenly into the bottom of each serving cup to create a firm crust.
In a bowl, whisk the pudding mix with cold milk until thick; let it set for 2 minutes, then fold in the whipped topping gently.
Spoon the creamy pudding over the cookie base, spreading smoothly. Layer the strawberries, blueberries, and banana slices in a red‑white‑blue pattern, leaving a little space for the final drizzle.
Drizzle melted chocolate over the top, add a few extra berries for garnish, and refrigerate the cups for at least 30 minutes before serving.
Notes & Tips
- 1 If you prefer a sweeter base, add a tablespoon of sugar to the cookie‑butter mixture.
- 2 For extra crunch, sprinkle a pinch of crushed graham crackers on top just before serving.
- 3 You can replace banana with white grapes for a different white‑fruit texture.
Tools You'll Need
-
Food processor or zip‑top bag and rolling pin
-
Measuring cups and spoons
-
Mixing bowls
-
Spatula
-
Serving cups
Must-Know Tips
- Don't over‑mix the pudding, it will lose its light texture.
- Let the chocolate drizzle cool slightly before drizzling; it stays glossy.
- Taste the fruit before adding; adjust sweetness with a dash of sugar if needed.
Professional Secrets
- Room temperature butter mixes more evenly with crumbs, ensuring a smooth base.
- Use chilled pudding for a firmer layer that holds its shape.
- Drizzle chocolate in a thin stream to create a delicate web rather than a thick coating.

Recipe by
EmilyEmily is a passionate food blogger and seasoned recipe creator at Arbmom Recipe, where she brings her culinary expertise and creativity to home cooks ...
Get Delicious Recipes Weekly
Join 25,000+ home cooks getting our best recipes straight to their inbox.
Free forever • No spam • Unsubscribe anytime