Why You'll Love It
- - No oven needed, perfect for hot days
- - Fresh berries add natural sweetness
- - Creamy cheesecake base feels indulgent yet light
- - Easy to assemble, even with kids helping
*"The colors are stunning, the taste is pure nostalgia – a must for any holiday spread!"*
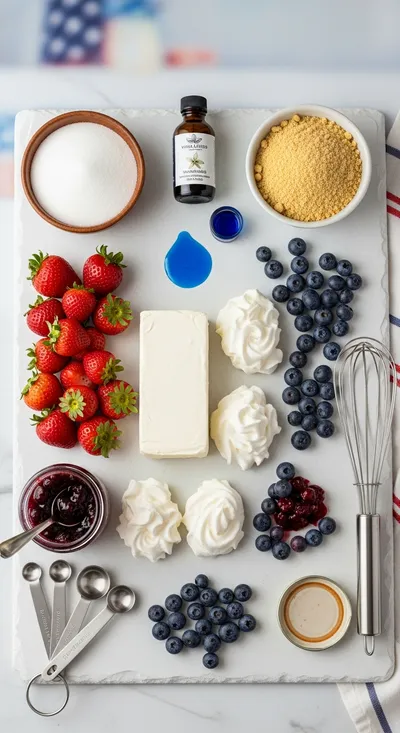
Essential Ingredient Guide
- Cream cheese: Choose full‑fat for richness; let it soften to room temperature for smooth mixing
- Mixed berries (strawberries, blueberries): Use fresh, ripe berries; slice strawberries thinly for even layers
- Whipped topping: A light, airy topping balances the dense cheesecake base
- Sugar: Granulated sugar dissolves quickly in the cream cheese mixture
- Lemon juice: A splash brightens the flavor and helps the filling set
- Vanilla extract: Just a dash adds warmth without overpowering the berries

Complete Cooking Process
-
Ingredient Readiness:
Soften the cream cheese, whip the topping, and wash the berries before you start.
-
Flavor Development:
Mix the cream cheese with sugar, lemon, and vanilla until silky; this is where the subtle tang forms.
-
Texture Control:
Fold the whipped topping gently to keep the mixture airy, then layer berries carefully to preserve their burst.
-
Finishing Touches:
Dust a pinch of powdered sugar on top, add a few whole berries for garnish, and let the salad chill.
-
Serving Timing:
Serve after at least an hour in the fridge; the flavors meld and the salad stays cool on a warm day.
- Chill the mixing bowl for a smoother cheesecake base
- Pat dry berries to avoid excess moisture
- Layer colors in order: white, red, then blue for visual impact
- Use a clear glass bowl to showcase the patriotic layers
Pro Tips
Well, these little adjustments make a world of difference. I remember once I rushed the layering and the colors ran together – oops! Taking a minute to dry each berry and keep the bowl chilled saved the look and the texture. It’s a gentle reminder that patience adds polish.

The essence of the dish:
A fun fact or historical angle:
Flavor or sensory focus:
You Must Know
- Make sure the cream cheese is fully softened
- Avoid over‑mixing once whipped topping is added
- Keep the salad chilled until serving
Frequently Asked Questions
→ Can I use frozen berries?
Yes, thaw them fully and pat dry; this prevents extra water from making the salad soggy.
→ Is this gluten‑free?
Absolutely, there are no grains or gluten ingredients in this recipe.
→ How long can it be stored?
Keep it refrigerated, covered, for up to 2 days; the berries may soften a bit but the flavor stays bright.
→ Can I make it vegan?
Swap cream cheese for a plant‑based cream cheese and use coconut whipped topping for a vegan version.
→ What if I don’t have a glass bowl?
Any clear serving dish works – a mason jar or a transparent trifle bowl adds charm.
→ Is it suitable for kids?
Definitely; the soft texture and sweet fruit make it a kid‑friendly treat.
Chef's Tips
Chill the salad for at least 30 minutes before serving to let flavors meld.,Pat berries dry to keep the salad from becoming watery.,If you prefer extra sweetness, drizzle a little honey over the strawberry layer.
Nutrition Facts
per serving
250
Calories
5g
Protein
18g
Carbs
18g
Fat
Taste Profile
Creamy with bright berry sweetness
Ingredient Substitutions
Don't have an ingredient? Try these alternatives
Slightly lower fat, keeps the texture smooth
Adds tang and reduces sugar
Recipe Variations
Try these delicious twists on the original
Spicy Version
Add a pinch of cinnamon to the cream cheese and a drizzle of chili honey over the strawberry layer.
Mediterranean Style
Swap strawberries for pomegranate seeds and add a sprinkle of feta crumbles for a savory contrast.
Common Mistakes to Avoid
Learn from others' mistakes for perfect results
- Over‑mixing the whipped topping, which makes it dense
- Using wet berries, leading to a watery salad
- Skipping the chilling step, resulting in a less cohesive texture
Meal Prep & Storage
Make Ahead Tips
You can assemble the layers up to 12 hours ahead; just keep the salad covered and refrigerated.
Leftover Ideas
Re‑stir gently before serving; add a splash of milk if the texture has thickened.
Perfect Pairings
Serve this with...
Cooking Timeline
Gather and prep all ingredients – soften cheese, slice strawberries, wash berries.
Mix cream cheese, sugar, vanilla, and lemon; fold in whipped topping.
Layer the mixture and berries in the serving bowl.
Garnish, cover, and chill the salad.
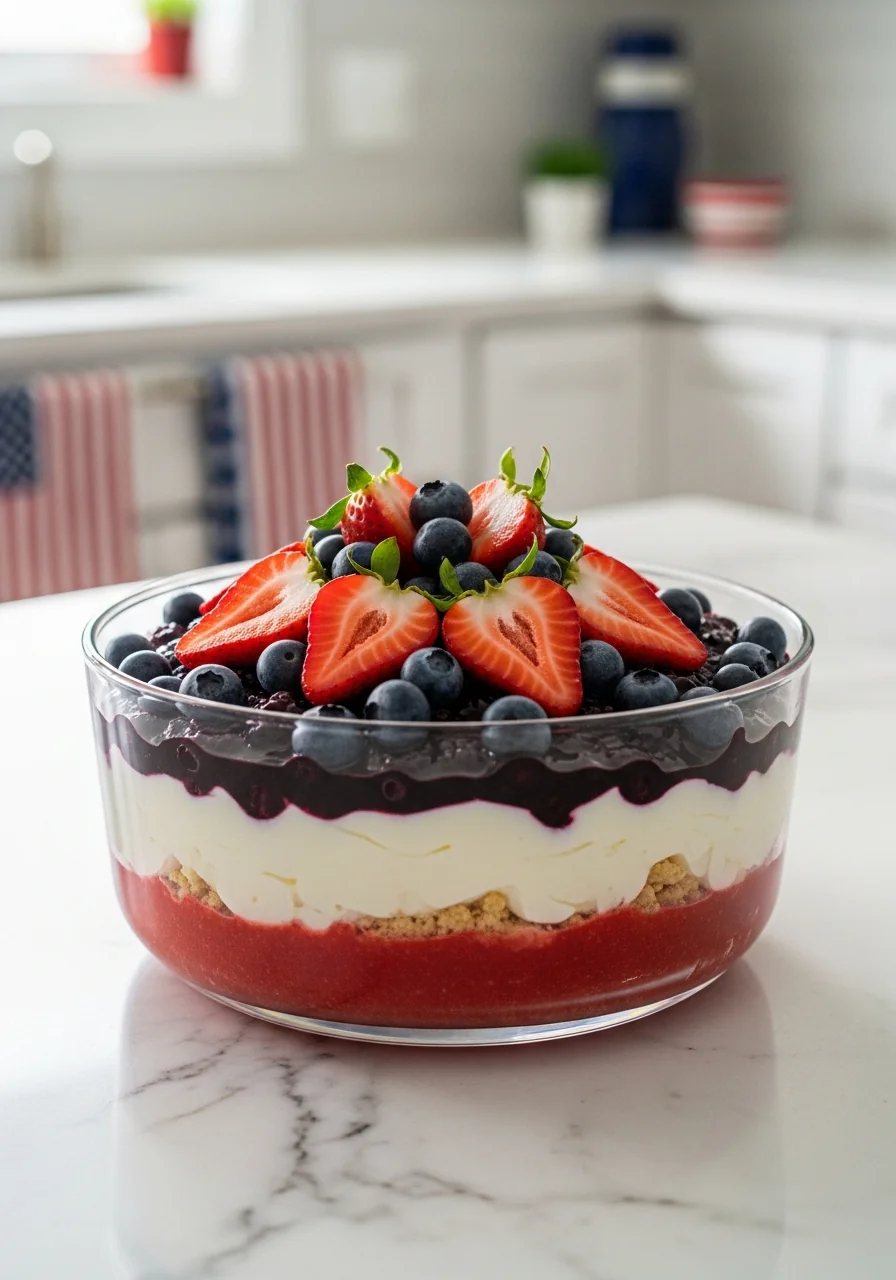
Red White and Blue Cheesecake Salad
A patriotic, creamy cheesecake salad layered with fresh berries and whipped cream, perfect for a July brunch or festive snack.
Timing
Prep Time
15 Minutes
Cook Time
0 Minutes
Total Time
15 Minutes
Recipe Details
Ingredients
Base
- 01 8 oz cream cheese, softened
- 02 1/4 cup granulated sugar
- 03 1 tsp vanilla extract
- 04 1 tbsp lemon juice
- 05 1 cup whipped topping
Layers
- 01 1 cup fresh strawberries, sliced
- 02 1 cup fresh blueberries
- 03 1/2 cup sweetened shredded coconut (optional for texture)
- 04 Fresh mint leaves for garnish
Instructions
In a bowl, beat the softened cream cheese with sugar until smooth, then stir in vanilla and lemon juice.
Gently fold the whipped topping into the cheese mixture; avoid over‑mixing so it stays fluffy.
In a clear serving bowl, spread a thin layer of the cheesecake mixture as the white base.
Layer sliced strawberries (red) over the base, then sprinkle blueberries (blue) on top; repeat layers if desired.
Finish with a dollop of whipped topping, a sprinkle of coconut if using, and garnish with mint leaves.
Notes & Tips
- 1 Chill the salad for at least 30 minutes before serving to let flavors meld.
- 2 Pat berries dry to keep the salad from becoming watery.
- 3 If you prefer extra sweetness, drizzle a little honey over the strawberry layer.
Tools You'll Need
-
Large mixing bowl
-
Hand mixer or whisk
-
Spatula
-
Sharp knife
-
Clear serving bowl
Must-Know Tips
- Don’t over‑mix the whipped topping, it can become dense.
- Keep the bowl cold; it helps the cheese hold its shape.
- Taste and adjust sugar before folding in the topping.
Professional Secrets
- Room temperature cream cheese blends seamlessly, avoiding lumps.
- Folding technique preserves air for a lighter texture.
- Layering in a glass dish showcases the patriotic colors.

Recipe by
EmilyEmily is a passionate food blogger and seasoned recipe creator at Arbmom Recipe, where she brings her culinary expertise and creativity to home cooks ...
Get Delicious Recipes Weekly
Join 25,000+ home cooks getting our best recipes straight to their inbox.
Free forever • No spam • Unsubscribe anytime