Why You'll Love It
- - No oven required, perfect for hot days
- - Fresh strawberry flavor shines through
- - Individual cups make serving easy
- - Little indulgence that feels elegant
*"These cups are like a bite‑size vacation – pure, creamy, and effortlessly beautiful!"*
Essential Ingredient Guide
- Graham cracker crust: Provides a buttery, slightly crunchy base; crush fine for smooth texture.
- Cream cheese: Room‑temperature cheese blends silkily; avoid over‑mixing to keep it airy.
- Strawberries: Fresh berries give natural sweetness and bright color; slice thin for layers.
- Sugar: Balances the tang of cheese; adjust if berries are very sweet.
- Lemon juice: Adds a subtle brightness that lifts the whole cup.
- Whipped topping: Lightens the filling; choose a stable brand for firm cups.
Complete Cooking Process
-
Ingredient Readiness:
Gather all components, crush the crackers, and let the cream cheese soften on the counter.
-
Flavor Development:
Combine the strawberry puree with a touch of lemon and sugar, letting the aroma mingle while the crust sets.
-
Texture Control:
Fold the whipped topping into the cream cheese gently, preserving air for a light bite.
-
Finishing Touches:
Layer crust, filling, and strawberry slices; chill until firm, then garnish with a mint leaf.
-
Serving Timing:
Serve straight from the fridge; the cups hold their shape best when cold.
- Press the crust firmly for an even base
- Use a hand‑mixer for the cream cheese to avoid lumps
- Top with whole strawberries for visual appeal
- Chill at least 2 hours for proper set
Pro Tips
I often find a little extra time in the fridge makes the difference between a wobble and a confident bite. When the cups are perfectly set, the texture feels like a soft pillow that gives way to the fresh strawberry burst. It's a quiet moment of satisfaction, especially when guests notice that no baking was involved.
The essence of the dish:
A fun fact or historical angle:
Flavor or sensory focus:
You Must Know
- Use fresh berries for brightest flavor
- Do not over‑mix the filling
- Chill long enough for firm layers
Frequently Asked Questions
→ Can I use a different crust?
Absolutely. Almond flour or pretzel crumbs work well for a gluten‑free alternative.
→ How long can I store the cups?
Keep them sealed in the refrigerator for up to 3 days; the texture stays luscious.
→ Can I freeze them?
Freezing is not recommended as the texture of the whipped topping can change.
→ What if I don’t have fresh strawberries?
Frozen strawberries, thawed and drained, can be used, though fresh yields the best flavor.
→ Is this recipe suitable for a low‑sugar diet?
You can reduce the added sugar or replace it with a natural sweetener like stevia.
→ Can I make these cups vegan?
Swap cream cheese for a vegan cream cheese and use a plant‑based whipped topping; the crust can stay the same or use vegan butter.
Chef's Tips
If the crust feels too dry, add a tiny drizzle of extra melted butter.,For extra strawberry intensity, macerate the sliced berries in a splash of orange liqueur (omit for no‑alcohol).,Use a piping bag for a cleaner finish on the cream cheese layer.
Nutrition Facts
per serving
220
Calories
4g
Protein
22g
Carbs
13g
Fat
Taste Profile
A bright, creamy strawberry delight
Ingredient Substitutions
Don't have an ingredient? Try these alternatives
Provides a similar buttery base; crush finely.
For dairy‑free; chill the can first for best volume.
Recipe Variations
Try these delicious twists on the original
Spicy Version
Add a pinch of cayenne and drizzle a thin layer of honey for a subtle heat.
Mediterranean Style
Mix in a spoonful of chopped pistachios and a drizzle of orange blossom honey.
Common Mistakes to Avoid
Learn from others' mistakes for perfect results
- Skipping the chill step, resulting in a runny filling
- Over‑mixing the cream cheese, making it dense
- Using stale crackers, which affect crust texture
Meal Prep & Storage
Make Ahead Tips
You can press the crust and chill it up to 24 hours ahead, then add the strawberry and filling when ready to serve.
Leftover Ideas
Keep leftovers refrigerated; gently stir the filling before serving if it settles.
Perfect Pairings
Serve this with...
Cooking Timeline
Prepare crust: crush crackers, mix with butter, press into ramekins.
Blend cream cheese, sugar, vanilla, lemon juice, and whipped topping.
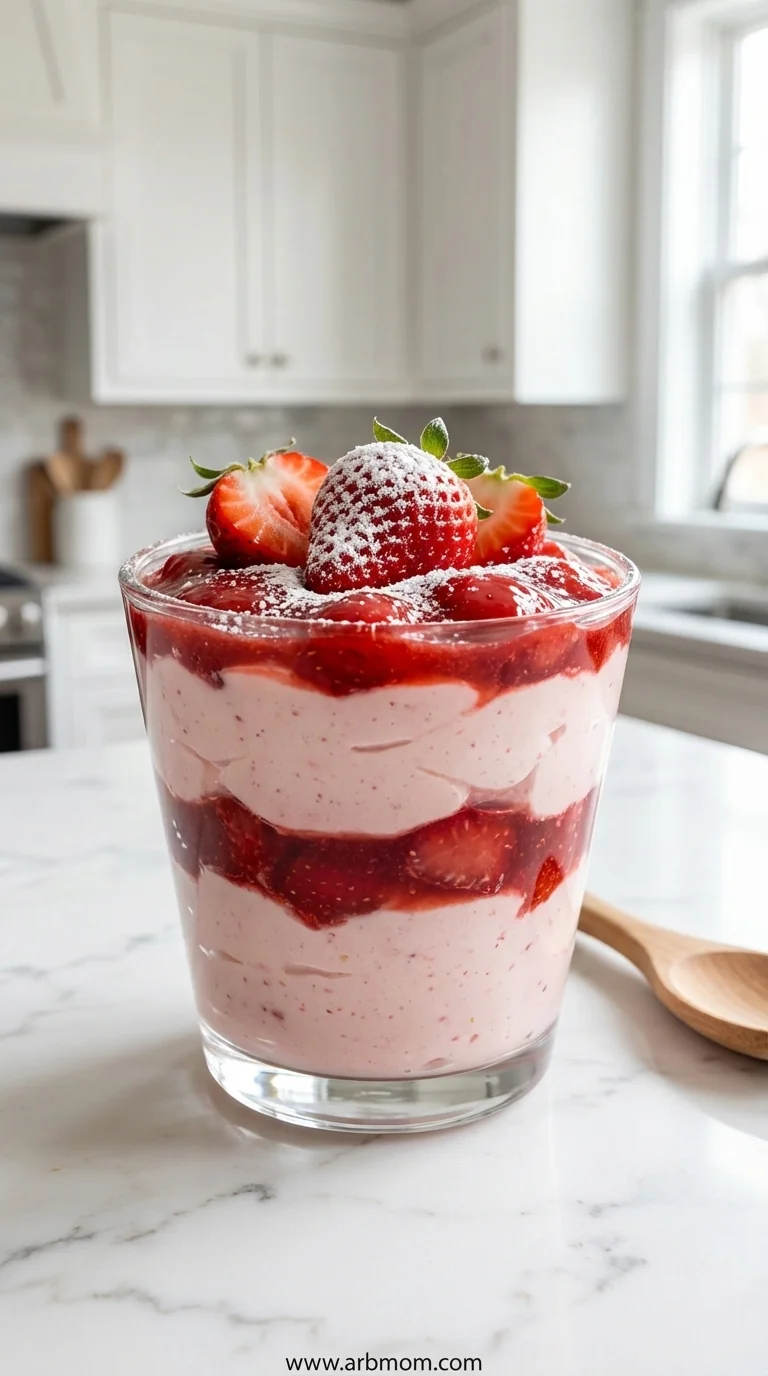
Layer jam and sliced strawberries over crust.
Add cream cheese filling, smooth tops, and chill.
Garnish with whole strawberry and mint before serving.
No-Bake Strawberry Cheesecake Cups
Enjoy creamy no-bake strawberry cheesecake cups layered with fresh berries and silky filling – a quick, delightful dessert that feels like a little celebration in every spoonful.
Timing
Prep Time
15 Minutes
Cook Time
0 Minutes
Total Time
15 Minutes
Recipe Details
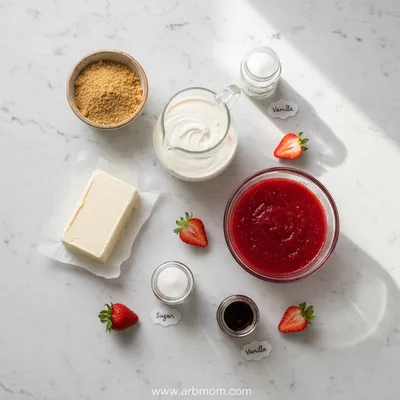
Ingredients
Crust
- 01 1 cup graham cracker crumbs
- 02 2 tbsp melted butter
- 03 1 tbsp sugar
Filling
- 01 8 oz cream cheese, softened
- 02 1/3 cup powdered sugar
- 03 1 tsp vanilla extract
- 04 1/2 cup whipped topping
- 05 1 tbsp lemon juice
Strawberry Layer
- 01 1 cup fresh strawberries, hulled and sliced
- 02 2 tbsp strawberry jam
- 03 1 tsp sugar (optional)
Garnish
- 01 Whole strawberry slice
- 02 Fresh mint leaf
Instructions
Combine graham cracker crumbs, melted butter, and sugar; press the mixture into the bottom of six 4‑oz ramekins to form an even crust.
In a bowl, beat the softened cream cheese with powdered sugar and vanilla until smooth; fold in the whipped topping, lemon juice, and a pinch of salt.
Spread a thin layer of the strawberry‑jam mixture over the crust, then layer sliced strawberries evenly.
Pipe or spoon the cream cheese filling over the berries, smoothing the tops. Chill the cups for at least 2 hours.
Before serving, garnish each cup with a whole strawberry slice and a tiny mint leaf for a fresh finish.
Notes & Tips
- 1 If the crust feels too dry, add a tiny drizzle of extra melted butter.
- 2 For extra strawberry intensity, macerate the sliced berries in a splash of orange liqueur (omit for no‑alcohol).
- 3 Use a piping bag for a cleaner finish on the cream cheese layer.
Tools You'll Need
-
Ramekins or small glasses
-
Mixing bowls
-
Hand mixer or whisk
-
Spatula
-
Measuring cups and spoons
-
Food processor (optional for crumbs)
Must-Know Tips
- Press the crust firmly to avoid cracks
- Do not over‑beat the cream cheese, keep it airy
- Chill long enough for the filling to set
- Garnish right before serving to keep mint fresh
Professional Secrets
- Room‑temperature cheese blends without lumps
- A brief chill of the crust before adding filling prevents sogginess
- Fold whipped topping gently to retain air

Recipe by
EmilyEmily is a passionate food blogger and seasoned recipe creator at Arbmom Recipe, where she brings her culinary expertise and creativity to home cooks ...
Get Delicious Recipes Weekly
Join 25,000+ home cooks getting our best recipes straight to their inbox.
Free forever • No spam • Unsubscribe anytime