Why You'll Love It
- - No oven needed, perfect for hot days
- - Creamy texture that melts on the tongue
- - Spiced crust adds comforting depth
- - Quick to assemble, great for gatherings
*"A slice feels like a sweet memory—soft, fragrant, and perfectly balanced."*
Essential Ingredient Guide
- Speculoos cookies: Choose the buttery, caramel‑spiced variety; they provide the foundation and crunchy contrast.
- Cream cheese: Use full‑fat cream cheese for richness; let it soften before mixing.
- Whipped cream: Creates a light, airy filling that prevents heaviness.
- Vanilla extract: Adds aromatic warmth; a little goes far.
- Lemon juice: A splash brightens the sweet cream and balances flavor.
- Honey: Provides gentle sweetness and helps the crust stick together.
Complete Cooking Process
-
Ingredient Readiness:
Gather the cookies, soften the cheese, and chill the cream; each component should be at room temperature before blending.
-
Flavor Development:
When the cream cheese meets the vanilla and lemon, a subtle aroma fills the kitchen, deepening the dessert’s personality.
-
Texture Control:
Fold the whipped cream gently to keep the filling light, and press the crust firmly but not over‑packed.
-
Finishing Touches:
Top with a dusting of crushed speculoos and a drizzle of honey just before serving.
-
Serving Timing:
Allow the cheesecake to set in the fridge for at least two hours; this lets the flavors meld and the crust firm up.
- Use a food processor for the crust so the crumbs are uniform.
- Line the pan with parchment for easy removal.
- Chill the bowl and whisk when whipping cream for maximum volume.
- Add a pinch of sea salt to the crust for hidden depth.
Pro Tips
These small steps can transform a simple dessert into something memorable. I often find that a well‑pressed crust holds its shape beautifully, and a quick whisk of the cream creates that airy lift we all love. Take a moment to taste the filling before it goes in the pan; you might discover you need a touch more lemon or honey.
The essence of the dish:
A fun fact or historical angle:
Flavor or sensory focus:
You Must Know
- Use room‑temperature cheese
- Do not over‑mix the filling
- Chill before slicing
Frequently Asked Questions
→ Can I use gluten‑free cookies?
Yes, substitute gluten‑free spiced biscuits; the flavor stays the same, just ensure they bind well with the honey.
→ How long can it be stored?
Keep refrigerated in an airtight container for up to three days; the crust may soften slightly but remains delicious.
→ Can I add fruit toppings?
Fresh berries or a drizzle of orange marmalade complement the spice nicely; add just before serving.
→ Is it suitable for a winter holiday?
Absolutely; the warm spices evoke holiday memories, and no baking keeps the kitchen cool.
→ What if I don’t have a food processor?
Place the cookies in a zip‑top bag and crush them with a rolling pin; then whisk with melted butter.
→ Can I make mini cheesecakes?
Yes, press the crust into individual jars or ramekins and fill; they set faster and look charming.
Chef's Tips
If the crust feels dry, add a splash more melted butter.,For extra sparkle, sprinkle a tiny pinch of cinnamon on the top.,When folding whipped cream, use a gentle motion to keep the filling airy.
Nutrition Facts
per serving
310
Calories
5g
Protein
23g
Carbs
22g
Fat
Taste Profile
A balanced sweet‑spice harmony with a creamy finish
Ingredient Substitutions
Don't have an ingredient? Try these alternatives
Provides a richer flavor; may need a bit more honey to balance sweetness.
Gives a lighter flavor; use the same amount.
Recipe Variations
Try these delicious twists on the original
Spicy Version
Add a pinch of cayenne and a drizzle of sriracha for a subtle heat that lifts the spices.
Chocolate Swirl
Fold in melted dark chocolate into half of the filling for a chocolate‑marbled effect.
Common Mistakes to Avoid
Learn from others' mistakes for perfect results
- Over‑mixing the cream cheese leading to a grainy texture.
- Skipping the chill step, which results in a soft, unstable crust.
- Adding too much honey, making the filling overly sweet.
Meal Prep & Storage
Make Ahead Tips
Prepare the crust and filling up to step 4; keep the assembled cheesecake covered in the fridge for up to 24 hours before serving.
Leftover Ideas
Refrigerate slices in an airtight container; enjoy within three days. Warm gently in the microwave for 10 seconds if you prefer a softer texture.
Perfect Pairings
Serve this with...
Cooking Timeline
Prepare crust ingredients and press into pan.
Mix and beat cream cheese filling.
Fold whipped cream into the filling.
Spread filling over crust and refrigerate.
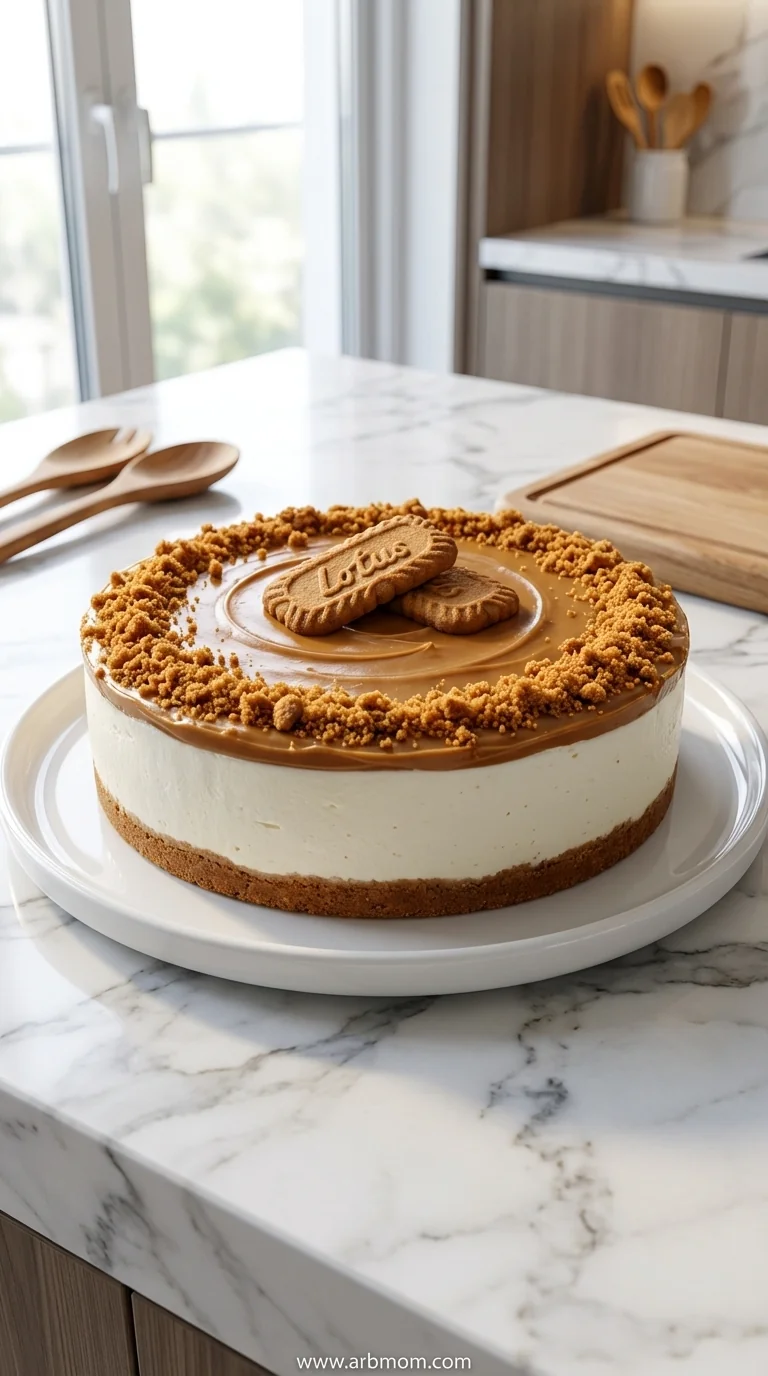
No-Bake Speculoos Cheesecake
A silky, no‑bake cheesecake layered on a buttery speculoos crust, ready in minutes and perfect for a quiet afternoon treat.
Timing
Prep Time
15 Minutes
Cook Time
0 Minutes
Total Time
15 Minutes
Recipe Details
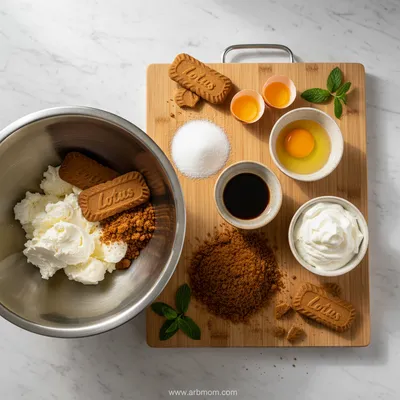
Ingredients
Crust
- 01 2 cups speculoos cookies, finely crushed
- 02 3 tbsp melted butter
- 03 1 tbsp honey
Filling
- 01 16 oz (450 g) cream cheese, softened
- 02 1 cup heavy whipping cream
- 03 1/3 cup honey
- 04 1 tsp vanilla extract
- 05 1 tbsp fresh lemon juice
- 06 Pinch of sea salt
Instructions
Combine crushed speculoos, melted butter, and honey in a bowl; stir until the mixture resembles wet sand.
Press the crust mixture firmly into the base of a 9‑inch springform pan; chill while you prepare the filling.
In a large mixing bowl, beat the softened cream cheese until smooth, then add honey, vanilla, lemon juice, and salt; mix gently.
In a separate bowl, whip the heavy cream to soft peaks; fold it into the cream cheese mixture until fully incorporated.
Spread the filling over the chilled crust, smooth the top, and refrigerate for at least 2 hours or until set.
Before serving, garnish with crushed speculoos crumbs and a drizzle of honey; slice and enjoy.
Notes & Tips
- 1 If the crust feels dry, add a splash more melted butter.
- 2 For extra sparkle, sprinkle a tiny pinch of cinnamon on the top.
- 3 When folding whipped cream, use a gentle motion to keep the filling airy.
Tools You'll Need
-
Food processor or zip‑top bag and rolling pin
-
Springform pan (9‑inch)
-
Mixing bowls
-
Hand mixer or stand mixer
-
Spatula
-
Measuring cups and spoons
Must-Know Tips
- Don't over‑mix the cream cheese or it can become grainy.
- Let the crust set in the fridge before adding filling.
- Taste the filling before chilling; adjust lemon or honey as needed.
Professional Secrets
- Room temperature cheese ensures a smooth blend without lumps.
- Cold whipped cream retains volume longer, giving a light texture.
- Pressing the crust evenly prevents cracks when slicing.

Recipe by
EmilyEmily is a passionate food blogger and seasoned recipe creator at Arbmom Recipe, where she brings her culinary expertise and creativity to home cooks ...
Get Delicious Recipes Weekly
Join 25,000+ home cooks getting our best recipes straight to their inbox.
Free forever • No spam • Unsubscribe anytime