Why You'll Love It
- - No oven required, perfect for hot days
- - Creamy texture that feels luxurious
- - Quick to assemble, set while you relax
- - Versatile base for endless toppings
*"The texture is like a cloud that melts on your tongue—pure comfort!"*
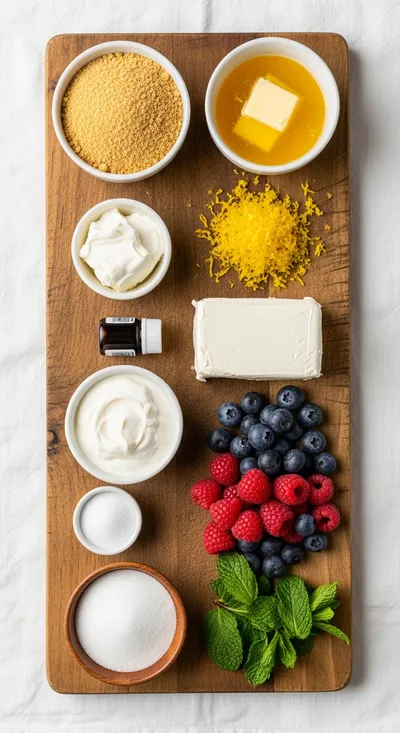
Essential Ingredient Guide
- Cream cheese: Choose full‑fat cream cheese; it gives the dessert its rich mouthfeel and helps it set firmly.
- Graham cracker crumbs: Lightly toasted crumbs add a subtle crunch and buttery flavor to the crust.
- Lemon zest: A pinch brightens the flavor without overpowering the sweet cream.
- Vanilla extract: Pure vanilla adds depth; a splash is enough to perfume the entire cheesecake.
- Heavy cream: Whipped into soft peaks, it lightens the filling, giving it that airy lift.
- Fresh berries: They add a burst of acidity and a beautiful color contrast on top.
Complete Cooking Process
-
Ingredient Readiness:
Soften the cream cheese, whip the heavy cream, and toast the crumbs—all before the fridge even gets a chance to cool.
-
Flavor Development:
Blend the cheese with sugar and vanilla; the aroma spreads through the kitchen, coaxing a smile.
-
Texture Control:
Fold the whipped cream gently to keep the mixture airy; too much stirring will deflate the clouds.
-
Finishing Touches:
Spread the filling over the crust, smooth the top, then crown with berries or a drizzle of sauce.
-
Serving Timing:
Let the cheesecake chill for at least four hours; the longer, the smoother the slice.
- Use room‑temperature cream cheese to avoid lumps
- Press the crust firmly for an even base
- Top just before serving to keep berries fresh
- Freeze leftovers for a quick bite later
Pro Tips
Well, these little adjustments can make a world of difference. I usually press the crust with the back of a measuring cup, feeling the gentle resistance as it settles. Then, when the time comes to serve, a quick garnish of fresh fruit adds a pop of color and a whisper of tartness that balances the richness perfectly. It’s those tiny moments that turn a simple dessert into a cherished memory.
The essence of the dish:
A fun fact or historical angle:
Flavor or sensory focus:
You Must Know
- Crust should be compact, not crumbly
- Set time is essential for firm slices
- Gentle folding keeps the texture airy
Frequently Asked Questions
→ Can I use a gluten‑free crust?
Absolutely! Swap the graham crackers for almond flour or gluten‑free cookie crumbs; just add a bit more melted butter to bind.
→ How long can I keep it refrigerated?
The cheesecake stays fresh for up to five days, covered tightly, though the texture is best within the first three.
→ What toppings work best?
Fresh berries, caramel drizzle, or a sprinkle of toasted nuts—all add texture and flavor without overpowering.
→ Do I need a springform pan?
A springform pan makes removal easy, but a simple pie dish works fine; just loosen the edges before chilling.
→ Can I make it ahead for a party?
Yes, assemble the day before and let it set overnight; it’ll be ready to slice when guests arrive.
→ Is there a dairy‑free version?
Swap cream cheese for a vegan cream cheese alternative and use coconut cream in place of heavy cream.
Chef's Tips
For a richer flavor, add a splash of bourbon‑free vanilla liqueur (optional).,If the crust seems dry, add an extra tablespoon of butter.,Use a rubber spatula to scrape every last bit of creamy goodness.
Nutrition Facts
per serving
340
Calories
6g
Protein
28g
Carbs
22g
Fat
Taste Profile
Creamy, subtly sweet with a hint of citrus
Ingredient Substitutions
Don't have an ingredient? Try these alternatives
Lower fat content; may result in a slightly lighter texture.
Provides a similar buttery flavor with a subtle malt note.
Recipe Variations
Try these delicious twists on the original
Spicy Version
Add a pinch of ground ginger and a drizzle of chocolate peanut butter sauce for a warm kick.
Mediterranean Style
Fold in chopped pistachios and a hint of orange blossom water; garnish with toasted almond slices.
Common Mistakes to Avoid
Learn from others' mistakes for perfect results
- Over‑mixing the filling, which can make it grainy.
- Pressing the crust too loosely, leading to cracks.
- Skipping the chilling time, resulting in a runny slice.
Meal Prep & Storage
Make Ahead Tips
You can assemble the cheesecake the night before; let it chill overnight for a firmer slice.
Leftover Ideas
Refrigerate leftovers in an airtight container; enjoy a spoonful as a quick snack.
Perfect Pairings
Serve this with...
Cooking Timeline
Prepare crust: combine crumbs, butter, and sugar; press into pan.
Blend cream cheese, sugar, vanilla, and lemon zest until smooth.
Fold whipped cream gently; spread mixture over crust.
Cover and refrigerate for at least four hours.
Garnish with berries or sauce just before serving.
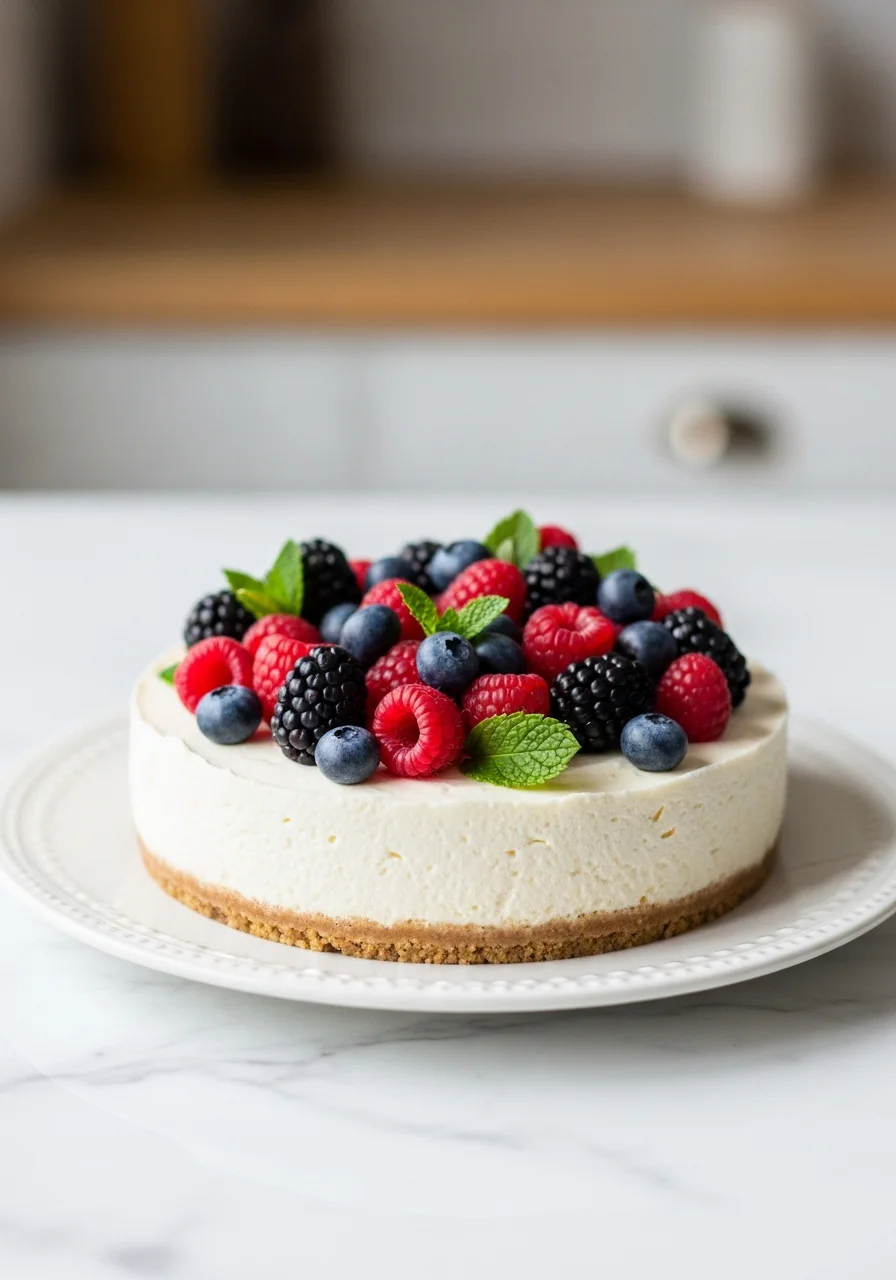
No-Bake Cheesecake Recipe
A silky, creamy No-Bake Cheesecake that sets in the fridge, offering a rich texture and subtle vanilla aroma without turning on the oven.
Timing
Prep Time
20 Minutes
Cook Time
0 Minutes
Total Time
4 Hours 20 Minutes
Recipe Details
Ingredients
Crust
- 01 1½ cups graham cracker crumbs
- 02 3 tbsp melted butter
- 03 2 tbsp sugar
Filling
- 01 16 oz full‑fat cream cheese, softened
- 02 ½ cup powdered sugar
- 03 1 tsp vanilla extract
- 04 2 tbsp lemon zest
- 05 1 cup heavy cream, whipped
- 06 ¼ cup fresh berries for topping
Instructions
Combine the graham cracker crumbs, melted butter, and sugar in a bowl; press the mixture firmly into the bottom of a 9‑inch springform pan.
In a large bowl, beat the softened cream cheese until smooth, then add powdered sugar, vanilla, and lemon zest; mix until fully incorporated.
Gently fold the whipped cream into the cheese mixture, being careful not to deflate the airy texture.
Spread the filling evenly over the crust, smooth the top with a spatula, and chill for at least four hours or overnight.
Before serving, garnish with fresh berries or a drizzle of your favorite sauce; consider pairing with strawberry swirl for a fruity contrast.
Notes & Tips
- 1 For a richer flavor, add a splash of bourbon‑free vanilla liqueur (optional).
- 2 If the crust seems dry, add an extra tablespoon of butter.
- 3 Use a rubber spatula to scrape every last bit of creamy goodness.
Tools You'll Need
-
9‑inch springform pan
-
Mixing bowls
-
Hand mixer or stand mixer
-
Rubber spatula
-
Measuring cups and spoons
-
Food processor (optional for crumbs)
Must-Know Tips
- Don't over‑mix the cream cheese; it can become grainy.
- Press the crust evenly to avoid cracks.
- Let the cheesecake sit at room temperature for 10 minutes before slicing for cleaner cuts.
Professional Secrets
- Room temperature cream cheese ensures a smooth blend.
- Whip the heavy cream to soft peaks for optimal lightness.
- Cover the cheesecake with parchment while chilling to prevent condensation.

Recipe by
EmilyEmily is a passionate food blogger and seasoned recipe creator at Arbmom Recipe, where she brings her culinary expertise and creativity to home cooks ...
Get Delicious Recipes Weekly
Join 25,000+ home cooks getting our best recipes straight to their inbox.
Free forever • No spam • Unsubscribe anytime