Why You'll Love It
- - Easy to assemble with simple ingredients
- - Flaky crust that melts in your mouth
- - Sweet‑spiced apple filling feels homey
- - Perfect for parties or quiet evenings
*"These mini pies are pure nostalgia in a bite—my kids can’t get enough!"*
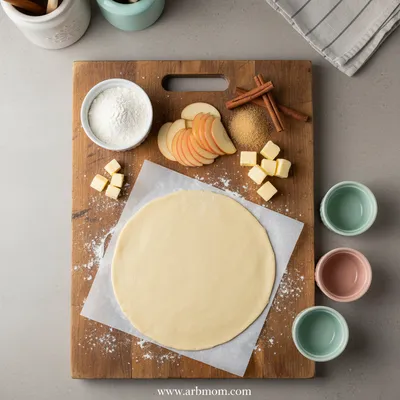
Essential Ingredient Guide
- Apples: Choose firm, slightly tart apples like Granny Smith; they hold shape and balance the sweetness.
- All‑purpose flour: Provides structure for the crust; sift for a lighter texture.
- Unsalted butter: Cold butter creates flaky layers; cut into small cubes.
- Cinnamon & nutmeg: Warm spices add depth; toast lightly to release aroma.
- Lemon juice: Brightens the filling and prevents apples from browning.
- Brown sugar: Adds caramel notes without overwhelming the fruit.
Complete Cooking Process
-
Ingredient Readiness:
Dice apples, chill butter, and whisk flour with salt before you begin.
-
Flavor Development:
Sauté apples with butter, sugar, and spices until they soften and caramelize.
-
Texture Control:
Handle the dough gently; over‑mixing will make the crust tough.
-
Finishing Touches:
Brush tops with a little egg wash for a glossy, golden finish.
-
Serving Timing:
Serve warm, perhaps with a scoop of vanilla ice cream, while the crust is still crisp.
- Keep butter cold for maximal flakiness
- Don’t over‑fill; a small edge prevents overflow
- Use a fork to press edges for a decorative seal
- Let pies rest 5 minutes before serving
Pro Tips
I’ve found that letting the pies sit just a few minutes after they leave the oven lets the filling settle, so the first bite isn’t too runny. It’s a small pause that makes the whole experience feel a little more thoughtful, like a quiet moment over a cup of tea.
The essence of the dish:
A fun fact or historical angle:
Flavor or sensory focus:
You Must Know
- Cold ingredients are key
- Don’t over‑mix the dough
- Watch the edges for perfect browning
Frequently Asked Questions
→ Can I freeze the mini apple pies?
Yes, freeze after baking; reheat in a low oven for a few minutes before serving.
→ What apples work best?
Granny Smith, Honeycrisp, or a mix of sweet and tart varieties give the best texture and flavor.
→ Do I need a special pan?
A standard muffin tin works fine; you can also use mini tart pans for a fancier look.
→ How do I make the crust gluten‑free?
Swap the all‑purpose flour for a gluten‑free blend and add a tablespoon of xanthan gum.
→ Can I add raisins or nuts?
Absolutely—add a handful of raisins or chopped walnuts to the filling for extra texture.
→ What’s the best way to store leftovers?
Cover tightly and keep in the refrigerator for up to three days; reheat gently.
Chef's Tips
If the dough feels sticky, refrigerate a few minutes longer.,Adjust sugar based on apple sweetness; you may need less brown sugar for very ripe apples.,For extra shine, brush with a little melted butter after baking.
Nutrition Facts
per serving
210
Calories
2g
Protein
30g
Carbs
9g
Fat
Taste Profile
Warm, sweet‑spiced comfort
Ingredient Substitutions
Don't have an ingredient? Try these alternatives
Add xanthan gum if the blend lacks it.
Reduce liquid elsewhere if substituting with a wet sweetener.
Recipe Variations
Try these delicious twists on the original
Spicy Version
Add a pinch of cayenne pepper and a drizzle of maple syrup for a gentle heat.
Mediterranean Style
Incorporate a sprinkle of toasted walnuts and a dash of orange zest into the filling.
Common Mistakes to Avoid
Learn from others' mistakes for perfect results
- Over‑mixing dough, which makes crust tough.
- Filling pies too full—causing overflow.
- Skipping the egg wash, leading to a dull crust.
Meal Prep & Storage
Make Ahead Tips
Prepare the crust a day ahead and keep refrigerated; the filling can be made up to 24 hours in advance and stored in the fridge.
Leftover Ideas
Reheat gently in a preheated oven at 300°F for 5‑7 minutes to restore crispness.
Perfect Pairings
Serve this with...
Cooking Timeline
Prepare crust dough and chill; dice apples.
Cook apple filling until soft and caramelized.
Roll out dough, cut circles, and press into tins.
Fill, glaze, and bake mini pies; cool slightly.
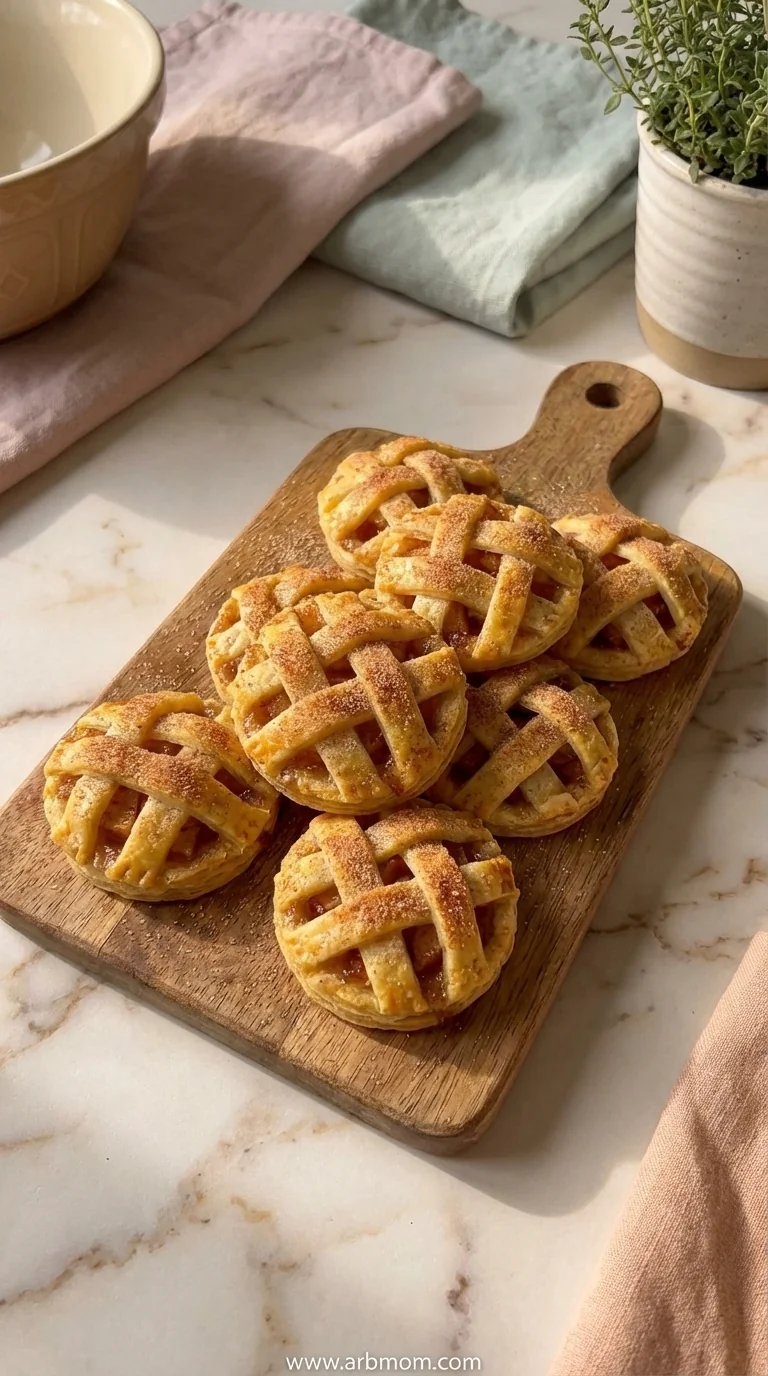
Mini Apple Pies – Easy Dessert Recipe
These mini apple pies bring together a buttery, flaky crust and a sweet, spiced apple filling that feels like a warm hug on a plate. Perfect for a quiet afternoon or a gathering, they melt in your mouth while the aroma of cinnamon and butter lingers in the kitchen. Honestly, they’re simple enough for a beginner, yet comforting enough to make any family member smile.
Timing
Prep Time
20 Minutes
Cook Time
25 Minutes
Total Time
45 Minutes
Recipe Details
Ingredients
Crust
- 01 2 cups all‑purpose flour
- 02 1/2 tsp salt
- 03 1/2 cup unsalted butter, cold and diced
- 04 4‑5 tbsp ice‑water
Filling
- 01 3 medium apples, peeled and diced
- 02 2 tbsp unsalted butter
- 03 1/4 cup brown sugar
- 04 1 tsp ground cinnamon
- 05 1/4 tsp ground nutmeg
- 06 1 tbsp lemon juice
- 07 1 tbsp all‑purpose flour (to thicken)
Finishing
- 01 1 egg, beaten (for glaze)
- 02 Optional: coarse sugar for sprinkling
Instructions
In a bowl, whisk flour and salt. Add cold butter cubes and rub together until the mixture resembles coarse crumbs.
Drizzle ice‑water gradually, mixing until the dough just comes together. Form into a disk, wrap, and chill for 15 minutes.
While dough chills, melt butter in a skillet over medium heat. Add diced apples, brown sugar, cinnamon, nutmeg, lemon juice, and flour. Cook, stirring, until apples are tender and the mixture thickens, about 8‑10 minutes.
Preheat oven to 375°F (190°C). Roll out the chilled dough on a lightly floured surface to about 1/8 inch thickness.
Cut circles to fit mini muffin tins (or use a cookie cutter). Press dough into each cup, creating a shallow base.
Spoon a generous amount of the apple filling into each crust, leaving a small border.
Brush tops with beaten egg and sprinkle with coarse sugar if desired.
Bake for 20‑25 minutes, until crust is golden and filling is bubbly. Cool briefly before removing from tins.
Notes & Tips
- 1 If the dough feels sticky, refrigerate a few minutes longer.
- 2 Adjust sugar based on apple sweetness; you may need less brown sugar for very ripe apples.
- 3 For extra shine, brush with a little melted butter after baking.
Tools You'll Need
-
Mixing bowl
-
Pastry cutter or rolling pin
-
Skillet
-
Mini muffin tin
-
Baking sheet
-
Pastry brush
Must-Know Tips
- Keep butter cold; it creates flaky layers.
- Don’t over‑mix dough to avoid toughness.
- Taste the filling before baking; adjust spice as needed.
Professional Secrets
- Chill dough after mixing; it relaxes gluten for a tender crust.
- Sauté apples with butter first; this builds a caramel base.
- Use an egg wash for a glossy, appetizing finish.

Recipe by
EmilyEmily is a passionate food blogger and seasoned recipe creator at Arbmom Recipe, where she brings her culinary expertise and creativity to home cooks ...
Get Delicious Recipes Weekly
Join 25,000+ home cooks getting our best recipes straight to their inbox.
Free forever • No spam • Unsubscribe anytime