Why You'll Love It
- - No baking required, just assemble and chill
- - Fresh fruit adds natural sweetness and color
- - Creamy frosting balances the tangy fruit
- - Perfect for both casual gatherings and formal picnics
*"The cake looked as bright as fireworks and tasted just as joyful—my kids couldn't stop asking for seconds!"*
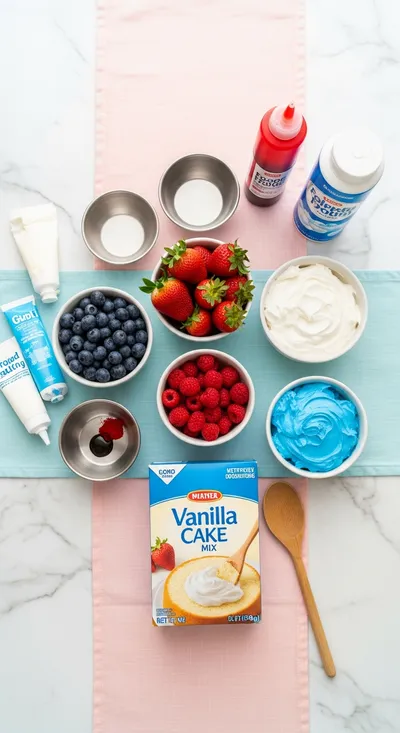
Essential Ingredient Guide
- White cake: Choose a light, fluffy vanilla or angel food cake; it soaks up syrup without getting soggy.
- Fresh berries: Use a mix of strawberries, blueberries, and raspberries for color contrast and juicy bursts.
- Whipped cream frosting: Stabilized with a touch of powdered sugar and vanilla; keeps its clouds shape.
- Simple syrup: A blend of water, sugar, and a splash of lemon juice adds moisture and subtle brightness.
- Lemon zest: Provides a fragrant lift that balances the sweetness of the berries.
- Powdered sugar (optional): Dust lightly for a festive snow‑like finish.
Complete Cooking Process
-
Ingredient Readiness:
Gather all berries, pat them dry, and slice the cake into even layers; keep the syrup ready.
-
Flavor Development:
Drizzle the simple syrup over each cake layer, letting it sink in before adding fruit.
-
Texture Control:
Fold whipped cream gently to keep it airy, then spread between layers without pressing too hard.
-
Finishing Touches:
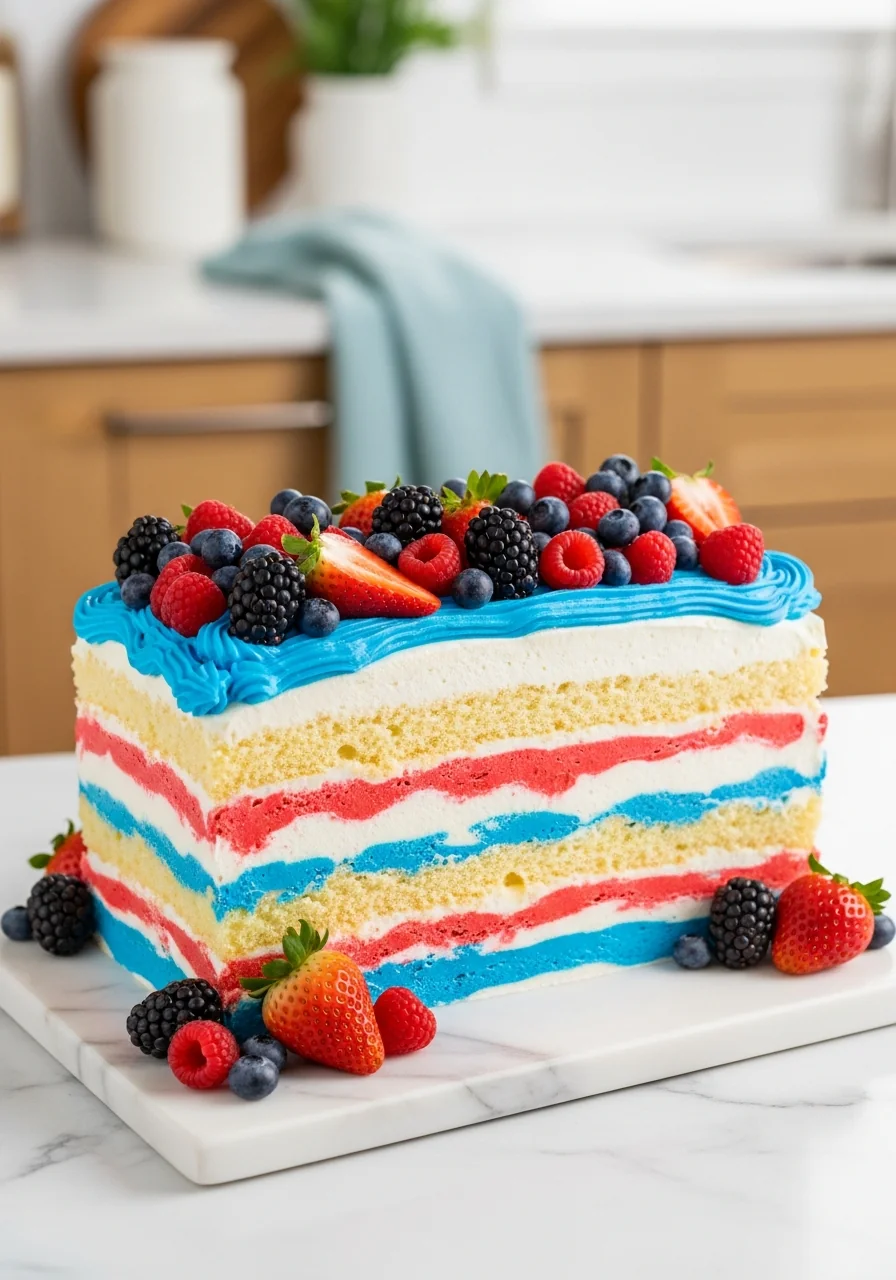
Top with a generous mound of berries, a dusting of powdered sugar, and a sprinkle of lemon zest.
-
Serving Timing:
Let the cake chill for at least an hour so flavors meld, then serve slightly cold.
- Use a serrated knife for clean cake layers
- Pat berries gently to avoid excess moisture
- Make syrup a day ahead for deeper flavor
- Add a tiny pinch of salt to the whipped cream for balance
Pro Tips
Well, these little tricks help the cake stay lush and the fruit stay bright. I’ve found that chilling the assembled cake not only sets the layers but also lets the lemon zest perfume the whole dessert. So, when you slice it, each piece looks like a little fireworks display, and the taste follows suit—soft, sweet, with a whisper of zest.
The essence of the dish:
A fun fact or historical angle:
Flavor or sensory focus:
You Must Know
- Use fresh, ripe berries for best color
- Don’t over‑soak the cake or it becomes mushy
- Keep the cake refrigerated until serving
Frequently Asked Questions
→ Can I make this cake ahead of time?
Yes, assemble it up to 24 hours ahead; keep it covered in the fridge.
→ What if I don’t have a white cake?
A light yellow or vanilla cake works fine; just avoid chocolate for a bright look.
→ Can I use frozen berries?
Frozen berries can be used, but thaw and pat dry first to prevent extra moisture.
→ How long does the cake stay fresh?
Stored refrigerated, it’s best within 3 days for optimal texture and flavor.
→ Can I make a gluten‑free version?
Swap the cake for a gluten‑free angel food or use a gluten‑free vanilla cake mix.
→ What other fruits work well?
Peaches, kiwi, or even diced mango add tropical twists while keeping the bright palette.
Chef's Tips
If you prefer a sweeter cake, increase the sugar in the syrup by 2 tbsp.,For a festive touch, add a few drops of red or blue food coloring to the whipped cream.,Handle berries gently to keep them whole for a prettier presentation.
Nutrition Facts
per serving
340
Calories
5g
Protein
38g
Carbs
15g
Fat
Taste Profile
Bright, sweet, and lightly tangy with fresh fruit notes
Ingredient Substitutions
Don't have an ingredient? Try these alternatives
Whip the chilled coconut cream; expect a slight coconut flavor.
Gives a deeper amber note; reduce sugar in whipped cream slightly.
Recipe Variations
Try these delicious twists on the original
Spicy Version
Add a pinch of cayenne to the whipped cream and toss berries with a splash of balsamic reduction.
Mediterranean Style
Swap berries for sliced figs and a drizzle of honey, and fold a handful of chopped pistachios into the frosting.
Common Mistakes to Avoid
Learn from others' mistakes for perfect results
- Over‑soaking the cake leading to a mushy texture
- Using berries that are too wet, causing soggy layers
- Whipping cream on warm bowls, resulting in weak peaks
Meal Prep & Storage
Make Ahead Tips
You can prepare the simple syrup and whip the cream a day ahead; keep them refrigerated separately and assemble the cake fresh on the day of celebration.
Leftover Ideas
Store any leftover cake in an airtight container in the fridge; gently re‑whip the cream if it loses volume before serving.
Perfect Pairings
Serve this with...
Cooking Timeline
Make simple syrup and let it cool; zest the lemon.
Whip the heavy cream with sugar and vanilla; refrigerate.
Slice the cake, brush with syrup, and begin layering.
Add berries and whipped cream between layers.
Finish top layer, decorate with remaining berries and dust.
Chill the assembled cake for at least one hour before serving.
July 4th Poke Cake Recipe
A festive, no‑fuss July 4th poke cake layered with fresh berries, whipped cream and a hint of citrus, perfect for a quick celebration dessert.
Timing
Prep Time
20 Minutes
Cook Time
0 Minutes
Total Time
1 Hour 20 Minutes
Recipe Details
Ingredients
Cake Layers
- 01 1 (9‑inch) white or vanilla cake, sliced horizontally into 3 layers
- 02 1/2 cup simple syrup (1 cup water + 1 cup sugar, cooled)
- 03 Zest of 1 lemon
Fruit & Frosting
- 01 2 cups mixed fresh berries (strawberries, blueberries, raspberries)
- 02 2 cups heavy cream
- 03 1/4 cup powdered sugar
- 04 1 tsp vanilla extract
- 05 Optional: 2 tbsp lemon juice for extra tang
Instructions
Prepare the simple syrup: combine water and sugar, bring to a simmer, cool, then stir in lemon zest.
Place the first cake layer on a serving plate, brush generously with half the syrup, then spread a thin layer of whipped cream.
Scatter a third of the berries over the cream, then repeat with the second cake layer, remaining syrup, and more whipped cream.
Top with the final cake layer, brush with any leftover syrup, then cover the whole cake with a smooth coat of whipped cream.
Arrange the remaining berries on top, drizzle lightly with lemon juice if desired, and dust with powdered sugar.
Refrigerate for at least one hour; serve chilled, optionally with a side of fresh lemonade.
Notes & Tips
- 1 If you prefer a sweeter cake, increase the sugar in the syrup by 2 tbsp.
- 2 For a festive touch, add a few drops of red or blue food coloring to the whipped cream.
- 3 Handle berries gently to keep them whole for a prettier presentation.
Tools You'll Need
-
Serrated knife
-
Cake stand or platter
-
Mixing bowl
-
Electric whisk
-
Measuring cups and spoons
-
Small brush for syrup
Must-Know Tips
- Don’t over‑soak the cake, just enough to moisten
- Pat berries dry to avoid soggy layers
- Use chilled bowls for whipping cream to keep it fluffy
Professional Secrets
- Room temperature cream whips faster and holds peaks longer
- Syrup with a touch of lemon balances the sweetness
- Chill the assembled cake for at least an hour to set the layers

Recipe by
GraceGrace is a passionate food blogger and recipe developer at Arbmom Recipe, where she brings a fresh and flavorful approach to home cooking. With years ...
Get Delicious Recipes Weekly
Join 25,000+ home cooks getting our best recipes straight to their inbox.
Free forever • No spam • Unsubscribe anytime