Why You'll Love It
- - No oven needed after the initial bake, keeping the kitchen cooler
- - Versatile – you can swap flavors or add crunchy layers
- - Makes a stunning centerpiece with minimal fuss
- - Kids love the fun, sandwich‑style look
*"The texture was just perfect—soft cake and creamy ice cream, a real crowd‑pleaser!"*
Essential Ingredient Guide
- Vanilla cake mix: Choose a high‑quality mix; it gives the cake a tender crumb and gentle sweetness.
- Premium vanilla ice cream: Softening the ice cream makes it easier to spread; look for a rich, buttery flavor.
- Whipped cream: Adds a light airy layer between cake and ice cream, balancing richness.
- Butter: Melted butter in the cake batter ensures a moist, buttery texture.
- Lemon zest: A little zest brightens the flavor, cutting through the sweetness.
- Brown sugar: Optional sweetener for the whipped topping; gives a caramel hint.
Complete Cooking Process
-
Ingredient Readiness:
Gather all components, let the ice cream soften for 10 minutes, and pre‑heat the oven for the cake layers.
-
Flavor Development:
Bake the cake batter until golden, allowing a subtle vanilla aroma to fill the kitchen.
-
Texture Control:
Cool the cake completely before spreading whipped cream, preventing sogginess.
-
Finishing Touches:
Layer softened ice cream between cake sheets, then freeze until firm.
-
Serving Timing:
Remove from freezer 5 minutes before slicing for clean cuts and a smooth bite.
- Use a serrated knife warmed in hot water for cleaner slices
- Add a thin layer of melted chocolate between cake and ice cream for extra depth
- Press a sheet of parchment paper on top before the final freeze to avoid sticking
- Garnish with fresh berries for a pop of color and acidity
Pro Tips
I find these small adjustments make the cake feel restaurant‑ready. So, when you pull it out of the freezer, give it a moment to breathe, then serve with a smile. It’s those quiet moments that turn a simple dessert into a memory.
The essence of the dish:
A fun fact or historical angle:
Flavor or sensory focus:
You Must Know
- Make sure the cake is completely cooled before adding ice cream
- Work quickly once layers are assembled to keep the ice cream firm
- Store the finished cake in the freezer until ready to serve
Frequently Asked Questions
→ Can I use a different ice cream flavor?
Absolutely – strawberry, chocolate, or even coffee work beautifully; just adjust garnishes accordingly.
→ Do I need an ice cream maker?
No, a high‑quality store‑bought ice cream softens nicely for this recipe.
→ How long can I keep the cake frozen?
Up to two weeks, tightly wrapped to prevent freezer burn.
→ Can I make this cake gluten‑free?
Yes, swap the cake mix for a gluten‑free version and ensure the ice cream is free of gluten additives.
→ What’s a good topping?
A drizzle of melted chocolate, toasted coconut, or fresh berries add visual appeal and flavor contrast.
→ Do I need to thaw before serving?
No, just let it sit at room temperature for 5 minutes; it will slice cleanly.
Chef's Tips
If the cake feels crumbly, add an extra egg to the batter for binding.,For a richer flavor, fold a teaspoon of espresso powder into the ice cream before spreading.,A quick dip of the knife in hot water will give cleaner slices.
Nutrition Facts
per serving
420
Calories
5g
Protein
45g
Carbs
22g
Fat
Taste Profile
Creamy, buttery, and refreshingly sweet
Ingredient Substitutions
Don't have an ingredient? Try these alternatives
Ensure the mix contains leavening agents; adjust baking time slightly.
Gives a subtle coconut flavor; chill the can before whipping.
Recipe Variations
Try these delicious twists on the original
Spicy Version
Add a pinch of cinnamon and a drizzle of caramel pepper sauce for a gentle kick.
Mediterranean Style
Incorporate crushed pistachios and a rose‑water infused whipped cream for a fragrant twist.
Common Mistakes to Avoid
Learn from others' mistakes for perfect results
- Over‑mixing the batter, leading to a dense cake
- Using ice cream that’s too hard to spread, causing cracks
- Not allowing the cake to fully cool before adding cream
Meal Prep & Storage
Make Ahead Tips
You can bake the cake layers up to two days ahead and keep them wrapped; soften the ice cream the night before assembling.
Leftover Ideas
Slice and enjoy straight from the freezer; any leftovers stay fresh for up to a week when re‑wrapped.
Perfect Pairings
Serve this with...
Cooking Timeline
Preheat oven and prepare batter; melt butter.
Bake two cake layers, then cool completely.
Whip cream and soften ice cream.
Assemble layers with whipped cream and ice cream.
Wrap cake and freeze until firm.

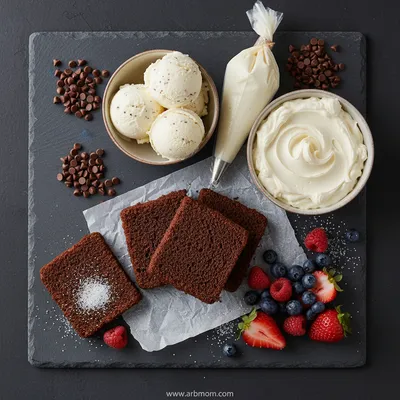
Ice Cream Sandwich Cake
A cool, creamy Ice Cream Sandwich Cake with soft vanilla cake layers and luscious vanilla ice cream, perfect for a refreshing treat on a warm day.
Timing
Prep Time
20 Minutes
Cook Time
25 Minutes
Total Time
45 Minutes
Recipe Details
Ingredients
Cake Layers
- 01 2 boxes vanilla cake mix
- 02 1 cup milk
- 03 ½ cup melted butter
- 04 3 large eggs
Filling & Frosting
- 01 1 pint premium vanilla ice cream, softened
- 02 1 cup heavy whipping cream
- 03 2 tbsp powdered sugar
- 04 1 tsp vanilla extract
- 05 Zest of 1 lemon
Instructions
Preheat oven to 350°F (175°C). In a large bowl combine cake mix, milk, melted butter, and eggs; mix until smooth.
Divide batter into two 9‑inch round pans. Bake 20‑25 minutes until a toothpick comes out clean; let cool completely on wire racks.
While the cakes cool, whip the heavy cream with powdered sugar, vanilla extract, and lemon zest until soft peaks form.
Spread a thin layer of whipped cream on the first cake layer, then spread softened vanilla ice cream evenly over it. Top with the second cake layer.
Wrap the assembled cake tightly in plastic wrap and freeze for at least 3 hours, or until firm.
Before serving, remove the wrap, let the cake rest 5 minutes, then slice with a warm knife. Garnish with berries or a drizzle of chocolate, if desired.
Notes & Tips
- 1 If the cake feels crumbly, add an extra egg to the batter for binding.
- 2 For a richer flavor, fold a teaspoon of espresso powder into the ice cream before spreading.
- 3 A quick dip of the knife in hot water will give cleaner slices.
Tools You'll Need
-
Two 9‑inch round cake pans
-
Electric mixer
-
Spatula
-
Plastic wrap
-
Freezer-safe container
Must-Know Tips
- Don't over‑mix the batter, it can make the cake dense.
- Let the ice cream soften just enough to spread, not melt.
- Freeze the assembled cake firmly before slicing.
Professional Secrets
- Room temperature butter ensures a smooth batter.
- Sift the cake mix for extra lightness.
- Use parchment paper between layers to prevent sticking.

Recipe by
EmilyEmily is a passionate food blogger and seasoned recipe creator at Arbmom Recipe, where she brings her culinary expertise and creativity to home cooks ...
Get Delicious Recipes Weekly
Join 25,000+ home cooks getting our best recipes straight to their inbox.
Free forever • No spam • Unsubscribe anytime