Why You'll Love It
- - No cooking required, just stir and freeze
- - Retains fresh huckleberry flavor and bright color
- - Keeps well in the freezer for up to six months
- - Perfect for quick breakfasts and elegant desserts
“This jam is the most effortless way to capture fresh berries – my kids love it on everything!”
Essential Ingredient Guide
- Fresh huckleberries: Choose plump, deep‑purple berries; rinse gently and remove any stems for pure flavor.
- Granulated sugar: Use regular white sugar; it dissolves quickly and balances the natural tartness.
- Lemon juice: A splash brightens the jam and helps set the texture without cooking.
- Vanilla extract: Adds a subtle warmth that rounds out the berry’s sharp notes.
- Pectin (optional): If you prefer a thicker spread, a pinch of natural pectin will help without heat.
- A pinch of salt: Enhances the overall sweetness and brings out the berry’s depth.
Complete Cooking Process
-
Ingredient Readiness:
Wash berries, pat dry, and measure sugar and lemon juice before you begin.
-
Flavor Development:
Combine berries, sugar, lemon, and a pinch of salt; let sit until berries release their juice.
-
Texture Control:
Mash gently for a smoother spread or leave chunky for a rustic feel.
-
Finishing Touches:
Stir in vanilla and optional pectin, then transfer to freezer‑safe containers.
-
Serving Timing:
Allow jam to thaw slightly for a spoon‑able consistency; serve with toast, yogurt, or drizzle over desserts.
- Add a thin slice of orange zest for extra brightness.
- Freeze in ice‑cube trays for perfect portion control.
- Use a wooden spoon to mash – it won’t bruise the berries as much.
- Label jars with the date; enjoy within six months for best flavor.
Pro Tips
Well, those little tricks make the whole experience feel like a quiet ritual. Yeah, I find myself reaching for the jam on lazy mornings, and it’s always there, ready. The freezer jam also travels well; pop a sealed jar into a picnic cooler and you’ve got a sweet surprise waiting for the kids. It’s the kind of simple pleasure that quietly lifts the day.
The essence of the dish:
A fun fact or historical angle:
Flavor or sensory focus:
You Must Know
- Use fully ripe berries for natural sweetness
- Stir gently to keep a rustic texture
- Freeze quickly to lock in flavor
Frequently Asked Questions
→ Can I use frozen huckleberries?
Yes, just thaw them first; the jam will be slightly softer but still delicious.
→ Do I need pectin?
Pectin is optional; the jam sets well without it because the fruit’s natural pectin does the job.
→ How long does the jam keep?
Store in the freezer for up to six months; a short thaw in the fridge makes it spreadable.
→ Can I substitute the sugar?
Honey or maple syrup works, but adjust the amount to keep the balance of tart and sweet.
→ Is this recipe vegan?
Absolutely, all ingredients are plant‑based.
Chef's Tips
If you like a thicker spread, add a little more pectin and let the jam sit an extra 5 minutes before freezing.,For a citrus spark, swap half the lemon juice for orange juice.,Label each jar with the date; the jam’s flavor is best within six months.
Nutrition Facts
per serving
120
Calories
1g
Protein
30g
Carbs
0g
Fat
Taste Profile
Bright, tangy, and naturally sweet
Ingredient Substitutions
Don't have an ingredient? Try these alternatives
Adjust amount for liquid consistency.
Use half the amount; it adds acidity without citrus flavor.
Recipe Variations
Try these delicious twists on the original
Spicy Version
Add a pinch of cayenne and a drizzle of honey for a subtle heat.
Mediterranean Style
Mix in chopped thyme and a splash of olive oil for a savory twist.
Common Mistakes to Avoid
Learn from others' mistakes for perfect results
- Skipping the resting time; the berries need to release their juice.
- Over‑mashing, which can turn the jam too smooth.
- Leaving too much headspace in jars, causing freezer burn.
Meal Prep & Storage
Make Ahead Tips
You can prepare the jam a day ahead; keep it sealed in the freezer and let it soften slightly before serving.
Leftover Ideas
Thaw in the refrigerator and use within a week; leftover jam makes a great glaze for baked goods.
Perfect Pairings
Serve this with...
Cooking Timeline
Gather and wash all berries.
Combine berries, sugar, lemon juice, and salt; stir.
Let mixture sit, mash lightly, add vanilla, and transfer to jars.
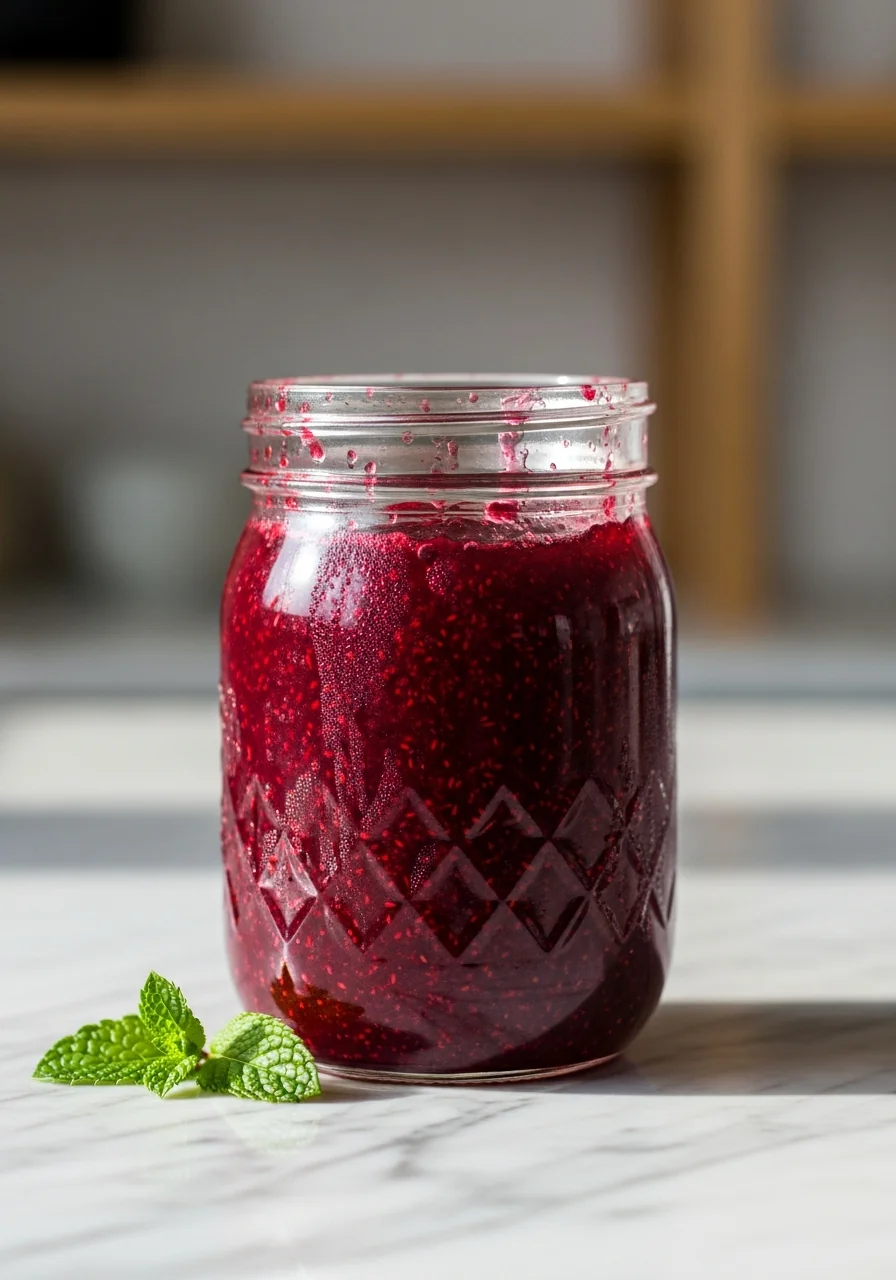
Huckleberry Freezer Jam Recipe
Bright, tangy huckleberry jam ready in minutes, perfect for toast, yogurt, or a sweet swirl in desserts.
Timing
Prep Time
10 Minutes
Cook Time
0 Minutes
Total Time
10 Minutes
Recipe Details
Ingredients
Main Ingredients
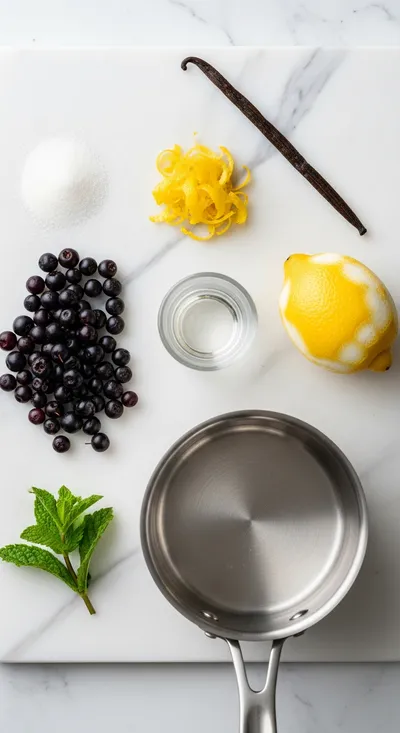
- 01 4 cups fresh huckleberries
- 02 1 cup granulated sugar
- 03 2 tbsp fresh lemon juice
- 04 1/4 tsp salt
- 05 1 tsp vanilla extract
- 06 Optional: 1 tsp pectin
Instructions
Wash the huckleberries, discard any stems, and pat them dry.
In a large bowl combine berries, sugar, lemon juice, and a pinch of salt; stir gently.
Let the mixture sit for about 5‑7 minutes until the berries release their juice; then mash lightly with a fork if you prefer a smoother texture.
Stir in vanilla extract and optional pectin, then transfer the jam into freezer‑safe jars, leaving a small space at the top.
Seal the jars and place them directly in the freezer; thaw briefly before serving.
Notes & Tips
- 1 If you like a thicker spread, add a little more pectin and let the jam sit an extra 5 minutes before freezing.
- 2 For a citrus spark, swap half the lemon juice for orange juice.
- 3 Label each jar with the date; the jam’s flavor is best within six months.
Tools You'll Need
-
Large mixing bowl
-
Measuring cups and spoons
-
Wooden spoon or fork
-
Freezer‑safe glass jars
-
Fine mesh strainer (optional for ultra‑smooth jam)
Must-Know Tips
- Don’t over‑mash; a few whole berries add lovely texture.
- Keep the jam cold while preparing to preserve the bright color.
- Taste after adding lemon and adjust sugar if needed.
Professional Secrets
- Use room‑temperature berries; they release juice faster.
- Add a dash of vanilla at the end to round out the tartness.
- Freeze quickly to lock in the fresh aroma.

Recipe by
EmilyEmily is a passionate food blogger and seasoned recipe creator at Arbmom Recipe, where she brings her culinary expertise and creativity to home cooks ...
Get Delicious Recipes Weekly
Join 25,000+ home cooks getting our best recipes straight to their inbox.
Free forever • No spam • Unsubscribe anytime