Why You'll Love It
- - Simple, quick to assemble
- - Fresh, seasonal fruit flavor
- - No added sugars needed
- - Warm, comforting texture
*"The flavor is just perfect – bright berries with a buttery crumble that melts in your mouth."*
Essential Ingredient Guide
- Huckleberries: Choose plump, deep‑purple berries; they give the crisp its sweet‑tart heart.
- Rolled oats: Provides a hearty crumb and a nuttish aroma when toasted.
- Almond flour: Adds a subtle richness and keeps the topping gluten‑free if needed.
- Brown sugar: Just enough to enhance the berries without overwhelming their natural taste.
- Lemon juice: A splash balances the sweetness and brightens the overall flavor.
- Butter: Cold, cubed butter creates those delightful, crumbly clumps when mixed.
Complete Cooking Process
-
Ingredient Readiness:
Rinse berries, pat dry, and toss with a drizzle of lemon juice; keep oats and flour separate for the topping.
-
Flavor Development:
The berries soften and release juices as they bake, mingling with the sugar for a syrupy glaze.
-
Texture Control:
Butter is cut into the dry topping until it resembles coarse crumbs, ensuring a crisp edge and a tender center.
-
Finishing Touches:
A quick dusting of powdered sugar after baking adds a glossy finish.
-
Serving Timing:
Serve warm, optionally with a dollop of vanilla yogurt for a cool contrast.
- Use frozen huckleberries if fresh are out of season – they thaw quickly.
- Cool the crumble on a rack before serving to keep it from steaming.
- Add a pinch of cinnamon for an extra warm note.
- Brush the top with a little melted butter for extra shine.
Pro Tips
Well, those little adjustments can make a world of difference. I remember once forgetting the butter in the crumble and it turned out soggy – oops! A quick brush of melted butter right before the last few minutes in the oven saved it, giving that satisfying crunch I adore.
The essence of the dish:
A fun fact or historical angle:
Flavor or sensory focus:
You Must Know
- Serve immediately for optimal crunch
- Cool slightly before scooping to avoid a soggy base
- Store leftovers under foil to retain texture
Frequently Asked Questions
→ Can I use other berries?
Absolutely – blueberries, blackberries, or raspberries work nicely, just adjust the sugar level to match their natural sweetness.
→ Is the recipe gluten‑free?
Swap rolled oats for certified gluten‑free oats and use a gluten‑free flour blend in place of almond flour.
→ How long does it keep?
Stored in an airtight container, the crisp stays fresh for up to two days; reheat to regain crispness.
→ Can I make it ahead of time?
Yes, assemble in a dish, cover, and refrigerate. Bake just before serving for maximum warmth.
→ What topping variations work?
Add chopped nuts, shredded coconut, or a sprinkle of oat bran for extra texture.
→ Is it suitable for vegans?
Replace butter with a plant‑based alternative and use maple syrup instead of honey.
Nutrition Facts
per serving
310
Calories
5g
Protein
42g
Carbs
14g
Fat
Taste Profile
A bright, buttery, and slightly tart berry dessert
Ingredient Substitutions
Don't have an ingredient? Try these alternatives
Coconut flour absorbs more liquid; adjust butter accordingly.
Choose a solid, cold alternative to retain crumbly texture.
Recipe Variations
Try these delicious twists on the original
Spicy Version
Add a pinch of cayenne and a drizzle of maple syrup for a subtle heat.
Mediterranean Style
Fold in chopped pistachios and a sprinkle of orange zest for a bright twist.
Common Mistakes to Avoid
Learn from others' mistakes for perfect results
- Using melted butter in the crumble – it creates a soggy topping.
- Over‑mixing the topping – loses the desired texture.
- Baking at too low a temperature – results in a pale, chewy crust.
Meal Prep & Storage
Make Ahead Tips
You can toss the berries with sugar and lemon juice up to 12 hours ahead; keep the crumble topping separate and bake just before serving.
Leftover Ideas
Reheat gently in a low oven to keep the topping crispy; avoid microwaving if possible.
Perfect Pairings
Serve this with...
Cooking Timeline
Preheat oven and prepare baking dish.
Mix berries with sugar, lemon, and cornstarch.
Combine dry topping ingredients and cut in butter.
Assemble berries and crumble in the dish.
Bake until golden, then let rest briefly.

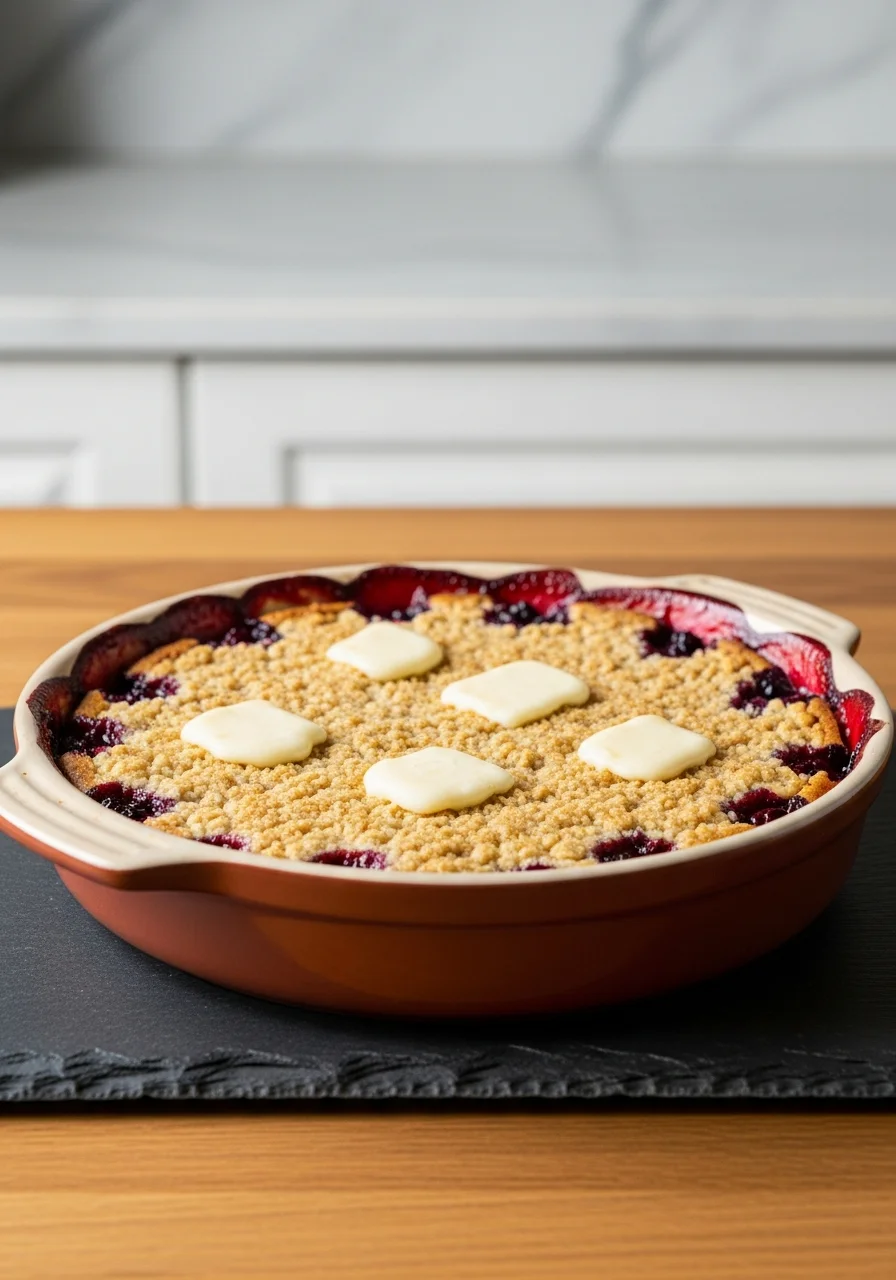
Huckleberry Crisp
A sweet‑and‑tangy Huckleberry Crisp that feels like a sunrise over the meadow. The berries burst with gentle warmth, and the buttery crumble adds a comforting rustle that whispers of home‑cooked mornings.
Timing
Prep Time
15 Minutes
Cook Time
25 Minutes
Total Time
40 Minutes
Recipe Details
Ingredients
Main Ingredients
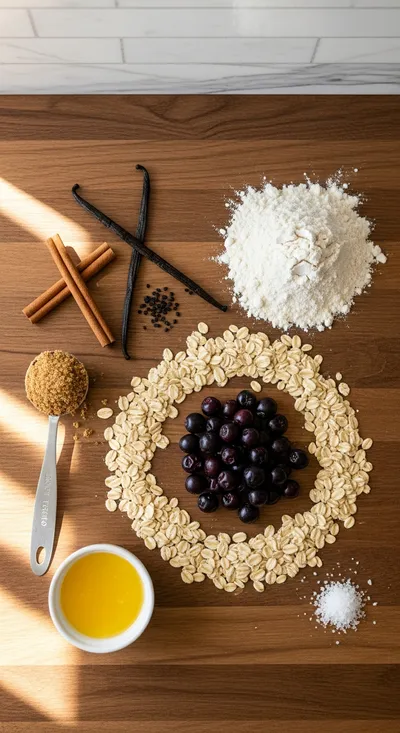
- 01 4 cups fresh huckleberries
- 02 1/4 cup granulated sugar
- 03 2 tbsp lemon juice
- 04 1 tbsp cornstarch
Crumble Topping
- 01 1 cup rolled oats
- 02 1/2 cup almond flour
- 03 1/3 cup brown sugar
- 04 1/2 tsp cinnamon
- 05 1/4 tsp salt
- 06 6 tbsp cold unsalted butter, cubed
Instructions
Preheat the oven to 375°F (190°C) and lightly butter a 9‑inch baking dish.
In a bowl, gently toss the huckleberries with sugar, lemon juice, and cornstarch; set aside to macerate.
Combine oats, almond flour, brown sugar, cinnamon, and salt in a separate bowl; cut in the cold butter until the mixture resembles coarse crumbs.
Spread the berry mixture evenly in the dish, then sprinkle the crumble topping over the berries.
Bake for 25‑30 minutes, until the topping turns golden brown and the berries are bubbling.
Allow to cool slightly, then serve warm – perhaps with a spoonful of huckleberry muffins on the side for extra indulgence.
Notes & Tips
- 1 If using frozen berries, add an extra tablespoon of cornstarch to soak up extra moisture.
- 2 A pinch of nutmeg can deepen the autumnal flavor.
- 3 For a lighter version, substitute half the butter with unsweetened applesauce.
Tools You'll Need
-
9‑inch baking dish
-
Mixing bowls
-
Pastry cutter or fork
-
Rubber spatula
-
Oven
Must-Know Tips
- Don't over‑mix the crumble; keep butter in chunks for texture.
- Let the berries rest with sugar for 10 minutes to release juices.
- Taste the topping before baking; adjust sweetness if needed.
Professional Secrets
- Room temperature butter integrates more evenly into the crumble.
- Baking on the middle rack ensures even browning.
- Let the crisp rest 5 minutes after baking to set the filling.

Recipe by
EmilyEmily is a passionate food blogger and seasoned recipe creator at Arbmom Recipe, where she brings her culinary expertise and creativity to home cooks ...
Get Delicious Recipes Weekly
Join 25,000+ home cooks getting our best recipes straight to their inbox.
Free forever • No spam • Unsubscribe anytime