Why You'll Love It
- - The contrast of crunchy Pebbles and creamy cheese is delightful
- - Easy to assemble, perfect for brunch or a sweet snack
- - Vibrant colors make it a visual treat
- - No baking required, just a quick chill
*"These tacos are a surprise in every bite—fun and surprisingly elegant!"*
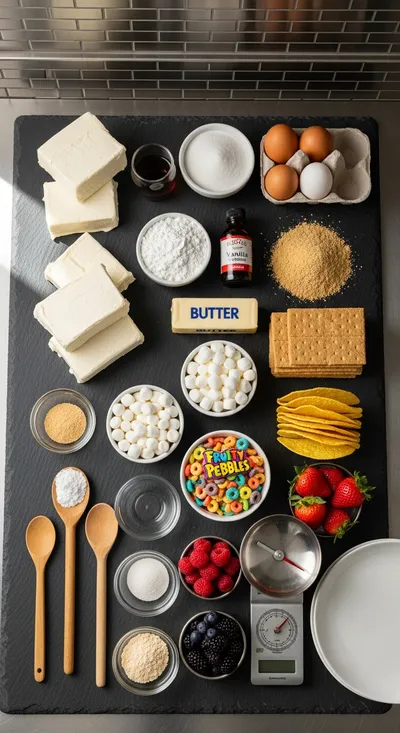
Essential Ingredient Guide
- Cream Cheese: Choose full‑fat cream cheese for richness; let it soften at room temperature for smooth mixing.
- Fruity Pebbles: Fresh, colorful cereal adds a sweet crunch; lightly toast if you prefer extra toasty notes.
- Mini Flour Tortillas: These serve as the taco shells; warm them briefly to make them pliable.
- Powdered Sugar: Sweetens the filling gently; sift to avoid lumps.
- Lemon Zest: A touch of zest lifts the richness with bright citrus aroma.
- Whipped Topping: Adds lightness; fold in at the end to keep the mixture airy.
Complete Cooking Process
-
Ingredient Readiness:
Soften cream cheese, slice tortillas, and measure cereal before you start; this keeps the assembly smooth.
-
Flavor Development:
Blend cream cheese with sugar, vanilla, and lemon zest; the flavors meld while you chill.
-
Texture Control:
Fold in whipped topping gently, then press toasted Pebbles into the tops just before serving.
-
Finishing Touches:
Drizzle a tiny bit of honey for shine and sprinkle extra Pebbles for crunch.
-
Serving Timing:
Serve immediately after assembling so the tortilla stays soft and the cereal stays crisp.
- Chill the cheesecake mixture for at least 30 minutes for firm filling
- Warm tortillas over a dry skillet for 10 seconds each side
- Press Pebbles lightly; too hard and they’ll crack
- Add a pinch of sea salt to balance sweetness
Pro Tips
I’ve found that a short chill helps the cheesecake stay in the taco without sliding out. The tortillas should be just warm enough to be pliable but not hot, otherwise the filling can melt. When you press the Pebbles, think of a gentle press—enough to stick but not crush. A tiny pinch of salt at the end brightens the overall flavor, making each bite feel complete.
The essence of the dish:
A fun fact or historical angle:
Flavor or sensory focus:
You Must Know
- Use room‑temperature cheese for a silky blend
- Toast the Pebbles lightly for deeper flavor
- Warm tortillas just enough to stay flexible
- Serve immediately for optimal texture
Frequently Asked Questions
→ Can I use gluten‑free tortillas?
Yes, corn tortillas work perfectly and keep the dish gluten‑free.
→ How long can the tacos sit before serving?
Ideally serve within 15 minutes; after that the Pebbles may lose their crunch.
→ Can I substitute the cream cheese?
A plant‑based cream cheese works, but keep the texture firm by adding a touch of coconut cream.
→ Do I need to bake anything?
No baking is required; just a quick warm of the tortillas.
→ What if I don’t have Fruity Pebbles?
Use any colorful sweet cereal, or crush rainbow sprinkles for a similar effect.
→ Can I make them ahead of time?
Prepare the cheesecake filling and store chilled; assemble tacos just before serving.
Chef's Tips
If the filling feels too soft, chill for 10‑15 minutes before assembly.,For extra crunch, toast the Pebbles lightly in a skillet for 30 seconds.,Serve immediately to keep the tortilla soft and the cereal crisp.
Nutrition Facts
per serving
280
Calories
6g
Protein
24g
Carbs
18g
Fat
Taste Profile
A bright, sweet dessert with a buttery backbone
Ingredient Substitutions
Don't have an ingredient? Try these alternatives
Choose a brand that holds shape; may need a touch more stabilizer.
Provides similar color and crunch but less sweetness.
Recipe Variations
Try these delicious twists on the original
Chocolate Drizzle
Add a drizzle of melted chocolate over the Pebbles for a richer finish.
Berry Burst
Fold fresh raspberry puree into the cheesecake filling before assembling.
Common Mistakes to Avoid
Learn from others' mistakes for perfect results
- Over‑warming tortillas until they become crispy
- Mixing the filling too long and creating a grainy texture
- Pressing Pebbles too hard and crushing them into mush
Meal Prep & Storage
Make Ahead Tips
The cheesecake filling can be prepared up to 24 hours ahead and kept chilled; warm tortillas just before serving.
Leftover Ideas
Store leftover filling in a sealed container; reheating is not needed—just use as a spread.
Perfect Pairings
Serve this with...
Cooking Timeline
Prepare toppings, zest lemon, and soften cream cheese.
Blend cream cheese, sugar, vanilla, and lemon zest until smooth.
Fold whipped topping gently into the mixture.
Warm tortillas, assemble tacos with filling, and press Pebbles on top.
Drizzle honey, garnish with berries, and serve immediately.
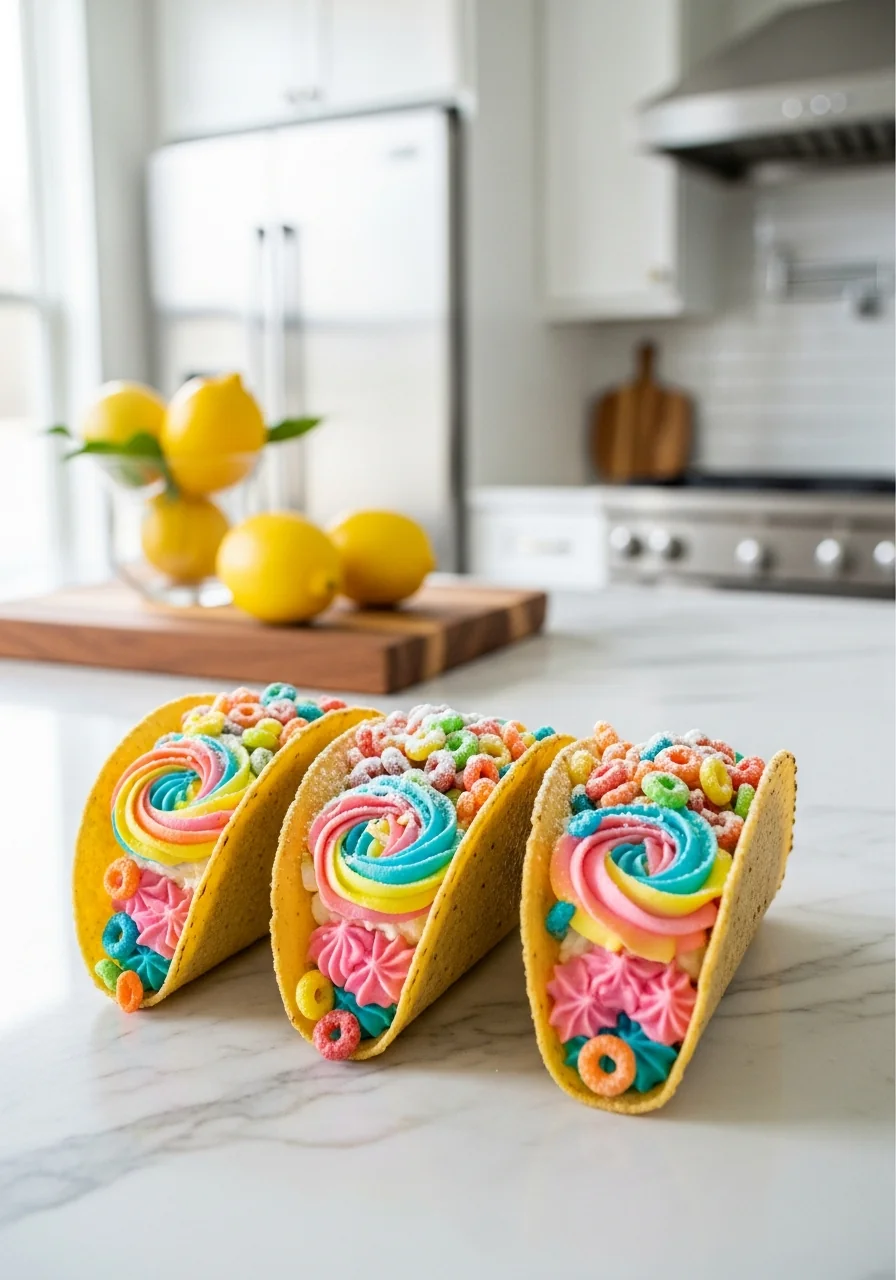
Fruity Pebbles Cheesecake Tacos
Indulge in a whimsical bite that marries the bright crunch of Fruity Pebbles with the silky smoothness of cheesecake, all tucked into a soft taco shell. It’s a playful dessert that feels like a childhood memory turned elegant brunch treat.
Timing
Prep Time
15 Minutes
Cook Time
5 Minutes
Total Time
20 Minutes
Recipe Details
Ingredients
Taco Shells
- 01 6 mini flour tortillas
- 02 2 tsp butter, melted
Cheesecake Filling
- 01 8 oz cream cheese, softened
- 02 1/4 cup powdered sugar
- 03 1 tsp vanilla extract
- 04 1 tsp lemon zest
- 05 1/2 cup whipped topping
Topping
- 01 1 cup Fruity Pebbles cereal
- 02 1 tbsp honey (optional)
- 03 Fresh berries for garnish (optional)
Instructions
Warm each tortilla in a dry skillet for about 5 seconds per side, then brush lightly with melted butter; set aside to stay pliable.
In a mixing bowl, beat the softened cream cheese until smooth, then add powdered sugar, vanilla, and lemon zest; continue until fully combined.
Fold the whipped topping into the cream cheese mixture gently, preserving the airy texture.
Spread a generous spoonful of the cheesecake filling onto the center of each warm tortilla, then fold them in half like a taco.
Press Fruity Pebbles onto the top of each taco, drizzle a little honey if desired, and garnish with a few fresh berries.
Notes & Tips
- 1 If the filling feels too soft, chill for 10‑15 minutes before assembly.
- 2 For extra crunch, toast the Pebbles lightly in a skillet for 30 seconds.
- 3 Serve immediately to keep the tortilla soft and the cereal crisp.
Tools You'll Need
-
Small skillet
-
Mixing bowl
-
Electric mixer or whisk
-
Spatula
-
Measuring cups and spoons
Must-Know Tips
- Don’t over‑mix the cream cheese or it will become grainy
- Warm tortillas just enough to stay flexible
- Press Pebbles gently to avoid crushing them
- Chill the filling for firm texture
Professional Secrets
- Room temperature cream cheese ensures a silky blend
- A quick butter glaze on tortillas adds subtle richness
- Adding a pinch of sea salt to the filling heightens sweetness

Recipe by
EmilyEmily is a passionate food blogger and seasoned recipe creator at Arbmom Recipe, where she brings her culinary expertise and creativity to home cooks ...
Get Delicious Recipes Weekly
Join 25,000+ home cooks getting our best recipes straight to their inbox.
Free forever • No spam • Unsubscribe anytime