Why You'll Love It
- - Cute presentation that delights both kids and adults
- - Simple ingredients you probably already have
- - Creamy filling with a gentle herb note
- - Perfect for brunch, picnics, or holiday tables
*These tiny chick eggs are a hit at every gathering!*
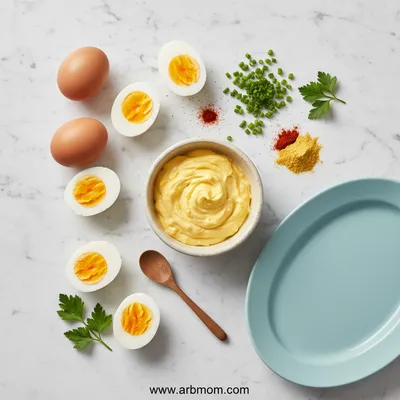
Essential Ingredient Guide
- Large eggs: Fresh, free‑range eggs give the yolks a richer color and a firmer texture for slicing.
- Mayonnaise: Choose a good quality mayo; it adds silkiness without overwhelming the yolk.
- Dijon mustard: A teaspoon provides a subtle bite that balances the richness.
- Fresh chives: Finely chopped, they lend a mild onion flavor and a dash of green.
- Lemon juice: A splash brightens the filling and cuts through the fat.
- Paprika: Dust lightly for color; it adds a whisper of warmth.
Complete Cooking Process
-
Ingredient Readiness:
Hard‑boil the eggs, then cool them quickly in ice water before peeling; this makes the whites firm and the yolks crumbly.
-
Flavor Development:
Mix yolks with mayo, mustard, lemon, and herbs; the flavors meld while you gently stir.
-
Texture Control:
Fold in a tiny bit of softened cream cheese if you like extra silk, but avoid over‑mixing to keep a light bite.
-
Finishing Touches:
Pipe the filling back into the whites, then add the chick details—tiny yolk dots for eyes and a sliver of pepper for beaks.
-
Serving Timing:
Serve chilled, ideally within an hour, so the colors stay vivid and the texture stays cool.
- Use a piping bag for tidy, even filling.
- Tap the egg halves gently on the counter to create a small dent for the chick’s head.
- Prepare the yolk mixture a little ahead; it settles nicely in the fridge.
- Add a hint of smoked paprika for a deeper hue if desired.
Pro Tips
When you lay out the plate, think of a spring meadow—soft greens beneath the cheerful yellow chicks. I often pair them with a simple cucumber ribbon salad; the cool crunch balances the rich filling. Take a moment to admire the little beaks before you bite; it makes the first taste feel like a quiet celebration.
The essence of the dish:
A fun fact or historical angle:
Flavor or sensory focus:
You Must Know
- Cool boiled eggs quickly to keep whites firm
- Pipe filling for a clean look
- Use paprika sparingly for color
- Serve chilled for best presentation
Frequently Asked Questions
→ Can I make these ahead of time?
Yes, you can pipe the filling and assemble the chicks up to 4 hours ahead; keep them refrigerated and cover loosely with plastic.
→ What if I don’t have chives?
A pinch of finely minced green onion or a sprinkle of dried parsley works as a mild substitute.
→ How do I prevent the yolk mixture from separating?
Make sure all ingredients are at room temperature before mixing and blend just until smooth.
→ Can I add a spicy kick?
A dash of hot sauce or a sprinkle of cayenne pepper in the filling will give a gentle heat without overwhelming the chick look.
→ What’s a good side dish?
A light cucumber ribbon salad or a handful of baby arugula tossed with lemon vinaigrette pairs nicely.
→ Are these gluten‑free?
Absolutely—no wheat products are used, making them safe for gluten‑free diets.
Chef's Tips
If you prefer a richer filling, add a teaspoon of cream cheese.,For a festive touch, sprinkle a bit of edible gold dust on the beaks.,Eggs can be hard‑boiled ahead and stored peeled in water for up to a day.
Nutrition Facts
per serving
120
Calories
5g
Protein
2g
Carbs
9g
Fat
Taste Profile
Creamy with a bright herb finish
Ingredient Substitutions
Don't have an ingredient? Try these alternatives
Provides similar creaminess with less fat.
Adds a subtle smoky note without changing color dramatically.
Recipe Variations
Try these delicious twists on the original
Spicy Version
Add a pinch of cayenne and a dash of hot sauce to the yolk mix for a gentle kick.
Mediterranean Style
Stir in chopped sun‑dried tomatoes and a sprinkle of feta, then garnish with a tiny olive slice.
Common Mistakes to Avoid
Learn from others' mistakes for perfect results
- Over‑cooking eggs, which makes whites rubbery.
- Using too much mayo, leading to a heavy filling.
- Skipping the chill step; the chick details lose definition.
Meal Prep & Storage
Make Ahead Tips
You can hard‑boil and peel the eggs up to a day ahead; keep them refrigerated and add the filling just before serving.
Leftover Ideas
Refrigerate in a sealed container; gently re‑pipe any filling that has settled before serving.
Perfect Pairings
Serve this with...
Cooking Timeline
Place eggs in pot, cover with water, bring to boil.
Turn off heat, let eggs sit; then transfer to ice bath.
Peel, halve, and remove yolks; start preparing filling.
Mix filling, pipe into whites, add chick details.
Chill assembled chicks before serving.
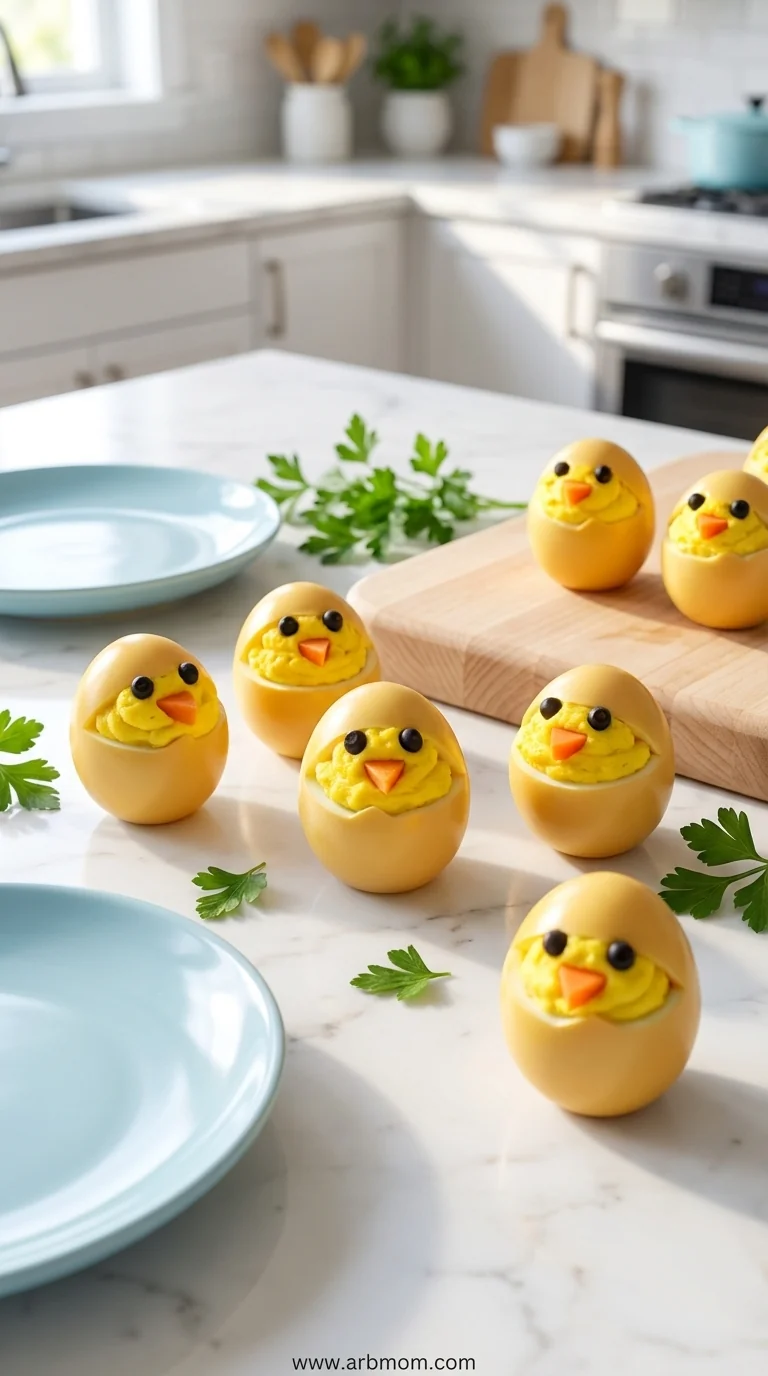
Deviled Egg Chicks Recipe
Adorable deviled egg chicks with creamy filling and festive presentation – perfect for brunch or a snack.
Timing
Prep Time
15 Minutes
Cook Time
10 Minutes
Total Time
25 Minutes
Recipe Details
Ingredients
Main Ingredients
- 01 6 large eggs
- 02 3 tbsp mayonnaise
- 03 1 tsp Dijon mustard
- 04 1 tsp lemon juice
- 05 1 tbsp finely chopped chives
- 06 Salt and pepper to taste
- 07 Paprika for dusting
Garnish
- 01 Thin slices of black olive for eyes
- 02 Small slice of red bell pepper for beak
Instructions
Place the eggs in a pot, cover with water, bring to a boil, then turn off the heat and let sit 10 minutes; this gentle method prevents rubbery whites.
Cool the eggs in an ice bath, peel, and slice each egg in half lengthwise, carefully removing the yolks into a bowl.
Mash the yolks with mayonnaise, mustard, lemon juice, chives, salt, and pepper until smooth; I like to taste and adjust the lemon for brightness.
Transfer the mixture to a piping bag fitted with a star tip and pipe back into each egg white, smoothing the tops gently.
Use a small dab of paprika to create a tiny dent for the chick’s head, then place a slice of black olive for each eye and a sliver of red pepper for the beak.
Refrigerate the assembled chicks for at least 20 minutes before serving; they look lovely on a platter beside a classic deviled eggs display.
Notes & Tips
- 1 If you prefer a richer filling, add a teaspoon of cream cheese.
- 2 For a festive touch, sprinkle a bit of edible gold dust on the beaks.
- 3 Eggs can be hard‑boiled ahead and stored peeled in water for up to a day.
Tools You'll Need
-
Medium saucepan
-
Ice water bowl
-
Paring knife
-
Mixing bowl
-
Fork
-
Piping bag with star tip
-
Platter for presentation
Must-Know Tips
- Cool eggs quickly to keep whites firm, prevents cracking later.
- Pipe filling for tidy, even presentation.
- Taste the mixture before filling; adjust lemon and salt.
Professional Secrets
- Use room temperature eggs for easier peeling.
- Whisk the yolk mixture just enough to avoid a grainy texture.
- Dust paprika lightly to avoid clumping on the chick heads.

Recipe by
OliviaOlivia is a passionate food blogger and recipe creator at Arbmom Recipe, where she brings her culinary expertise and love for home cooking to a vibran ...
Get Delicious Recipes Weekly
Join 25,000+ home cooks getting our best recipes straight to their inbox.
Free forever • No spam • Unsubscribe anytime