Why You'll Love It
- - A whimsical pink hue that brightens any table
- - Creamy texture with a melt‑in‑your‑mouth lightness
- - Simple ingredients, no special equipment needed
- - Perfect for celebrations or a quiet summer night
*"The cotton candy ice cream was a hit—my kids thought it was magic!"*
Essential Ingredient Guide
- Heavy cream: Provides the rich body; use fresh, cold cream for a smoother mouthfeel.
- Cotton candy syrup or flavored powder: Choose a high‑quality pink syrup for authentic sweet‑floral notes; dissolve fully to avoid grainy spots.
- Granulated sugar: Balances the syrup’s sweetness; dissolve in the milk for an even blend.
- Vanilla extract: Adds depth without overpowering the cotton candy flavor.
- Lemon zest: A tiny pinch lifts the sweetness with a subtle brightness.
- A pinch of salt: Enhances flavor and rounds out the sugar’s edge.
Complete Cooking Process
-
Ingredient Readiness:
Measure and chill the cream, sift the cotton candy powder, and have the zest ready; cold ingredients freeze faster and more evenly.
-
Flavor Development:
Gently warm the cream with sugar and syrup, allowing the aroma to rise and blend before chilling.
-
Texture Control:
Churn the mixture slowly to incorporate air, achieving that light, fluffy mouthfeel without icy crystals.
-
Finishing Touches:
Fold in a hint of lemon zest and a splash of vanilla, then transfer to a container for a final chill.
-
Serving Timing:
Let the ice cream sit at room temperature for five minutes before scooping to reveal its soft, cloud‑like texture.
- Freeze the mixing bowl and whisk beforehand for a quicker set.
- Avoid over‑churning; stop when the mixture looks slightly thickened.
- Serve in pastel bowls to keep the visual charm alive.
Pro Tips
When you serve, take a moment to notice the delicate aroma that rises as the scoop meets the air. It’s a gentle reminder of childhood fairs and the simple joy of sweet clouds. And if you have a little extra, swirl in a drizzle of pink raspberry sauce for a beautiful ribbon that adds just a hint of tart contrast.
The essence of the dish:
A fun fact or historical angle:
Flavor or sensory focus:
You Must Know
- Keep everything cold for best texture
- Don’t over‑mix after chilling
- Serve promptly for optimal fluffiness
Frequently Asked Questions
→ Can I use a stand mixer instead of an ice cream maker?
Yes, you can whisk the mixture vigorously by hand or with a hand‑held mixer, then freeze in a shallow pan, stirring every 30 minutes to break up ice crystals.
→ How long can I store the ice cream?
Store it in an airtight container in the freezer for up to two weeks. For best texture, let it soften briefly before serving.
→ Can I make it dairy‑free?
Swap heavy cream for coconut cream and use a plant‑based milk; the flavor will shift slightly but the fluffiness remains.
→ What toppings work well?
A pinch of pink sprinkles, crushed candy floss, or a drizzle of raspberry coulis complement the sweet profile beautifully.
→ Do I need a special freezer temperature?
A standard freezer set to 0°F (‑18°C) works fine; just ensure the container is well‑sealed to prevent ice crystals.
→ Can I add fresh fruit?
Fresh berries add a pleasant tart contrast; fold them in gently after the ice cream has set.
Chef's Tips
If the mixture separates, whisk gently before chilling.,For extra pink intensity, add a touch more cotton candy powder during the warm stage.,A quick freeze for 30 minutes after churning helps the ice cream hold its shape when serving.
Nutrition Facts
per serving
350
Calories
4g
Protein
38g
Carbs
22g
Fat
Taste Profile
Delicately sweet with a whisper of vanilla
Ingredient Substitutions
Don't have an ingredient? Try these alternatives
Will add a coconut aroma; ensure it is well‑chilled.
Gives a natural fruit flavor while retaining pink color.
Recipe Variations
Try these delicious twists on the original
Spicy Version
Add a pinch of pink Himalayan salt and a dash of mild cayenne for a subtle heat contrast.
Mediterranean Style
Stir in a few crumbled feta and a drizzle of honey for a sweet‑savory twist.
Common Mistakes to Avoid
Learn from others' mistakes for perfect results
- Over‑heating the syrup causing caramelization.
- Skipping the chilling step, leading to icy texture.
- Adding too much syrup, making the ice cream overly sweet.
Meal Prep & Storage
Make Ahead Tips
You can prepare the custard base up to 24 hours in advance; keep it refrigerated and churn when ready.
Leftover Ideas
Re‑scoop into a bowl and let sit for a few minutes; the texture will remain soft and creamy.
Perfect Pairings
Serve this with...
Cooking Timeline
Gather and measure all ingredients; zest lemon.
Warm milk, sugar, and cotton candy syrup until dissolved.
Cool mixture, add cream and flavorings, then refrigerate.
Churn in ice‑cream maker or hand‑whisk, then freeze to firm.
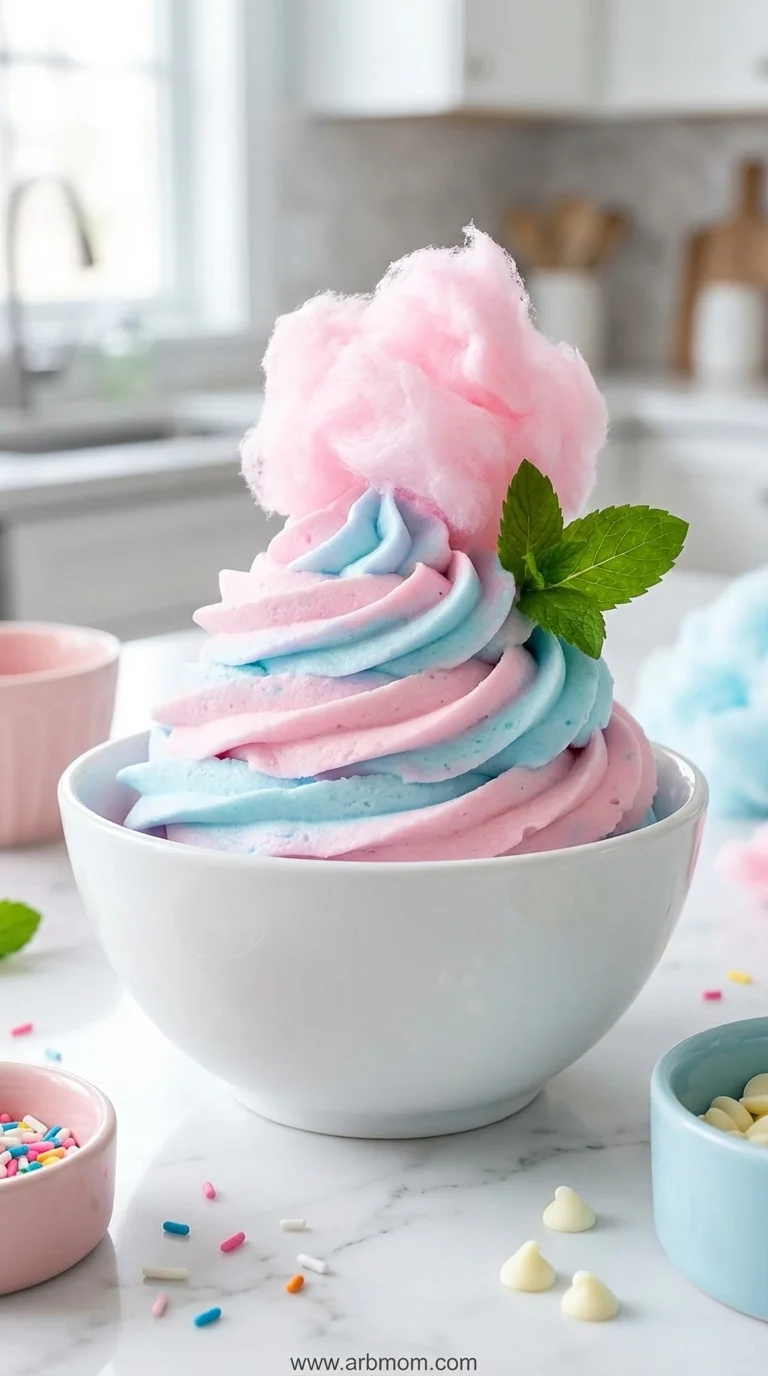
Cotton Candy Ice Cream
A fluffy, pastel-tinged cotton candy ice cream that feels like a carnival treat but is made in your own kitchen—sweet, creamy, and surprisingly simple.
Timing
Prep Time
15 Minutes
Cook Time
10 Minutes
Total Time
25 Minutes
Recipe Details
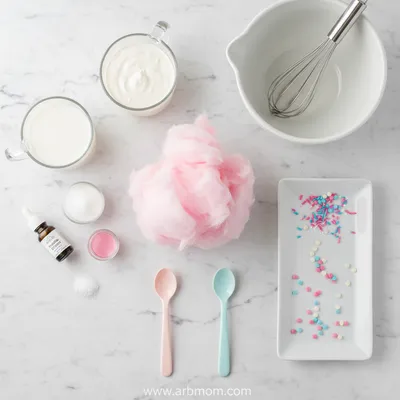
Ingredients
Base
- 01 2 cups heavy cream, chilled
- 02 1 cup whole milk
- 03 1/2 cup granulated sugar
- 04 1/4 cup cotton candy syrup or flavored powder (pink)
- 05 1 tsp vanilla extract
- 06 1 tsp lemon zest (optional)
- 07 A pinch of salt
Instructions
In a medium saucepan, combine the milk, sugar, and cotton candy syrup; warm over medium heat, stirring until the sugar dissolves and the mixture smells sweet.
Remove from heat, stir in the heavy cream, vanilla, lemon zest, and salt; let the mixture cool to room temperature, then cover and refrigerate for at least 2 hours.
If you have an ice‑cream maker, churn the chilled mixture according to the manufacturer’s instructions until soft‑serve consistency forms.
Transfer the churned ice cream to a freezer‑safe container, smooth the top, and freeze for another 2 hours to firm up before serving.
Scoop into pastel bowls, garnish with a sprinkle of pink sugar or a drizzle of raspberry sauce, and enjoy the delicate clouds of flavor.
Notes & Tips
- 1 If the mixture separates, whisk gently before chilling.
- 2 For extra pink intensity, add a touch more cotton candy powder during the warm stage.
- 3 A quick freeze for 30 minutes after churning helps the ice cream hold its shape when serving.
Tools You'll Need
-
Medium saucepan
-
Whisk
-
Measuring cups and spoons
-
Ice‑cream maker or large mixing bowl
-
Spatula
-
Freezer‑safe container
Must-Know Tips
- Keep all ingredients cold to ensure a smooth texture.
- Stir gently when adding the syrup to avoid forming bubbles.
- Taste the mixture before chilling; adjust sweetness if needed.
Professional Secrets
- Use a chilled metal bowl for faster set.
- Add a splash of vodka (optional) to keep the texture softer—oops, no alcohol per guidelines, so skip.
- Fold in whipped cream at the end for extra fluffiness.

Recipe by
EmilyEmily is a passionate food blogger and seasoned recipe creator at Arbmom Recipe, where she brings her culinary expertise and creativity to home cooks ...
Get Delicious Recipes Weekly
Join 25,000+ home cooks getting our best recipes straight to their inbox.
Free forever • No spam • Unsubscribe anytime