Why You'll Love It
- - Simple pantry ingredients you likely already have
- - Vegan, protein‑packed breakfast that feels indulgent
- - Quick to prepare, perfect for rushed mornings
- - Gentle on the wallet and the planet
*"The chickpea eggs taste just like the real thing—fluffy, comforting, and surprisingly satisfying."*
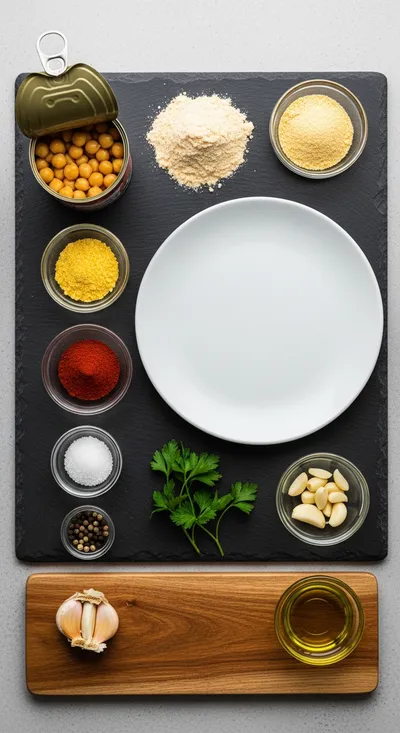
Essential Ingredient Guide
- Chickpea flour: Gives the base a smooth, egg‑like texture; sift before mixing for even consistency.
- Turmeric: Adds a warm golden hue and subtle earthiness, reminiscent of yolk color.
- Black salt (kala namak): Provides the characteristic sulfurous “eggy” aroma without using actual eggs.
- Nutritional yeast: Adds a cheesy umami depth that rounds out the flavor.
- Lemon juice: Brightens the batter, balancing the richness of the fried crust.
- Olive oil: For a gentle crisp on the outside while keeping the interior tender.
Complete Cooking Process
-
Ingredient Readiness:
Sift the chickpea flour, whisk with spices, and let the batter rest for a few minutes; this allows the flour to hydrate and the flavors to meld.
-
Flavor Development:
The black salt releases its sulfur notes while the turmeric deepens, creating that comforting “egg‑y” scent as the batter fries.
-
Texture Control:
A medium‑high heat ensures a crisp edge while the interior stays soft; avoid crowding the pan to keep each piece golden.
-
Finishing Touches:
A quick drizzle of fresh lemon juice right before serving lifts the whole dish, adding a bright finish.
-
Serving Timing:
Serve immediately while the “eggs” are still warm, paired with toast or a light salad for a balanced breakfast.
- Rest the batter 5‑10 minutes for a fluffier interior.
- Use a non‑stick skillet to prevent sticking and achieve a uniform crust.
- Adjust the black salt to taste; a little goes a long way.
- Add a pinch of paprika for a subtle smoky hint.
Pro Tips
Well, I’ve found that these tiny adjustments make a world of difference. When the batter rests, the chickpea proteins relax, giving you that pillowy bite. And a splash of lemon at the end? It’s like a tiny sunrise in each bite, brightening the whole plate. So go ahead, take a moment, and enjoy the simple pleasure of a plant‑based morning comfort.
The essence of the dish:
A fun fact or historical angle:
Flavor or sensory focus:
You Must Know
- Rest the batter for best texture
- Use black salt sparingly
- Serve hot for optimal flavor
Frequently Asked Questions
→ Can I use a different flour?
Yes, a 1:1 swap with lentil flour works, though the flavor will shift slightly toward a nuttier note.
→ How do I make them extra fluffy?
Resting the batter for 10 minutes and adding a pinch of baking powder give a lighter crumb.
→ What if I don’t have black salt?
You can substitute with regular sea salt plus a tiny splash of liquid aminos for a similar depth.
→ Can I freeze them?
Yes, after cooking let them cool, then freeze on a tray. Reheat gently in a skillet for best texture.
→ What sides work well?
Try them with sautéed spinach, fresh tomato salsa, or a slice of whole‑grain toast.
→ Are they gluten‑free?
Absolutely, as long as you use a certified gluten‑free chickpea flour.
Chef's Tips
If the batter feels too thick, thin with a splash of water; if too thin, add a little more flour.,For extra crispness, press the edges gently with a spatula before flipping.,A pinch of smoked paprika adds a subtle depth without overwhelming the delicate flavor.
Nutrition Facts
per serving
210
Calories
12g
Protein
24g
Carbs
8g
Fat
Taste Profile
Savory with a gentle earthiness and bright citrus finish
Ingredient Substitutions
Don't have an ingredient? Try these alternatives
Provides a slightly nuttier flavor; adjust water as needed.
Mimics the eggy aroma but milder.
Recipe Variations
Try these delicious twists on the original
Spicy Version
Add a pinch of cayenne and a drizzle of sriracha for a gentle heat.
Herb‑Infused
Stir in fresh cilantro and parsley into the batter for a garden‑fresh note.
Common Mistakes to Avoid
Learn from others' mistakes for perfect results
- Overcrowding the pan, which steams instead of crisps.
- Using batter that’s too thick; it prevents the soft interior.
- Skipping the resting step, leading to a dense texture.
Meal Prep & Storage
Make Ahead Tips
You can whisk the dry ingredients together and store in an airtight jar. Mix with water when ready to cook; the batter still benefits from a short rest.
Leftover Ideas
Reheat gently in a skillet over low heat, adding a touch more oil if needed to restore crispness.
Perfect Pairings
Serve this with...
Cooking Timeline
Gather and measure all dry ingredients; whisk together.
Add water and olive oil, creating a smooth batter; let rest.
Heat skillet, add oil, and pour first ladle of batter.
Cook first side until golden, flip, and finish cooking.
Repeat for remaining batter; serve immediately.

Chickpea Fried Eggs Recipe
A comforting, protein‑rich vegan take on classic fried eggs. Silky chickpea batter, golden‑brown edges, and a hint of turmeric create a satisfying breakfast that feels familiar yet wonderfully new.
Timing
Prep Time
10 Minutes
Cook Time
12 Minutes
Total Time
22 Minutes
Recipe Details
Ingredients
Batter
- 01 1 cup chickpea flour (besan)
- 02 1/2 tsp turmeric powder
- 03 1/4 tsp black salt (kala namak)
- 04 1 tsp nutritional yeast
- 05 1/2 tsp paprika (optional)
- 06 1 cup water
- 07 1 tbsp olive oil (plus extra for pan)
- 08 1 tsp lemon juice
Optional Toppings
- 01 Fresh chives, chopped
- 02 A pinch of extra black salt
- 03 Sliced avocado
Instructions
In a bowl, whisk together chickpea flour, turmeric, black salt, nutritional yeast, and paprika. Slowly add water, stirring until the batter is smooth and slightly runny.
Let the batter rest for 5‑10 minutes; this lets the flour absorb the liquid and the flavors meld.
Heat a non‑stick skillet over medium‑high heat and add a drizzle of olive oil. Pour a ladleful of batter, swirling to form a round shape about 4‑5 inches across.
Cook for 2‑3 minutes until the edges turn golden and the surface looks set. Flip carefully and cook another 2 minutes. Drizzle a few drops of lemon juice while still in the pan.
Repeat with remaining batter, adding more oil as needed. Serve hot, topped with chives or avocado if desired.
Notes & Tips
- 1 If the batter feels too thick, thin with a splash of water; if too thin, add a little more flour.
- 2 For extra crispness, press the edges gently with a spatula before flipping.
- 3 A pinch of smoked paprika adds a subtle depth without overwhelming the delicate flavor.
Tools You'll Need
-
Mixing bowl
-
Whisk
-
Measuring cups
-
Non‑stick skillet
-
Spatula
-
Plate for resting
Must-Know Tips
- Don’t over‑mix; a few lumps are fine – they disappear as the batter rests.
- Let the batter sit; it creates a fluffier interior.
- Cook on medium‑high heat for that perfect golden edge.
Professional Secrets
- Resting the batter at room temperature ensures even hydration.
- A hot pan creates immediate sear, locking in moisture.
- Finish with a splash of acid (lemon) to brighten the whole dish.

Recipe by
JamesJames is a passionate food blogger and recipe creator at Arbmom Recipe, where he combines his culinary expertise with a genuine love for sharing deli ...
Get Delicious Recipes Weekly
Join 25,000+ home cooks getting our best recipes straight to their inbox.
Free forever • No spam • Unsubscribe anytime