Why You'll Love It
- - Quick to assemble, perfect for last‑minute cravings
- - Crispy exterior with a molten, cheesy core
- - Gentle spice that isn’t overpowering
- - Versatile; serve with salsa, guacamole, or sour cream
*"These are my new favorite party snack—simple, cheesy, and always a hit!"*
Essential Ingredient Guide
- Tortilla strips: Choose fresh corn tortillas; they crisp up beautifully when fried.
- Shredded cheese: A blend of cheddar and mozzarella gives melt and flavor.
- Ground beef: Seasoned lightly with cumin and paprika for a warm backdrop.
- Spices: Cumin, smoked paprika, and a pinch of chili powder create depth.
- Lime juice: Adds a bright acidity that balances the richness.
- Sour cream: Optional dip; its tang cuts through the cheese.
Complete Cooking Process
-
Ingredient Readiness:
Trim the tortillas into sticks, grate cheese, and brown the beef with spices.
-
Flavor Development:
Combine beef and cheese, allowing the cheese to melt into the meat.
-
Texture Control:
Fry the assembled sticks until golden, ensuring a crisp shell.
-
Finishing Touches:
Drizzle lime juice and serve with chosen dips.
-
Serving Timing:
Enjoy while still warm; the cheese stays melty for the first few minutes.
- Pat the tortilla sticks dry before frying to avoid splatter.
- Keep the oil temperature steady for even browning.
- Serve immediately for the best texture contrast.
Pro Tips
These little tricks come from years of cooking for family gatherings. I’ve found that a gentle shake of the pan halfway through frying keeps each stick uniformly crisp. Also, a quick sprinkle of fresh cilantro right before serving adds a subtle herbaceous note that ties everything together.
The essence of the dish:
A fun fact or historical angle:
Flavor or sensory focus:
You Must Know
- Keep oil hot, around 350°F (175°C).
- Don’t overcrowd the pan.
- Serve with a cooling dip for balance.
Frequently Asked Questions
→ Can I bake instead of fry?
Yes, bake at 425°F (220°C) for 12‑15 minutes, turning once, until golden.
→ What cheese works best?
A mix of sharp cheddar and mozzarella provides flavor and melt.
→ Can I make this gluten‑free?
Use corn tortillas that are certified gluten‑free; all other ingredients are safe.
→ How long can I store leftovers?
Refrigerate in an airtight container for up to 2 days; reheat briefly in a skillet.
→ What dip pairs well?
Fresh guacamole, salsa roja, or a simple sour cream with lime juice.
→ Is there a vegan version?
Swap beef for seasoned black beans and use dairy‑free cheese; fry as usual.
Chef's Tips
If the sticks start to fall apart, press the tortilla gently around the filling before frying.,For extra flavor, sprinkle a pinch of smoked sea salt just after frying.,Serve immediately for the best cheese pull.
Nutrition Facts
per serving
380
Calories
18g
Protein
26g
Carbs
22g
Fat
Taste Profile
Savory with a bright citrus finish
Ingredient Substitutions
Don't have an ingredient? Try these alternatives
Adjust cooking time for turkey; lentils should be pre‑cooked.
Provides comparable melt and a slightly nutty flavor.
Recipe Variations
Try these delicious twists on the original
Spicy Version
Add a pinch of cayenne and a drizzle of sriracha for a gentle kick.
Mediterranean Style
Mix feta and olives into the cheese blend, and finish with a sprinkle of oregano.
Common Mistakes to Avoid
Learn from others' mistakes for perfect results
- Overcrowding the pan, which drops oil temperature and leads to soggy sticks.
- Skipping the drying step for tortillas, causing excess splattering.
- Leaving the cheese mixture too wet, which can cause leaks during frying.
Meal Prep & Storage
Make Ahead Tips
You can brown the seasoned beef and grate the cheese up to a day ahead; keep refrigerated and assemble when ready to fry.
Leftover Ideas
Reheat gently in a skillet with a splash of oil to revive the crispness.
Perfect Pairings
Serve this with...
Cooking Timeline
Gather and prep all ingredients; cut tortillas, grate cheese, and season beef.
Brown the ground beef with spices in a hot skillet.
Combine cheese and beef, then assemble sticks.
Fry the sticks until golden, turning once.
Drain, drizzle lime, and serve with chosen dips.

Cheesy Taco Sticks Recipe
Crispy, cheesy taco sticks that melt in your mouth, offering a comforting crunch and a warm, spiced center. They’re ready in minutes, perfect for a quick snack or a friendly gathering. Try them with a squeeze of lime and a dollop of sour cream for extra brightness.
Timing
Prep Time
15 Minutes
Cook Time
20 Minutes
Total Time
35 Minutes
Recipe Details
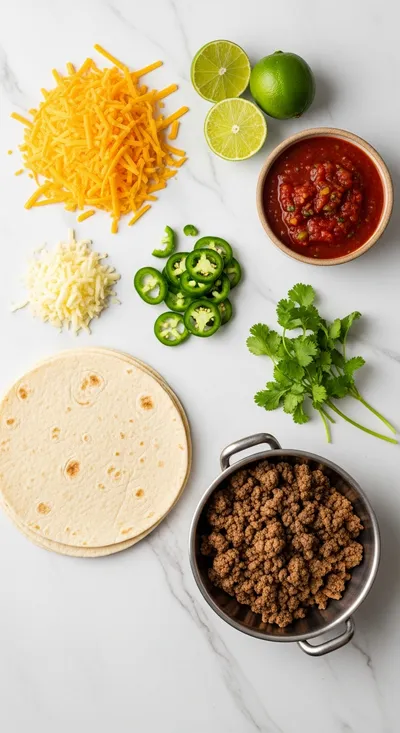
Ingredients
Main Ingredients
- 01 12 corn tortillas, cut into sticks
- 02 1 cup shredded sharp cheddar cheese
- 03 1 cup shredded mozzarella cheese
- 04 8 oz ground beef
- 05 1 tsp cumin
- 06 1 tsp smoked paprika
- 07 1/2 tsp chili powder
- 08 Salt and pepper to taste
- 09 Vegetable oil for frying
- 10 1 lime, cut into wedges
For Dipping
- 01 1/2 cup sour cream
- 02 1 tbsp lime juice
- 03 Chopped cilantro (optional)
Instructions
Heat a skillet with about 1/2 inch of oil over medium‑high heat until shimmering.
In a bowl, combine ground beef, cumin, smoked paprika, chili powder, salt, and pepper. Cook the mixture in the hot oil until browned, breaking it up as it cooks; set aside.
Mix the shredded cheddar and mozzarella together; stir the cooked beef into the cheese so it starts to melt slightly.
Take a tortilla stick, place a pinch of the cheese‑beef mixture near one end, and roll the stick around the filling, sealing with a dab of water if needed.
Fry the stuffed sticks in batches, turning once, until golden brown and crisp, about 2‑3 minutes per side.
Remove with a slotted spoon, drain on paper towels, and drizzle with fresh lime juice before serving.
Notes & Tips
- 1 If the sticks start to fall apart, press the tortilla gently around the filling before frying.
- 2 For extra flavor, sprinkle a pinch of smoked sea salt just after frying.
- 3 Serve immediately for the best cheese pull.
Tools You'll Need
-
Large deep skillet or pot
-
Sharp knife
-
Cutting board
-
Mixing bowls
-
Slotted spoon
-
Paper towels
Must-Know Tips
- Don't overcrowd the pan, Cook in batches to keep oil temperature steady.
- Let the cheese‑beef mixture rest a minute before stuffing, Allows flavors to meld.
- Taste as you go, Adjust seasoning if needed.
Professional Secrets
- Room temperature tortillas, Ensures even crisping
- High heat for searing, Creates a perfect crust
- Drain excess oil on paper towels, Captures a clean finish

Recipe by
OliviaOlivia is a passionate food blogger and recipe creator at Arbmom Recipe, where she brings her culinary expertise and love for home cooking to a vibran ...
Get Delicious Recipes Weekly
Join 25,000+ home cooks getting our best recipes straight to their inbox.
Free forever • No spam • Unsubscribe anytime